The management fee amounts that are calculated per unit are dependent on the Management Fee setting/profile that is selected for each property. Please refer to How to set up Management Fees in order to set up your management fees according to your business needs.
Step 1 - Go to the Manager Page
-
From the left navigation menu, click on Accounting and select Manager.

Step 2 - Determine the management fee collection mode for your Rentvine account is set up for
There are two types of management fee collection modes in Rentvine. Bill or Ledger mode. The mode is already preset by the Rentvine onboarding/support team during your account setup. You cannot change modes yourself.
-
If your Rentvine account is configured to use Bill mode, you will see the Dashboard tab on the Manager page (see image below). Go directly to:
Step 3: How to Collect Management Fees in Bill Mode.
You will not need to perform Step 4 in this article.
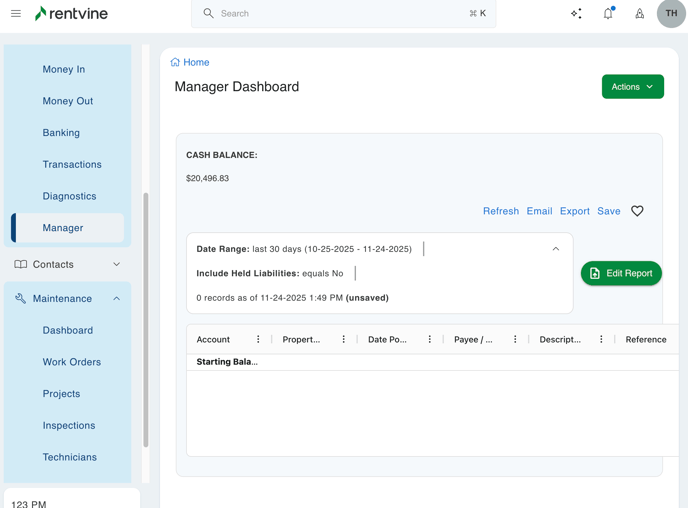
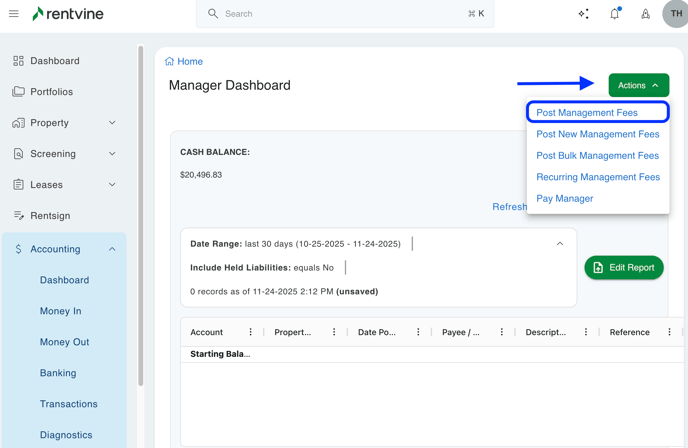
- If your Rentvine account is configured to use Ledger mode, you will NOT see the Dashboard tab (see image below). Skip Step 3 and go directly to Step 4.
Step 4: How to Collect Management Fees in Ledger Mode.
Step 3 - How to Collect Management Fees in Bill Mode
Collecting management fees in a Bill mode means posting fees that create bills, which then need to be paid out to the property management company. The steps below will show you how to post (bill) and collect all your management fees in Bill mode.
It is best practice to post and collect all management fees (Base Fees + Additional Fees) before paying owners. Make sure to collect management fees once again at the end of the month.
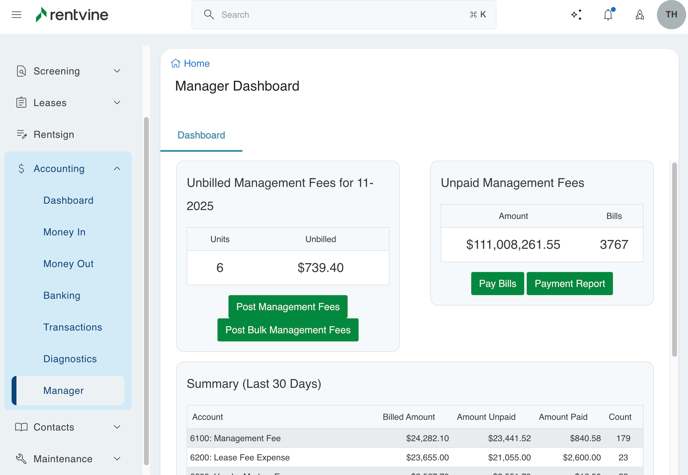
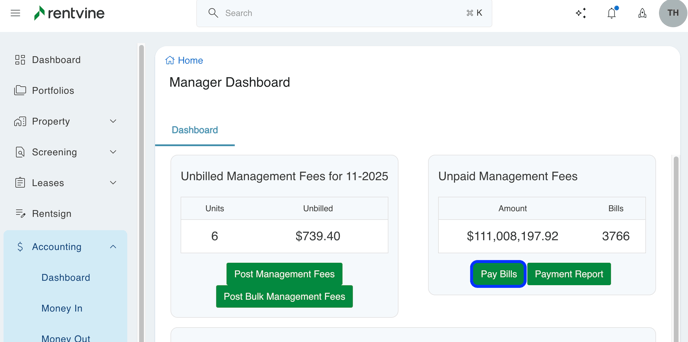
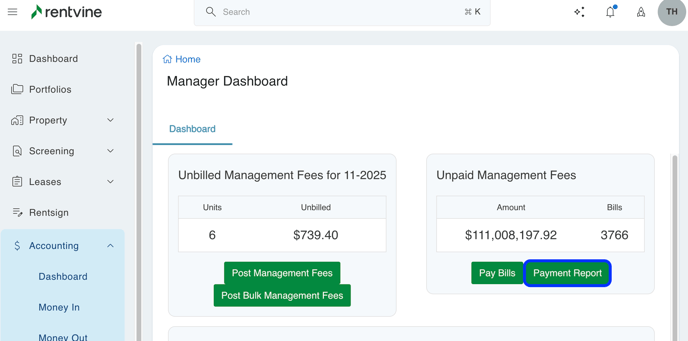
- The Manager Dashboard is separated into 3 sections (see image below)
- Unbilled Management Fees - This section shows all pending fees that need to be posted (unbilled) in the current month. It shows the total number of units and the amount pending.
- Unpaid Management Fees - This section shows all fees that have already been posted (billed) and need to be paid out to the property management company as of the current date. It shows the total amount waiting to be paid and the number of bills.
- Summary - This section shows the status (billed, unpaid, or paid) of all fees broken out by Chart of Accounts based on the period.

-
Select the Post Management Fees button to start the process of posting (billing) management fees. It will take you to a new page.
-
On this page, select the period (defaults to the current month) and optionally filter by Portfolio, Property, or Property Group. You can also filter if you would like to see base management fees, additional management fees, or both. Then click Search

-
The search results will return 2 sections
-
Unbilled Management Fees - Shows all units that have pending fees that need to be posted (billed) in the selected period. Only units that have pending fees will appear in this section.

-
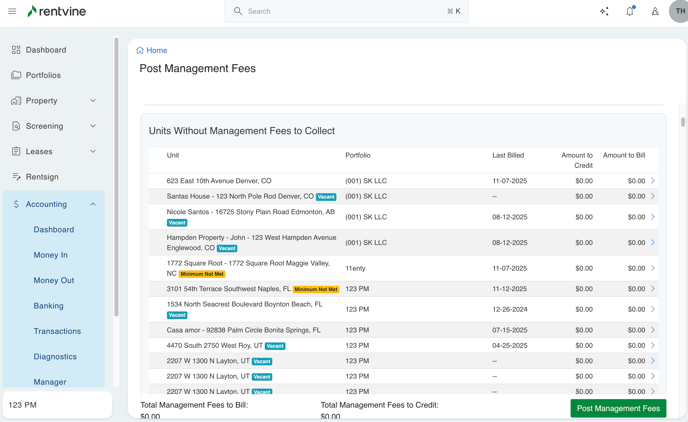
Units Without Management Fees to Collect - Shows all units that do NOT have any pending fees to post (bill) in the selected period.
-
-
In the Unbilled Management Fees section, select the units that you want to post (bill) fees for. You can click the select all box or click the individual units that are appropriate. If you want to see more details as to how the pending amount to be posted (billed) per unit was calculated, click on the right arrow next to the amount to bill. Once you are ready to post (bill) the fees, click on the Post Management Fees button.

Details of Pending Fees
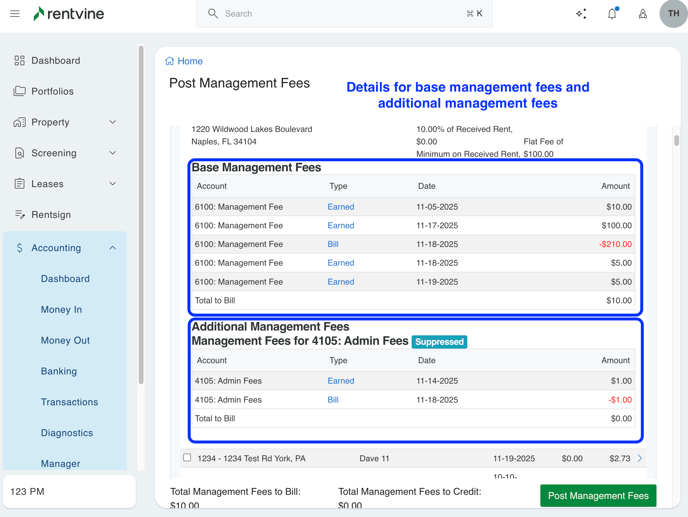
If you see an amount greater than $0.00 in the Amount to Credit column, it means that there are fees that need to be credited back to the unit because fees were previously posted (billed) in the selected period. This typically occurs if you previously posted fees in the selected period and one of the units had a lease payment returned due to insufficient funds. 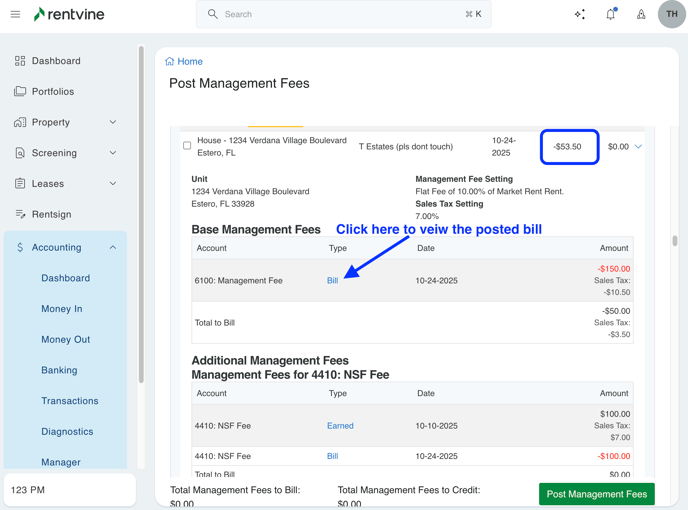
- If the previously posted management fee bill has already been paid, retain the credit and proceed with posting it.
- If the management fee bill that was posted earlier remains unpaid, click on it to void it.
-
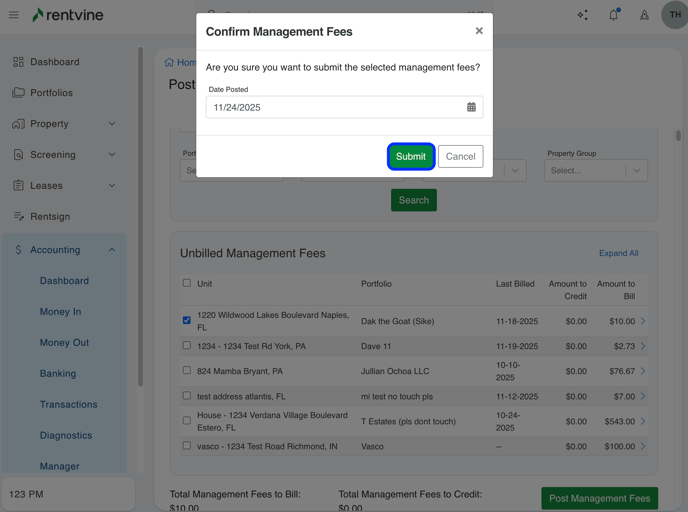
After clicking the Post Management Fees button, a pop-up window will appear to confirm posting (billing and/or crediting) the management fees that were selected. It will prefill today's date, or you can choose the date that you want to post the bills and/or credits. Click Submit to complete posting (billing and/or crediting) management fees.
- If you are ready to pay the property management company, click on Manager from the left navigation menu and then click on the Pay Bills button.
- The Pay Bills page has been filtered to only show bills to be paid to the property management company. In order to pay the bills, you can follow the article How to Pay Bills and start at Step #2.
- Once the bills are paid, the collection of management fees is completed
- If you would like to see a breakdown of all management fees that have been collected, click on the Payment Report button on the manager dashboard. This report is grouped by the Chart of Account.
Example of Payment Report (also known as a Vendor Payment report)

Step 4 - How to Collect Management Fees in Ledger Mode
Collecting management fees in Ledger mode means that the fees post to a manager ledger. Bills are not created. Once the fees are posted to the manager ledger, you can then pay the property management company from the manager ledger.
-
If all of your management fee settings/profiles are configured to collect base management fees based on Percent of Rent ONLY, then you can skip to Step 6 to pay the property management company. All fees should already be posted/collected on the manager ledger.
- If you have management fee settings/profiles configured to collect base management fees based on minimum amounts, recurring flat amounts, recurring percent of actual rent, or percent based on market rent, please continue with Step 1 below in order to post/collect those fees to the manager ledger. Once they are posted/collected, you can pay the property management company.
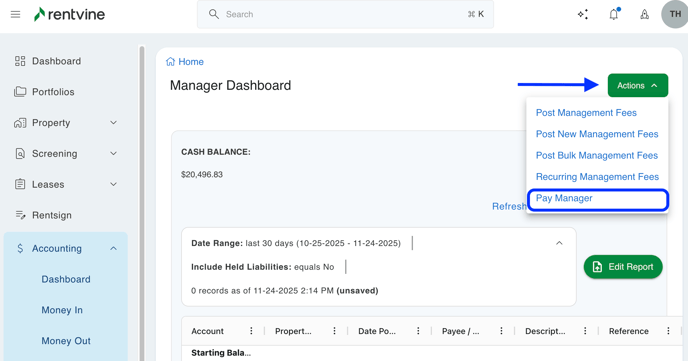
- Select Post Management Fees from the drop-down menu
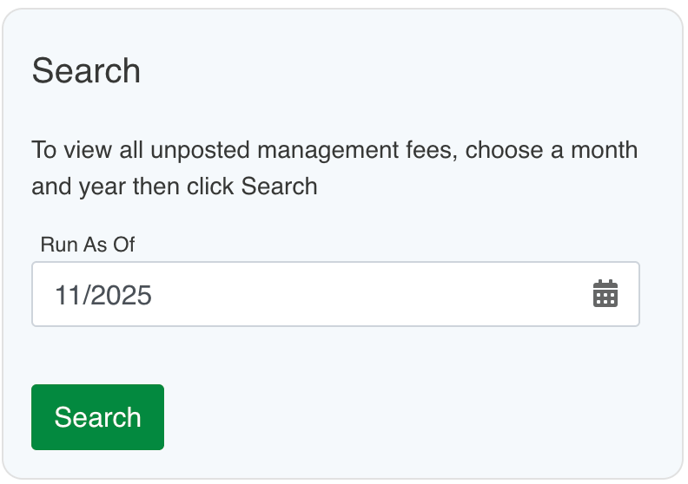
- The Run As Of field will default to the current month. Click the green Search button
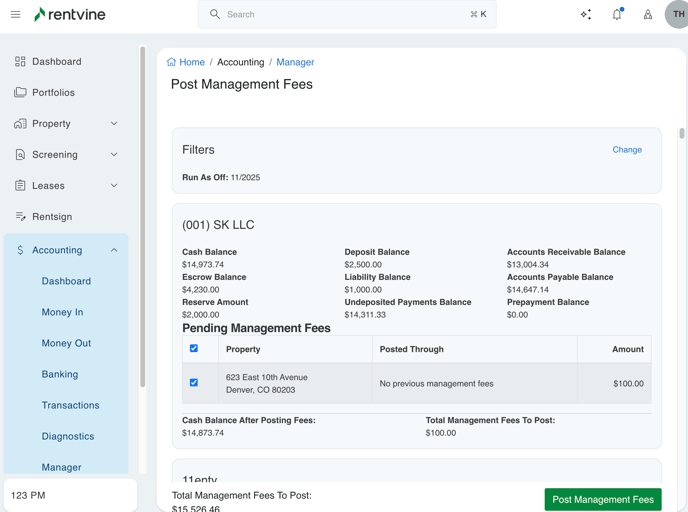
- The results that show are the management fees that need to be posted to the manager ledger. They are grouped by portfolio, with each unit that is owned by that portfolio. You'll see the Pending Management Fees for each unit with the dollar amount on the right side. The amount is based on the management fee setting/profile that is configured for that unit.
- After reviewing the pending management fees for each unit, click the checkbox to the far left of each unit that you would like to post the pending management fee. You will notice the Total Management Fees Paid total on the bottom left increases as you select more units.
- When you have selected all the management fees that you want to post, click the green Post Management Fees button in the bottom right
- If you are ready to pay the property management company, click on Pay Manager from the drop-down menu.
- Complete the fields in the Pay Manager screen
- The Bank Account will autofill to your default bank account within your global settings. You can change bank accounts if you need to
- The Payment Type will autofill to how you have selected to pay yourself in your global settings. You can override this if needed
- The Date Posted will default to today
- If you are paying by check, the Check Number will default to the next check number. You can override this if needed
- In the next section, the Account will autofill to "Management Fee Expense" or something similar.
- The Amount field will default to the difference between the Operating Balance and the Undeposited Funds. You can override this amount if you would like, but it is recommended that you deposit any undeposited funds before paying out yourself. For assistance with depositing funds, please see the article How to Record a Deposit
- If you would like to add additional accounts, click on the Add Line Item button, and repeat these steps. (Use this if you want to categorize the payment into different accounts other than the "Management Fee Expense" account.)
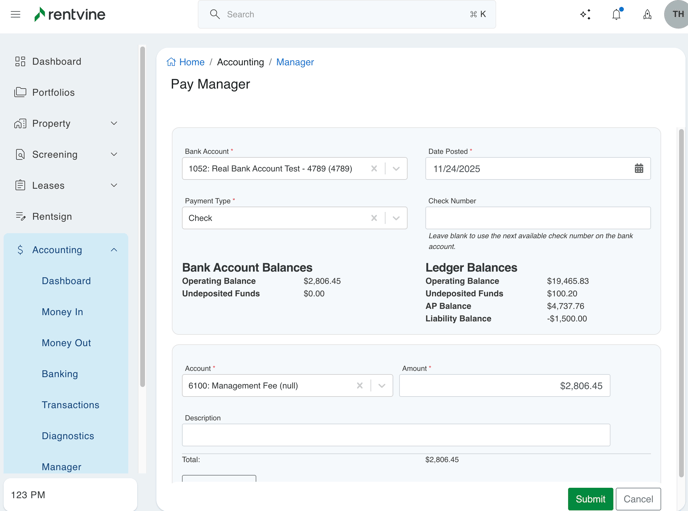
- When you have completed the steps above, click the green Submit button in the bottom right corner
- Click the green Submit Payments button on the Confirm Payment pop-up. If you have Two-Factor Authentication enabled, enter the MFA code.
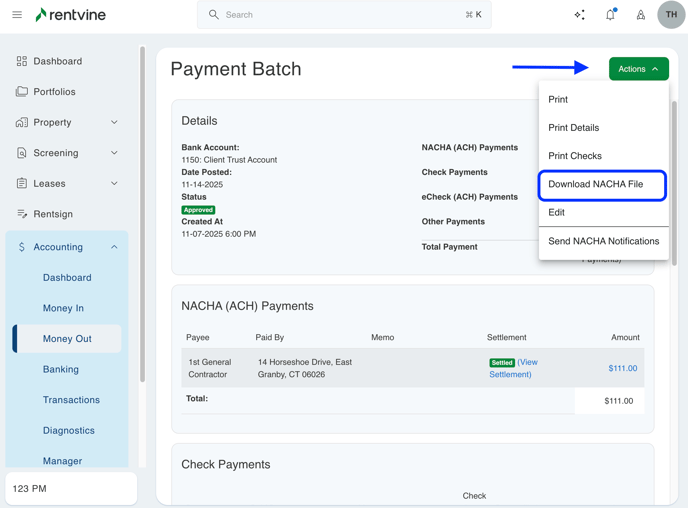
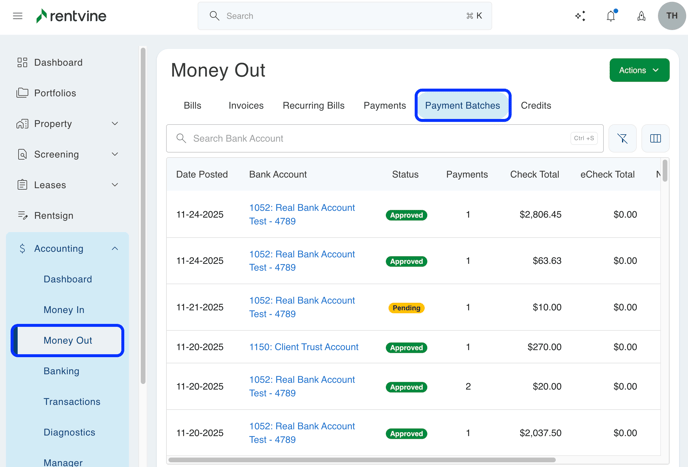
- If you paid by eCheck(ACH), it will automatically start the processing of the payment. If you paid yourself by Check or NACHA (ACH), access that payment batch to either print the check or download the NACHA file
- On the left side, click on Accounting
- Then, click on Money Out
- Click on the Payment Batches tab under the search field, and click on the batch for the payment that you just made
-
- Click on the green Actions button on the right side
- Click on either
Print Checks or Download a NACHA File, whichever option applies to this payment batch.