The move-out workflow includes releasing the deposit, settling any unpaid lease charges, and move-out charges. Then, refunding any excess amount left over to the tenant.
- Go into the financial lease of the tenant(s) you wish to move out
- Click on the green Actions tab towards the top right, and select Move Out from the list

.jpeg?width=688&height=326&name=Image%2012-5-25%20at%2010.09%20AM%20(1).jpeg)
- On the next page, complete the Move Out Details section
- The Notice Date will autofill with today's date, but you can override that if the date is different than today
- Enter the Expected Move Out Date if that date is known
- From the drop-down list, select the Move Out Reason for the list of options. This is a required field, so an option will need to be selected before moving to the next screen
- If the Unit Availability Date is known, you can enter it at this time
- Lastly, switch the toggle option on or off if the lease agreement was violated. This will show on the Move Out letter
- Click the green Next button at the bottom right

- In the next section, complete the Tenants section for the forwarding information
- Select a tenant from the dropdown list of tenants (s) on the lease for whom you wish to send the balance of the security deposit
- Enter the forwarding address for the tenant
- Enter the email address of the tenant
- Enter the phone number of the tenant
- Click the green Next button at the bottom right

- On the Accounting screen, make any edits to the move-out charges and credits
- In the top section for Security Deposits, you will notice all of the deposits held for this lease. This includes management-held or owner-held deposits
- In the Charges section, you will see any outstanding charges that show the GL, description, and amount, with the total of the Move Out charges at the bottom. If you need to add any additional move-out charges at this time, you can click the Add Charge button. You can add as many move-out charges that apply for this lease
- In the Credits section, you will see any outstanding credits on the lease. Similar to the charges section, you can add any additional credits to the lease that may apply by clicking the Add Credit button
- If you add additional charges and/or credits, you will see the numbers change in the Summary section on the right side
- Click the green Next button at the bottom right

- Review and complete the move out process for this lease
- The Date Posted section will default to today's date, but you can override this if necessary
- Choose the Completed Lease Status that fits this lease by selecting it from the Completed Lease Status dropdown
- The Move Out Date will also default to what was entered into the Expected Moved Out Date field in the first section of the process, but you can override this if necessary
- Enter a Close Date for the lease
- Enter a Close Description for the lease with any details that are applicable. This section will not show on the move-out statement
- Enter any Tenant Remarks. This section will appear on the move-out statement

- Disable Portal Payments- Here, you can disable the portal payments for the whole lease so the tenant cannot log in and make extra payments.
- Disable Portal Access- This will disable the entire portal for the tenant and no longer let them log in to their portal.
.jpeg?width=688&height=94&name=Image%2012-5-25%20at%2010.17%20AM%20(1).jpeg)
-
- If there is a refund due to the tenant, you will notice the Refund Information section at the bottom
- The Bank Account will default to the system's default bank account, where security deposits are refunded
- The next thing to do is choose the tenant's name you would like to refund to.
- Enter a Memo for the check if you would like
- Next, you can choose how you would like to refund the tenant by check, cash, eCheck, or NACHA.
- If you choose eCheck or NACHA, you will need to enter the account number and routing number, or you can choose a saved payment method if the tenant has one added in their portal.
- If you choose check, then you will need the Name on the Check will default to the tenant selected on the Tenants tab. You can override this if necessary
- Enter a Check Number, or leave it blank if you'd like the system to use the next check number in order
- The Check Address will default to the address entered on the Tenants tab. You can click the pencil icon to edit the address if necessary

- You can also split the deposit by clicking "Split" instead of "Single".
- By doing this, you will be able to enter the same information, with the only difference being that you can now split the deposit between all tenants.
- You can add as many tenants as you would like by clicking the "Add Split" button.
- Make sure that the split total equals


- The last step is to choose if you would like to create a pending bank transfer. The pending bank transfer is going to be based on your posting settings and assumes that the funds are being held in the escrow trust bank account from these posting settings. If this toggle is on, an automatic pending bank transfer will be created. If you need more information regarding these bank transfers, please view this article by clicking here.

- Once everything looks good, click on the green Submit button in the bottom right corner
- A Confirm Move Out pop-up will appear. After reading through this section and clicking the toggle option to Approve on Submission, the refund to the tenant, click on the green Complete Move Out button

Steps After the Move Out is Completed
- Print the Move Out Statement
- You should now be back at the regular view of the financial lease, and you will notice two red sections towards the top letting you know that the Lease is closed and that the move-out has been completed
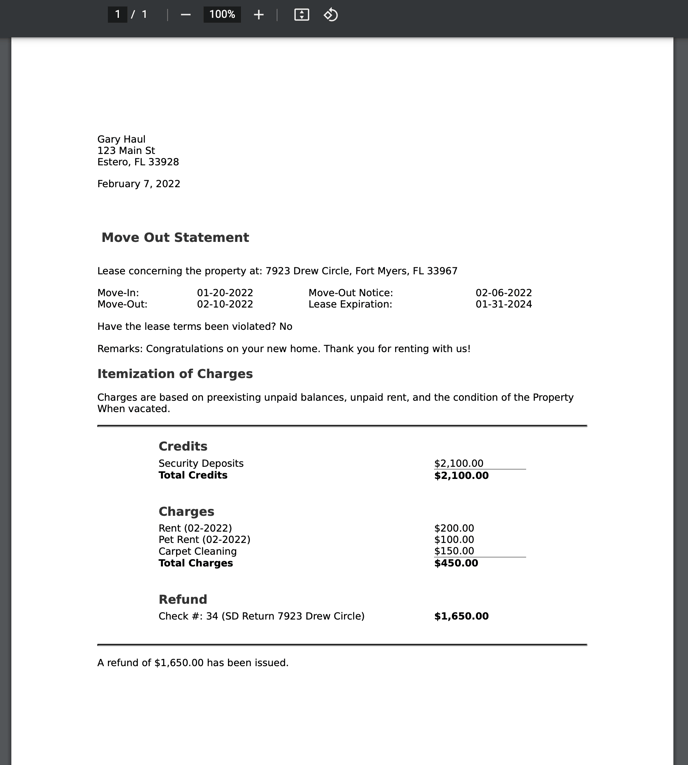
- In the Move Out Information section, click on Print Move Out Statement. This will open a PDF in a different tab where you can see specifics about the move out, including dates of the lease, credits, charges, and the total refund

- You can download the move-out statement to PDF and/or print the statement as well
- Once you are done, you can exit this screen
- Print the refund check to mail to the tenant
- To locate the payment that was created for the refund, click on Accounting on the left side
- Then, click on Money Out
- Select the Payments tab
- If you are doing this step right after the steps above, the tenant refund payment should be towards the top of the list. If not, search the tenant's name in the search field in the Money Out section
- When you locate the payment, click on it to open up the payment details

- In the Payment Details, if the payment has already been approved, click on the green Actions button on the right
- Select Print Check from the options
- A pop-up will appear with today's date in the date field. You can override this if necessary. Click the green Print Checks button
.jpeg?width=688&height=400&name=Image%2012-5-25%20at%2010.35%20AM%20(1).jpeg)
- The check will open in a new tab for you to download and mail out to the tenant
9. If you created a pending bank transfer, you will need to complete that by following this article. If you did not create a pending bank transfer but still need to record a bank transfer to avoid an Escrow mismatch on the owner/portfolio ledger, you can click the following article: Bank Transfer.
- If you are refunding or settling lease charges with the security deposit from a bank account other than its current location, you should transfer the funds to the bank account from which the funds will be disbursed.
You can view current Escrow Mismatches on portfolios in the Diagnostics section under Accounting

