Rentvine helps you market your rental vacancies to all of the right places through our syndication network.
- Property Syndication
- View Active Listings
- Activate a Listing
- Syndication Settings
- Property Marketing Information
Property Syndication
With just a few clicks, you can target over 90% of potential residents actively searching for properties.
Once your property information is accurately entered, your listing will go live on your website and be included in any chosen syndication networks. These networks further distribute your listing to various partner sites, ensuring widespread visibility. This comprehensive syndication network encompasses a vast array of different websites, maximizing your property's exposure.
Syndicate property listings to multiple rental sites, including:
- Zillow Rental Network (may require a paid account on Zillow)
- Zillow
- Trulia
- Hotpads
- Zumper Network (offers 5 free listings at a time; if you want to exceed that limit, you may need to upgrade to a paid account on their site.)
- Zumper
- PadMapper
- Microsoft Bing
- Movoto
- RentLingo
- ULoop
- Trovit
- Apartments.com Network (offers 10 free listings at a time; if you want to exceed that limit, you may need to upgrade to a paid account on their site)
- Apartments.com
- ForRent.com
- ApartmentHomeLiving.com
- ApartmentFinder.com
- Apartamentos.com
- Corporatehousing.com
- Westsiderentals.com
- Rent Network (You must have an account set up with rent.com or rentals.com)
- Rent.com
- Rentals.com
- ApartmentGuide
- Redfin
- Rentalsource.com
- Some sites require payment to advertise, such as Zillow Network and Rent Network
- Certain sites may offer a limited number of free listings, such as Zumper Network and Apartments.com Network, but if you want to exceed that limit, you will need to upgrade to a paid account on those sites.
- Not all data will transfer to all sites, and some sites have photo limits.
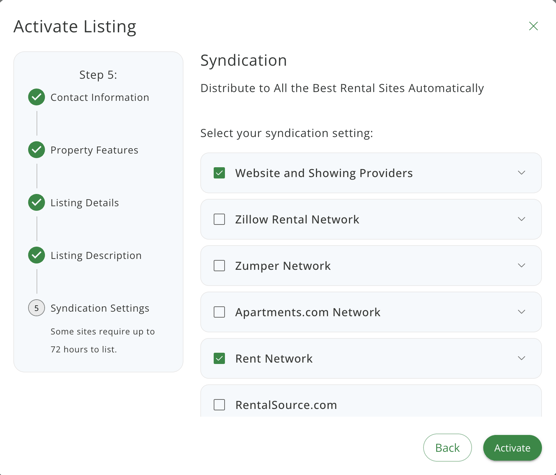
Some sites require up to 72 hours to list and/or delist rental listings.
View Activate Listings
To view your active listings click on the Marketing tab under Properties.

Click on the property to get more details. You can also access the property marketing by going to the marketing tab on the property itself.

If the property is already active, you will see all of the relevant marketing information.
- Date Advertised
- Days On Market
- Syndication Settings

Activate a Listing:
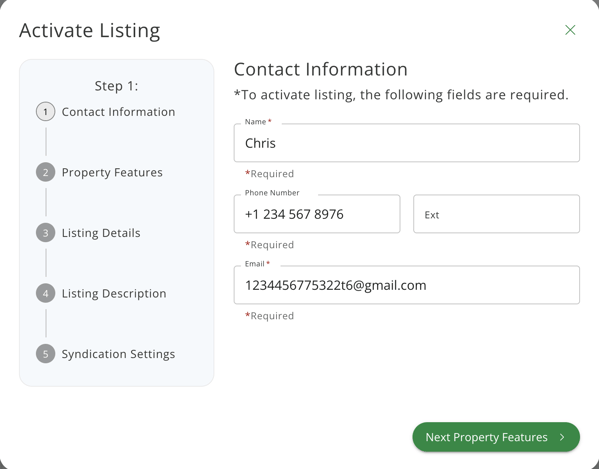
To activate a listing, click on the marketing tab for the property or unit, then click the Activate Listing toggle.

This will take you through the "Listing Flow". The first step of this is to enter the contact information for this listing. This will be who is notified of any interested applicants when they reach out on any of the syndicated websites. Click the green "Next Property Features" button to go to step 2.
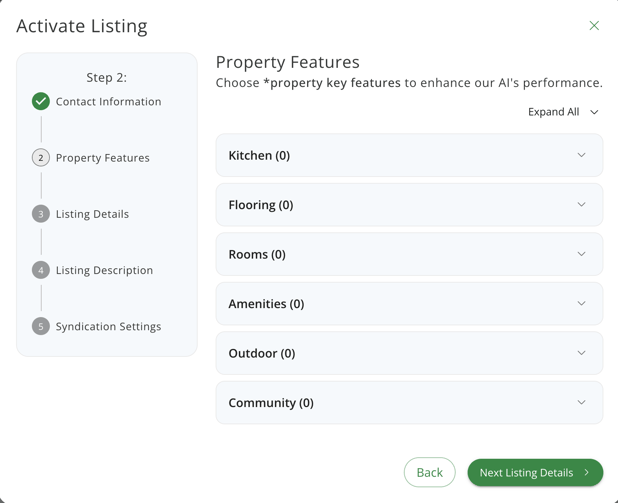
The next step is to select the property features. You can click into each main category to bring down a drop-down. This will show you all of the features of the property that you can select for this section. You can select all of the features by clicking the checkbox next to the desired feature. You will also notice that key features can be added. Key features can be set in your global settings under custom features. These key features will be automatically added to a description when creating an AI-generated description. Click the "Next Listing Details" button to move to the next step.
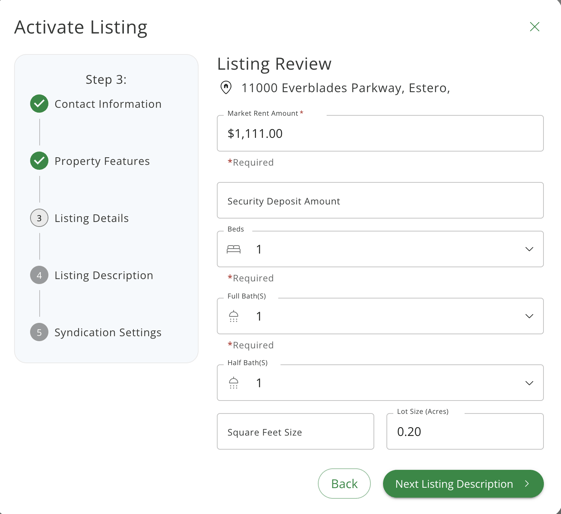
The next step is to add the listing details. From this page, you will be able to add:
- The market rent amount
- Security Deposit Amount
- Number of Beds
- Number of Full Baths
- Number of Half Baths
- Square Footage
- Lot Size
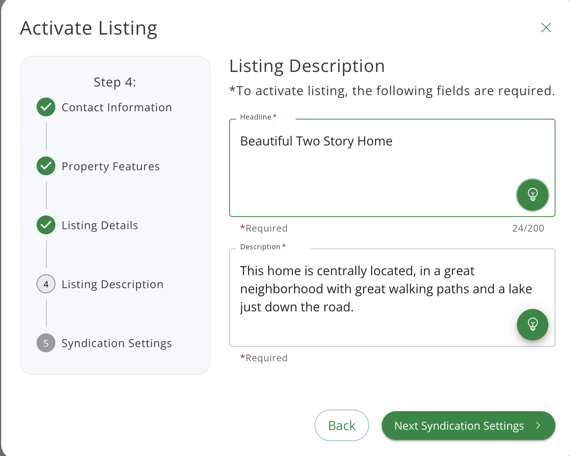
The fourth step will be to enter the listing description. This will be the headline and description of the property. This will show on all of the websites that you choose to syndicate to. You can click the lightbulb icon to use the AI generation for both the headline and the description.
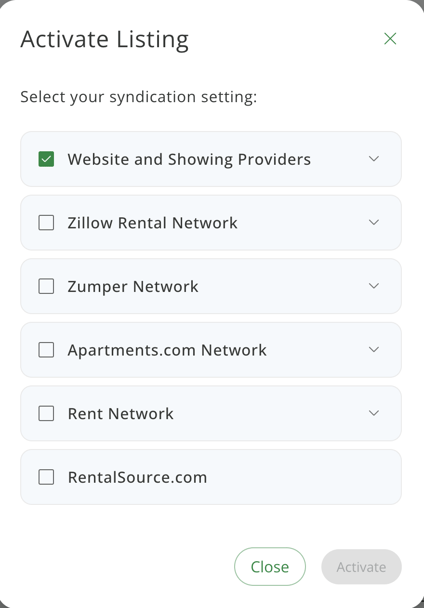
The last step of this flow is to choose your syndication settings. These will be the websites you choose to show this listing on. Please click here to learn how to set up these listings. Once these are selected, you can click the "Activate" button to fully activate this listing.
Outside of this flow, you will still be able to update or add any data. Please see below for more information on the individual sections of the marketing page.
Syndication Settings
Choose your syndication settings for this property or unit. This will show you all of the websites that this property is currently listed on. You will also be able to check off new syndications if you would like by clicking the checkbox next to them. Click update to save any changes made.

Property Description
The property details section requires a Headline for the listing and a description.
- Property Headline should be short, eye-catching, and informative *Required
- Longer, more detailed property descriptions will give the prospective tenant a better idea of what to expect from that property before a showing. Be sure to include all relevant information so that your agents are not spending time showing the property to tenants who are unsure of what the property has to offer. *Required
- You can use the AI generation to create a description and headline for your property. This will add any key features that are selected for this property. To do this, you can click the lightbulb icon inside this description box.


Property Details
- Mark the property as furnished or unfurnished
- Enter the lot size. Currently, the only option is in acres.
- Add a virtual tour link. YouTube, Vimeo, and Matterport are some of the most commonly used formats for virtual tours.
- If you are using Rentvine applications, the APP URL will already be populated. This can be changed if you are using a third-party provider.
- If you are using Rently as a showing provider, please enter the lockbox Number.
- Add a description to the lockbox if applicable.

Property Lease Details
Lease details for a property are to describe the length of the lease, the availability date, and to add a description of the security deposit. These are all optional fields, but they are important pieces of information for the tenant.

- Enter the availability date. If the date is in the future, the date will show as entered. If the date is today or in the past, it will show as Immediately.
- Lease Description should describe the length of the lease and any special or extraordinary terms that the prospective tenant should be aware of.
- Security Deposit Description allows for more details if an exact security deposit is not listed on the property.
Marketing Contact *Required
The marketing contact information is required for all listings. Please be sure to enter the primary contact name, phone, and email address. This is the most commonly missed piece of information, and will cause an error if not entered. The secondary contact is optional.

Area Information
This section allows for a description of the area. It is great to include shopping plazas, major highways, and other landmarks. Provide prospective tenants from outside of the area with more information about how to get around and what there is to do.
School information is important to prospective tenants with children or for college students.

Restrictions
Enter the property or unit restrictions for pets, smoking, and housing assistance.
Pets - Choose Yes or No for Cats and Dogs. Enter a pet description - No Aggressive Dog Breeds, or limit 2 cats, etc.
Accepts Smoking and Accepts Assistance are both yes or no options.

Parking
Provide the prospective tenant with information about parking for this property or unit. The type of parking is open text, so that you can be descriptive. ie: Attached Garage or Street Parking Only
Spaces is a number field looking for the total number of parking spaces provided. If describing a two-car garage, enter the number 2.

Utilities
Enter what utilities are included or not included with this property or unit. Enter the type of heat, such as forced air, radiant, baseboard, etc. This field is free-form text, so that it can be accurately described.

Property Features
Select any features that are included in this property or unit. The features /amenities are broken up by category. The categories include:
- Kitchen
- Flooring
- Rooms
- Amenities
- Outdoor
- Community

Each Category will have a list of features. There will also be the option to add additional features. If a feature is created on a property or unit, that feature will then be available to all properties or units within your account, so you do not need to add it multiple times.

Toggle the options, blue (checkbox) is yes, black (x) is no. When the features for this property or unit are correct, click the save button at the bottom of the list.
Custom Fields
Custom Fields can be set on a LISTING so that they appear in the marketing options. Go to settings, custom fields, then click on Listing. Create a group and then enter the fields that you would like to have for marketing your properties and units. See below example of custom fields for listings.
**Custom Fields can be anything important to you to track. Please note that most syndication partners have a distinct set of fields that they accept. Custom fields will not be included with most syndications.

Marketing Documents
Upload any additional documents that need to be provided to the prospective tenant. This is NOT the location to add marketing images. This is for disclosures, marketing flyers, etc.

Marketing Images
All marketing images should go in the Details section of the property or unit. Drag and drop images in the order you would like them to appear.


Reorder Images: Click on any image to show all of the images. Click in the middle of an image, and drag the image to change the order. Repeat this process until all images are in the desired order.

Main Photo: This will be the primary image for the property and the image that shows in the property list view on your website. To change the Main Photo click on the image that you would like to be the main photo, and then click the checkbox for Main Photo.
Edit the image:
Click on the ellipses next to the image name and select edit.
Photo name and Caption may be changed.
Delete: To delete an image, click on the image,
and then select the trash can icon.

HEIC file types: Coming soon to Rentvine, there will be a converter to turn HEIC image files into JPEG files.