User Roles
This article is going to go over all of the role settings and explain what they do.
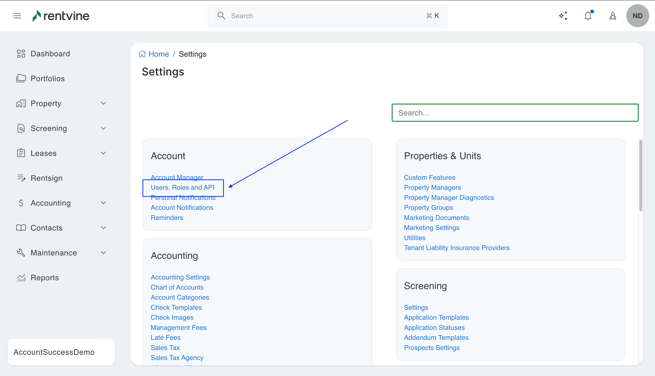
Roles are a set of different permissions that can be applied to all users in your Rentvine account. To create a new role, access your global settings by clicking on your profile icon in the top right-hand corner and selecting "Settings". From there, navigate to "Users, Roles, & API", click on "Roles", and create a new role with a unique name and desired settings. Once created, you can assign these roles to your users to adjust their permissions accordingly.
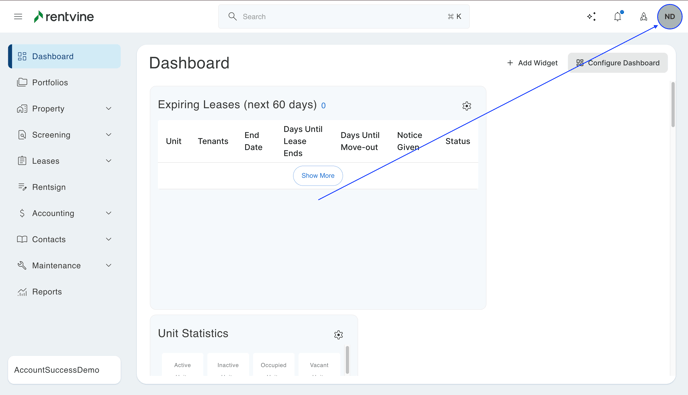
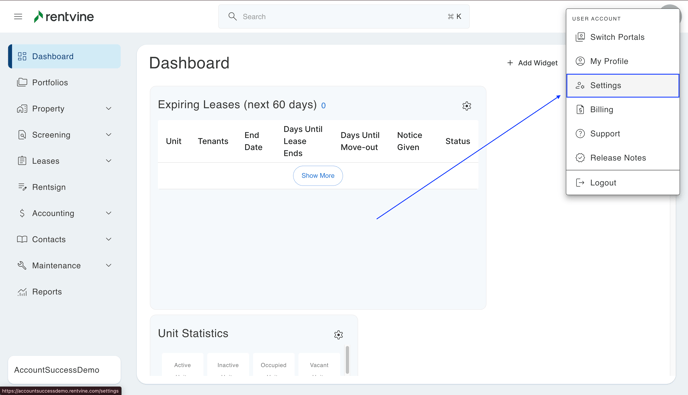
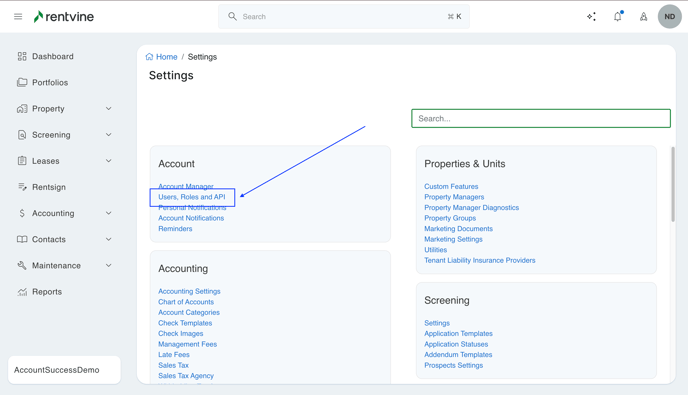
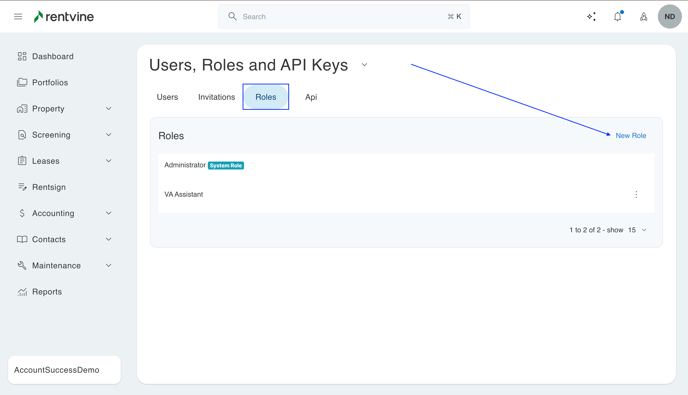
Then click on "Users, Roles, & API". From here, you can click on Roles and click Create New Role. Here you will be able to create a name for the role and choose all of the settings you want to attach to the role. When you are done, you will be able to attach these roles to your users, and it will change their permissions accordingly.
There are a lot of different role settings you can set up for your users. These are all broken down into different categories. Those categories are listed below, and you can click each one to take you to those settings on this page.
Helpful Tip: If you are looking for a specific role, press the Cmnd+F buttons on your keyboard to search for a specific role setting's name.
Administration Contacts
Accounting Reports
Leasing Notes
Properties Files
Maintenance Alerts
Portfolios Screening
Notifications Portfolio Groups
System Rentsign
Administration
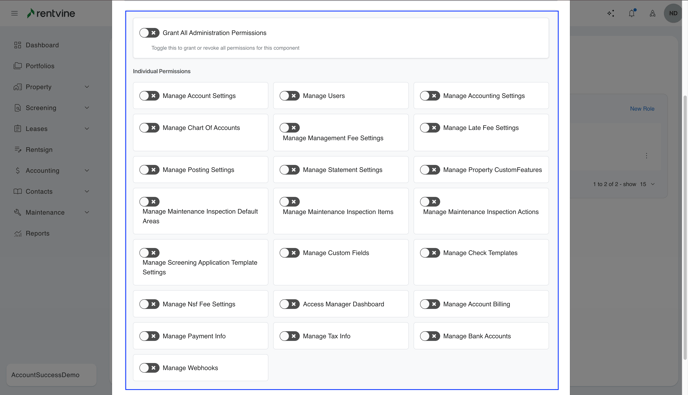
The toggles for "Administration" are related to all of the global settings. The global settings will change certain settings for the whole Rentvine account. This is where you choose what you will choose what you allow users to change and what they can't change.
The top toggle in here is "Administration". If you toggle this on, it will turn on all toggles for this field, and will toggle off all if you toggle it off.
The others are as follows:
Affects Account Global Settings:
- Manage Account Settings- allows the user to edit, add, or delete the "account manager" settings from the global settings page. This toggle will also allow the user to view and edit the tax reporting settings (1099 Reporting).
- Manage Users- allows users to edit, add, or delete users from the global Users, Roles, & API settings page.
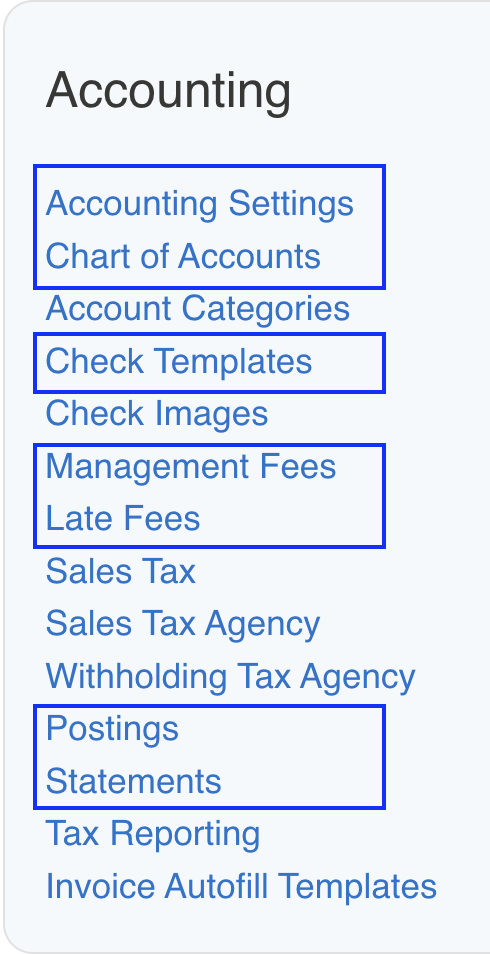
Affects Accounting Global Settings:
- Manage Accounting Settings- allows users to edit, add, or delete the settings from the global "accounting settings" page.
- Manage Chart of Accounts- allows users to edit, add, or delete the settings from the global settings page.
- Manage Management Fee Settings- allows users to edit, add, or delete the settings from the "Management Fees" global settings page.
- Manage Late Fee Settings- allows users to edit, add, or delete the settings from the "Late Fees" global settings page.
- Manage Posting Settings- allows users to edit, add, or delete the settings from the "Postings" option on the global settings page.
- Manage Statement Settings- allows users to edit, add, or delete the "Statements" settings from the global settings page.
- Manage Check Templates- allows users to edit, add, or delete the "Check Template" settings from the global settings page.
- Manage NSF Fee Settings- allows users to edit the NSF settings within the accounting settings from the global settings page. Please note that if "Manage accounting settings" is off, the user will not be able to edit the NSF settings either.
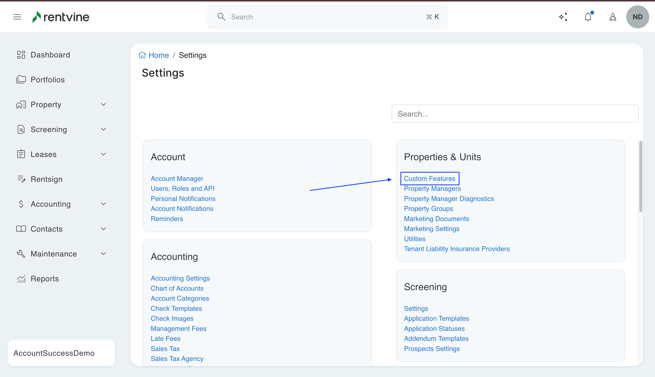
Affects Properties and Units Global Settings:
- Manage Property Custom Features- allows the user to edit, add, or delete the "Custom Features" settings from the global settings page.
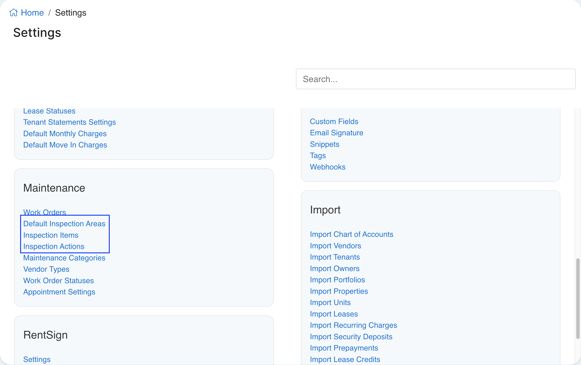
Affects Maintenance Global Settings:
- Manage Maintenance Inspection Default Areas- allows user to edit, add, or delete "Default Inspection Areas" settings from the global settings page.
- Manage Maintenance Inspection Items- allows the user to edit, add, or delete the "Inspection Items" settings from the global settings page.
- Manage Maintenance Inspection Actions- allows the user to edit, add, or delete the "Inspection Actions" settings from the global settings page.
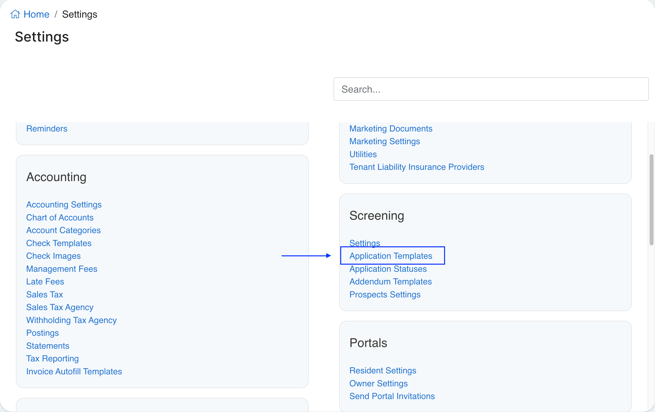
Affects Screening Global Settings:
- Manage Screening Application Template Settings- allows the user to edit, add, or delete the "Application Templates" settings from the global settings page.
Affects "Other" Global Settings:
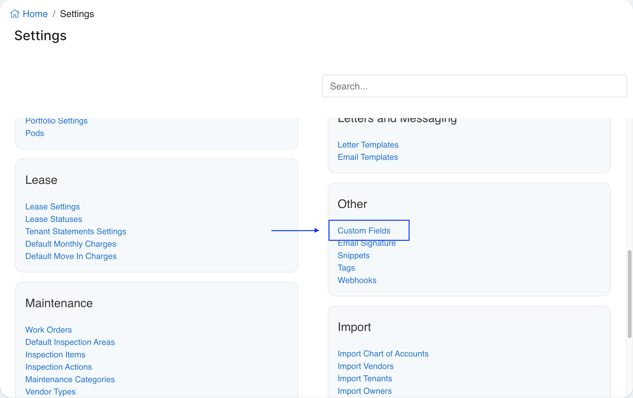
- Manage Custom Fields- allows users to edit, add, or delete the "Custom Field" settings from the global settings page.
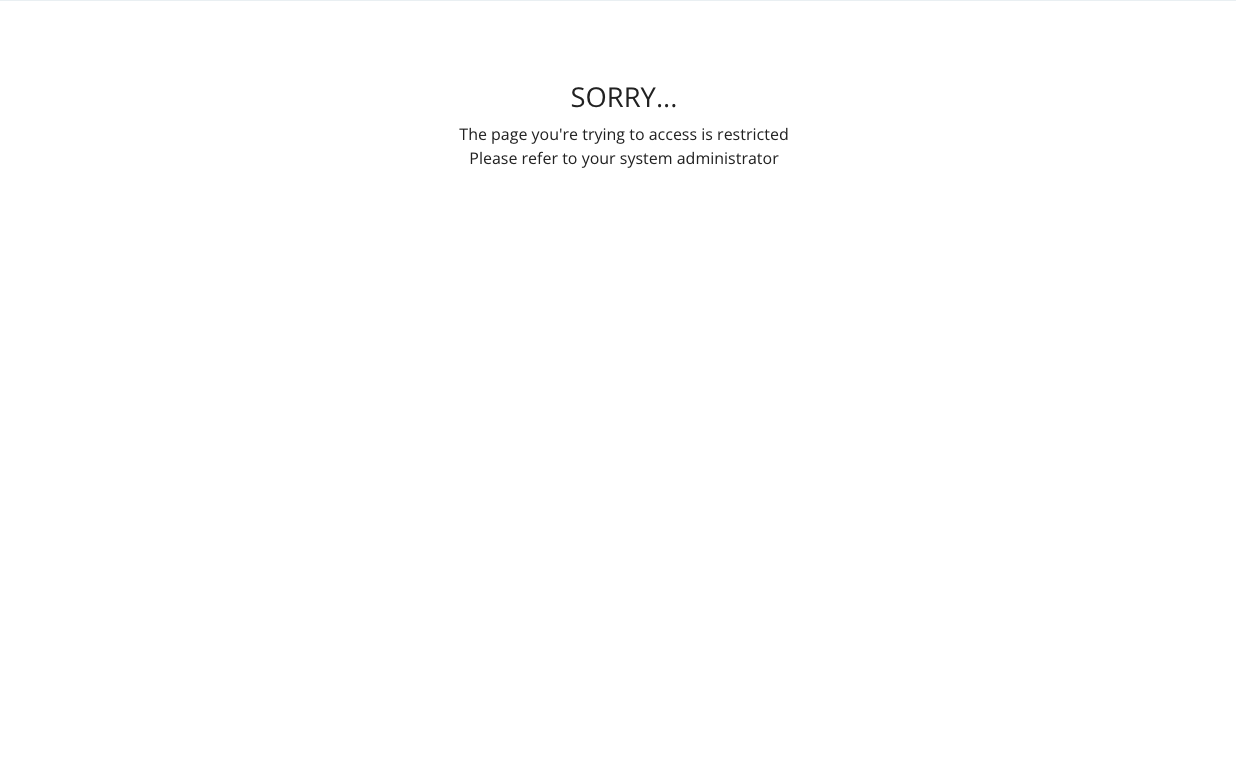
This is what users will see when they try to go into one of these settings that are turned off on the user roles for administration.
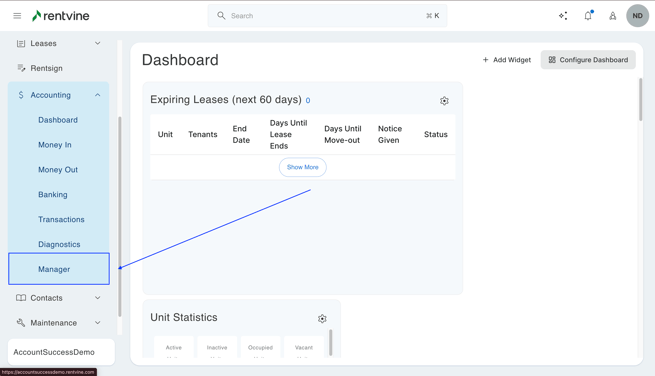
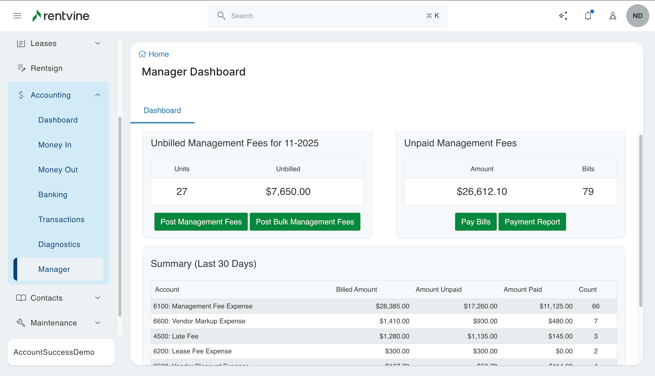
- Access Manager Dashboard - This will allow the user to view the Manager Dashboard, where all management fees can be posted, pay management bills, and payment reports can be located
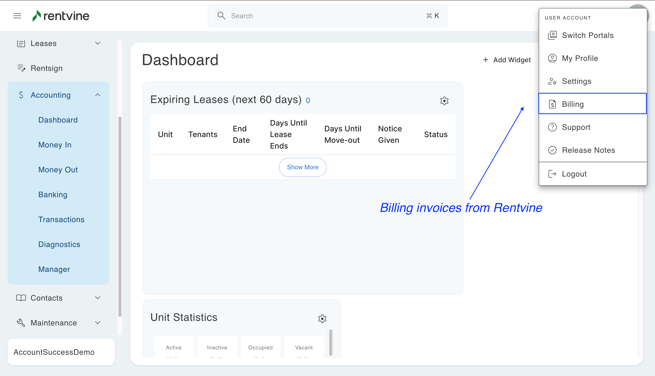
- Manage Account Billing - This limits the user from view the Billing section within Rentvine that shows the invoices from Rentvine for the software itself
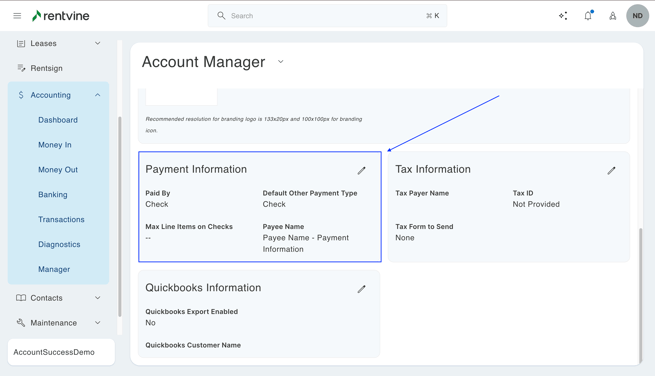
- Manage Payment Info - Allows users to adjust the way the Management Company is paid out
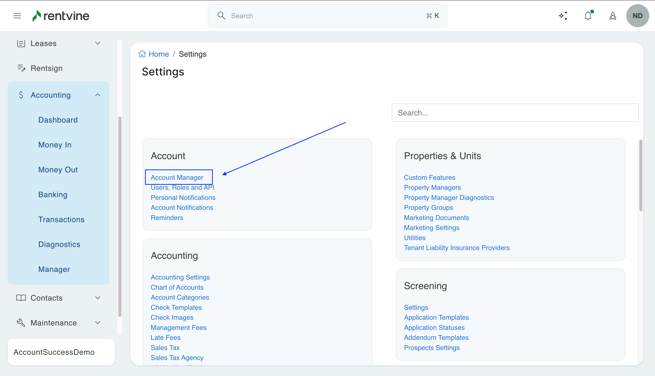
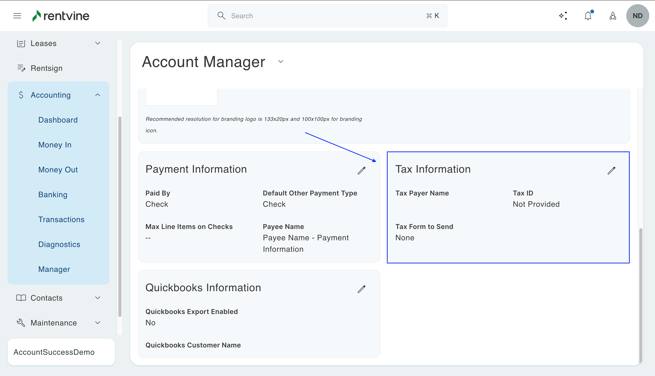
- Manage Tax Info - Allows users to adjust the Tax Information tied to the Management Company

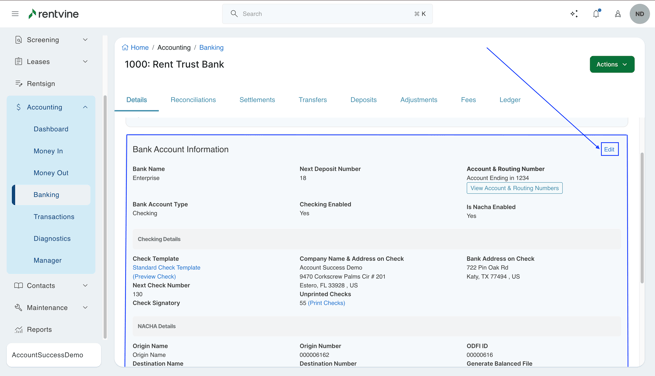
- Manage Bank Accounts - This allows users the ability to adjust information on the bank account
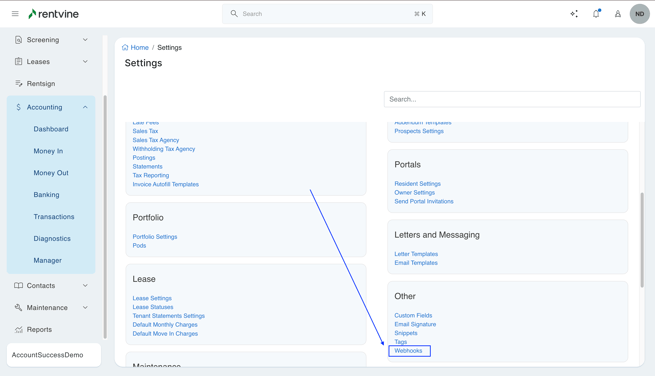
- Manage Webhooks - Allows users to manage webhooks within the system
Accounting
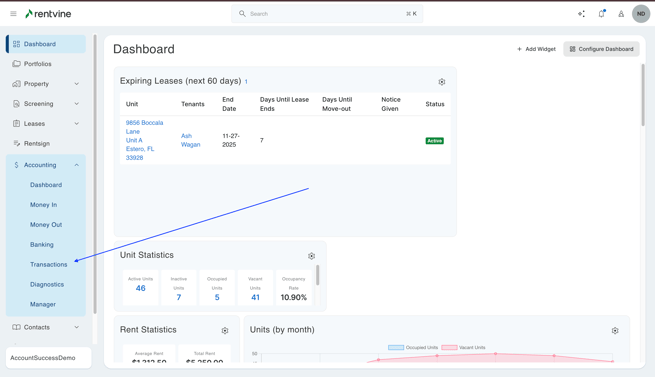
The accounting toggles are going to give access to certain actions within the "Accounting" tab of your Rentvine account. These include different tabs such as the Money In, Money Out, Banking, Transactions, Diagnostics, and Manager.
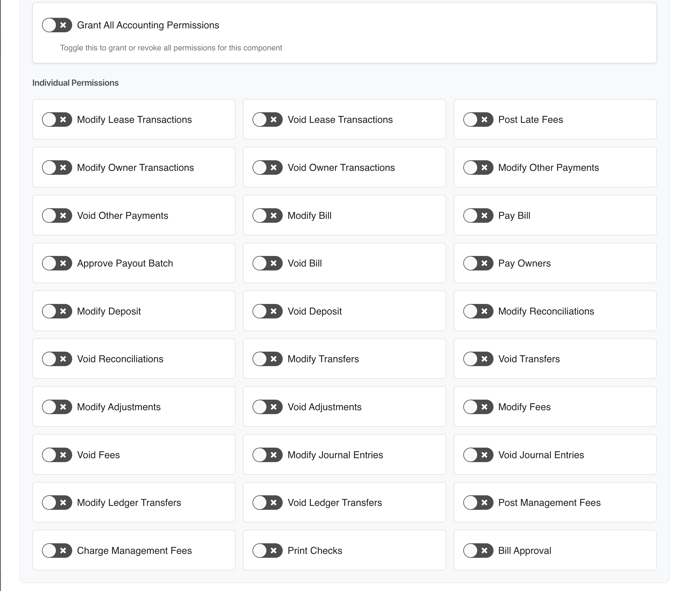
The top toggle here is "Accounting". If you toggle this on, it will turn on all toggles for this field, and will toggle off all if you toggle it off.
The other toggles are as follows:
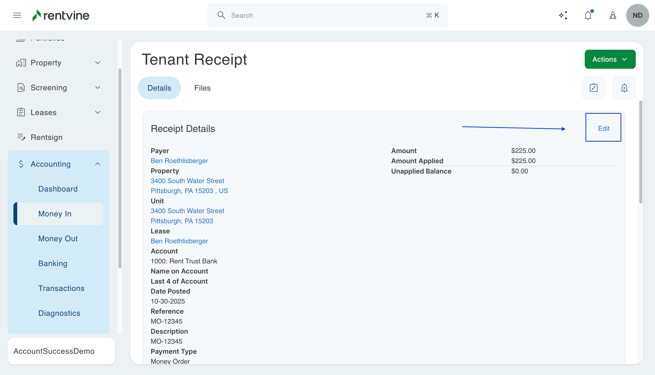
- Modify Lease Transactions- This toggle will be for the tenant receipts/charges within the money-in section. Once they click on one of these, they will be able to view the payment, and there will be an edit button in the top right to change some information. They will also be able to do this on credit. This works the same way from the transactions tab on a lease, where they will have the same ability. If this is off, there will be no edit button. This will also allow the user to record tenant payments. They can do this through the quick actions or the Money In green actions button. If this is off, they will see the screen saying they don't have permission.
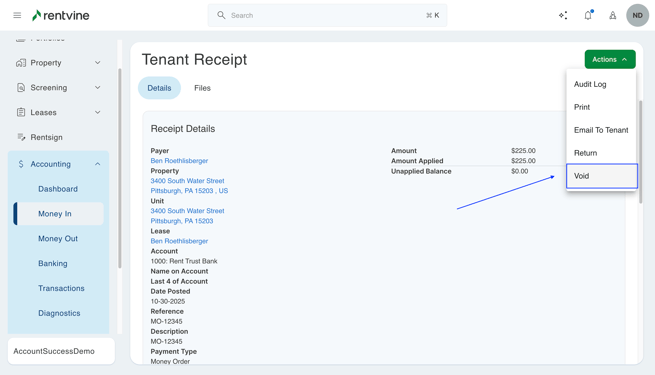
- Void Lease Transactions- This toggle deals with the same thing as the above toggle, but just deals with the voiding. If this is on and the charge isn't paid, the user will be able to click the green actions button and void the lease transaction. If this is off, the user will not see that from the green actions button.
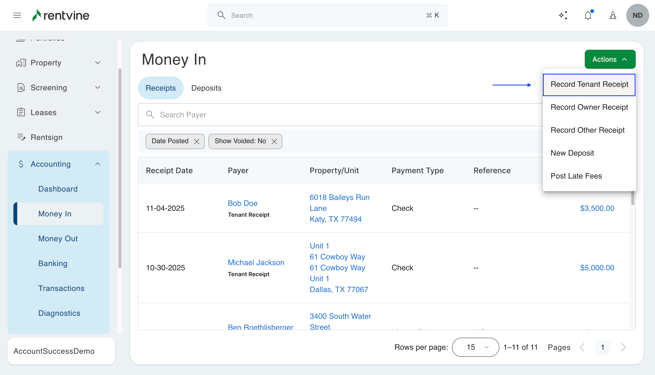
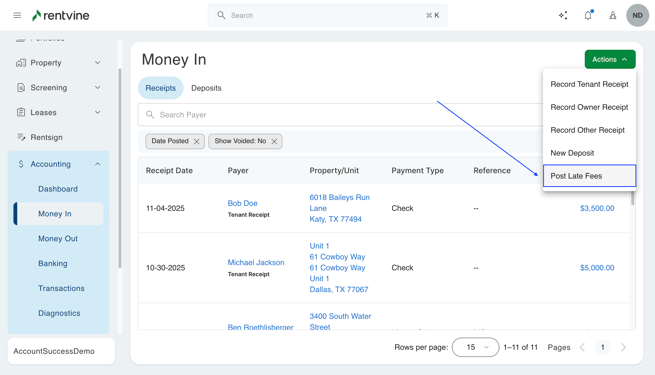
- Post Late Fees- This is a toggle for the money-in section. This is for if you pay late fees manually. If this is on a green actions button will appear for the user to post late fees (This will only show if it is the only toggle on; a green actions button will appear if multiple actions are enabled).
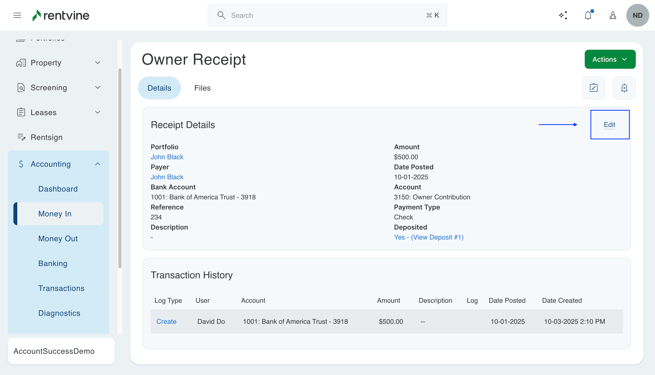
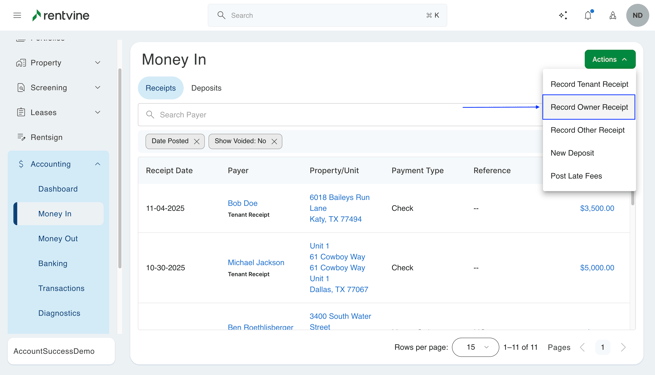
- Modify Owner Transactions- This toggle will be in the money-in section as well. This will allow the user to edit certain information for individual owner payments. There will be an edit button in the top right to change the information. If this is toggled off, the user will not see anything here. This will also allow the user to record owner payments. They can do this through the quick actions or the Money In green actions button. If this is off, they will see the screen saying they don't have permission.
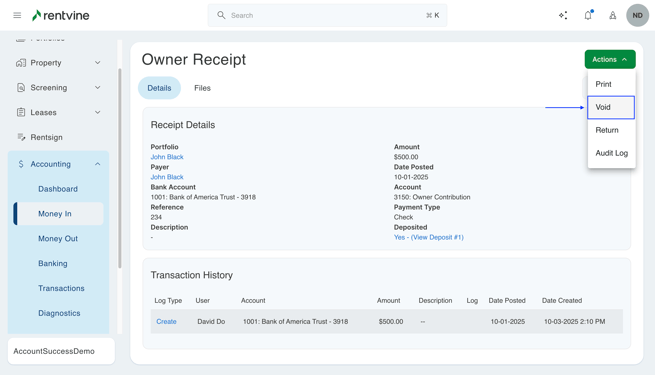
- Void Owner Transactions- This toggle deals with the same thing as the above toggle, but just deals with the voiding. This is for those owner payments. If a user clicks a specific one, they will have the option to void the payment if it was recorded via check. They will do this through the green actions menu. If this toggle is turned off, they won't see that option.
- Modify Other Payments- This toggle will be in the money-in section. This will allow the user to edit certain information for individual owner payments. There will be an edit button in the top right to change the information. If this is toggled off, the user will not see anything here. This will also allow the user to record other payments. They can do this through the quick actions or the Money In green actions button. If this is off, they will see the screen saying they don't have permission and won't see it in the green actions button.
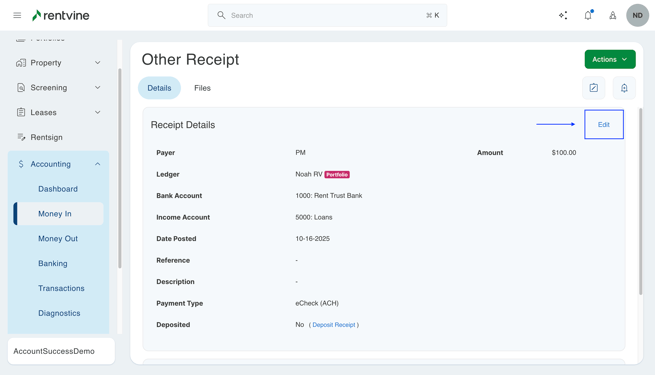
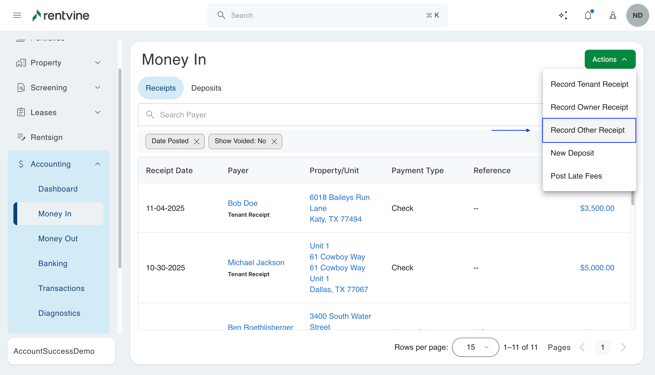
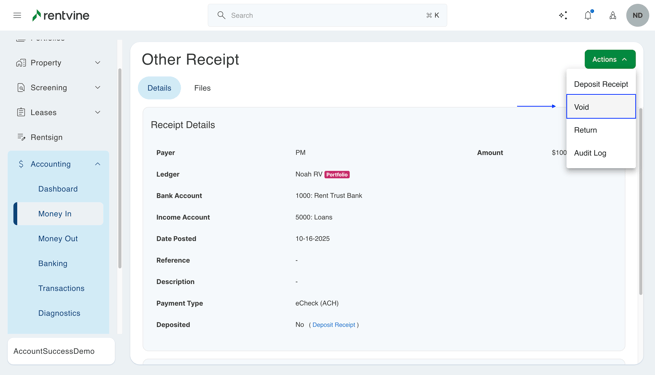
- Void Other Payments- This affects the same toggle as the above. It will be for voiding other payments. If the user clicks on the other payment, they will be able to void it from the green actions menu. If this is not toggled on, the user will not see that option.
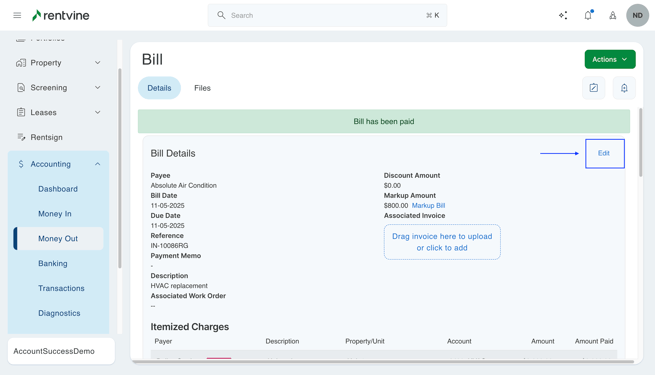
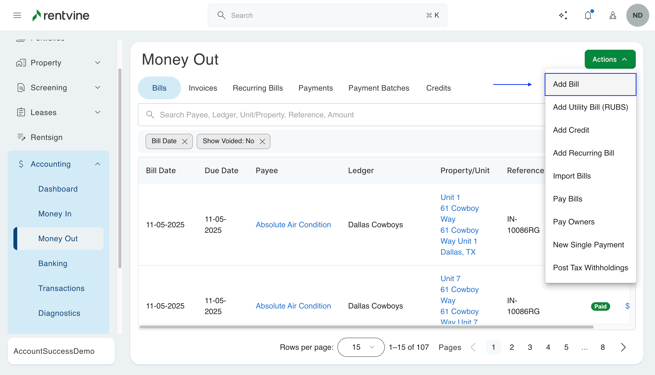
- Modify Bill- This toggle will affect the bill's section under "Money Out". It will allow the user to edit a bill within their Rentvine account. If the user clicks on a bill here, they will see an edit button to change the information regarding this specific bill. The user will also have the ability to create bills from this section under the green actions button, or the quick actions. If this toggle is off, they will not see either of these options.
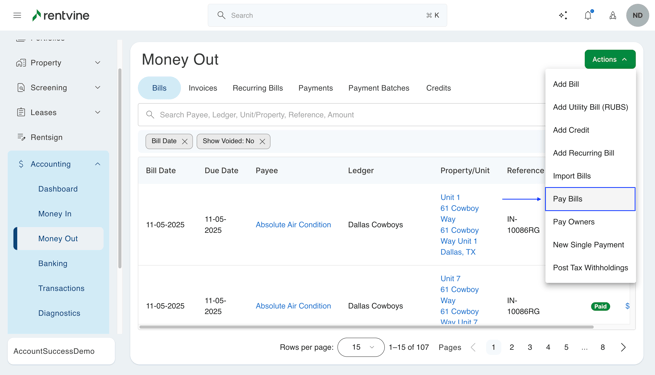
- Pay Bill- This toggle will be in the green actions button of the "Money Out" tab in the quick actions menu. If this is turned on, it will allow the user to click and pay bills that are already posted in Rentvine. If this toggle is off, they will not be able to see this action.
- Approve Bill Pay Batch- This toggle will only work if a payment or a payout has been created and the toggle for approval on submission is turned off. This will make it so the payment batch is pending, ready for approval. This will give that user the authority to approve those payment batches.
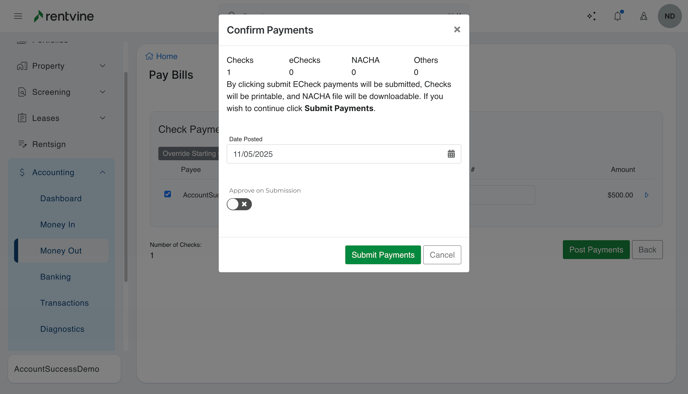
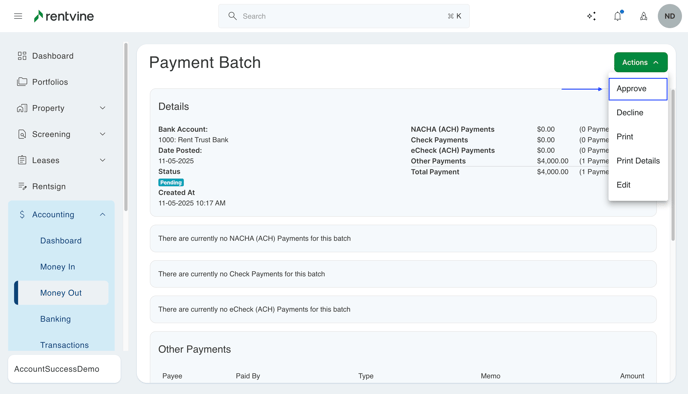
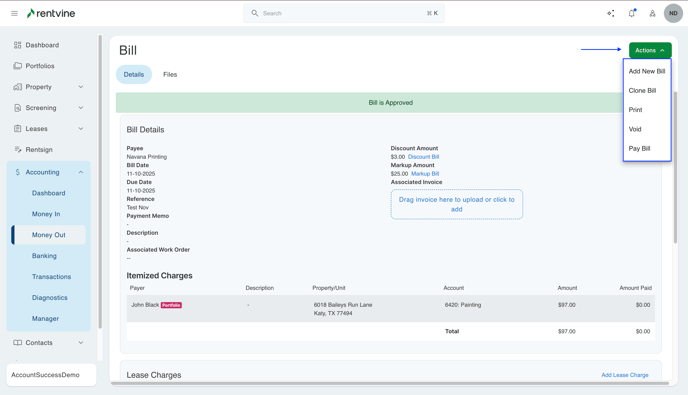
- Void Bill- This will allow the user to void any bills. This is from the money out section> bills. If they click on a specific bill, they will be able to click the green actions button within here and void the bill. If this is off, they will not be able to see this option in the green actions button.
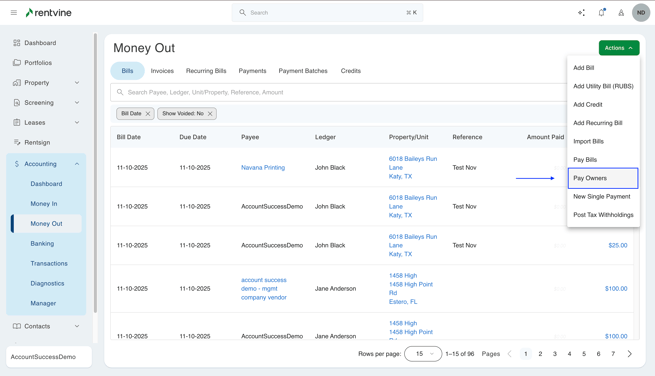
- Pay Owners- This toggle will allow the user to do owner payouts either through the quick actions or through money out> green actions> pay owners. Instead of a green actions button here, they will have a green button that says "Pay Owners".
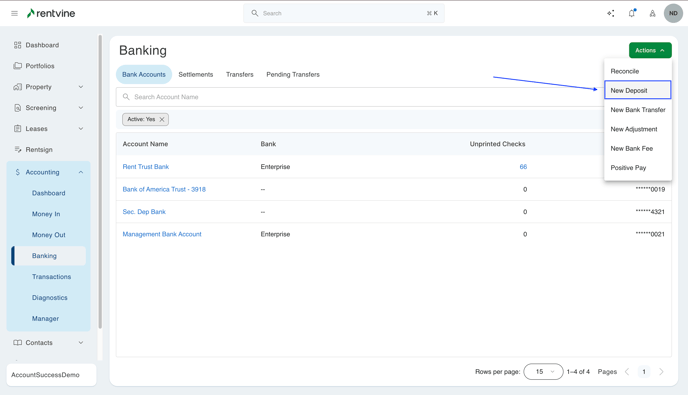
- Modify Deposit- This toggle will be in the "Banking" section of the accounting tab. This will allow the user to create new deposits for funds within their Rentvine account. They will be able to do this from the main banking page by clicking the green actions button, then new deposit, or clicking on a bank account. In here, they will see the options for a new deposit. If this toggle is off, they will still be able to view all of the deposits they will not be able to edit them, and those options above will not be there.
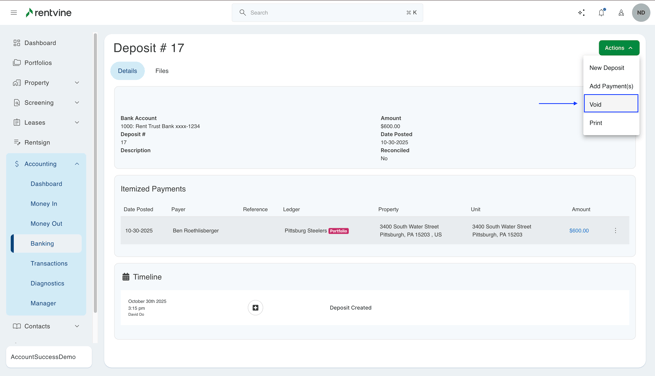
- Void Deposit- This toggle will go with the toggle above. For those same deposits, it will allow the user to go into each deposit for a bank account and click the green actions button. In here, they will be able to void and void any deposits recorded.
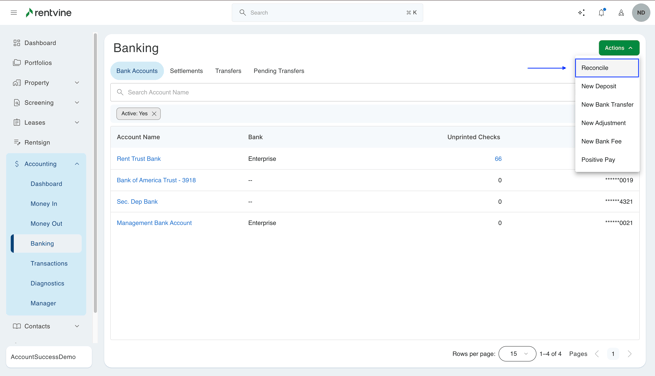
- Modify Reconciliations- This toggle will be in the "Banking" section of your Rentvine account. This will allow the user to create a new reconciliation for a certain period and edit what is chosen to reconcile within it. To do this, they will go to the banking tab and click the green actions button> reconcile, or click on a bank account and click the reconcile button in the top right. If this toggle is off, the user will not be able to click the reconcile button but will still be able to view previous reconciliations.
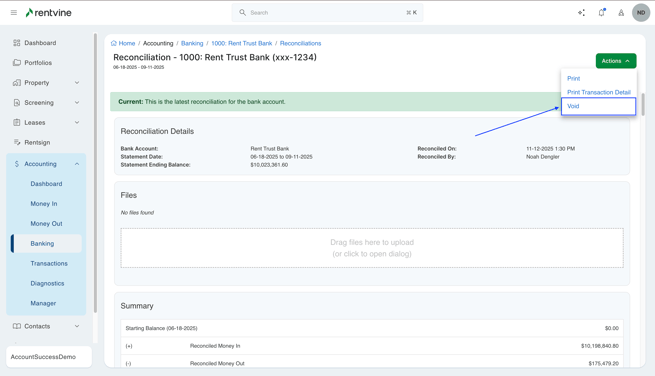
- Void Reconciliations- This toggle will be for the same reconciliations as the above toggle. The user will be allowed to go into the reconciliations tab for any of the bank accounts you have in Rentvine. They will then be able to click on a specific reconciliation, and under the green actions button, they can void it.
- Modify Transfers- This toggle will be in the "Banking" section of your Rentvine account. This will allow the user to go to the "Transfers" tab, and under the green actions button, they will have the ability to create bank transfers.
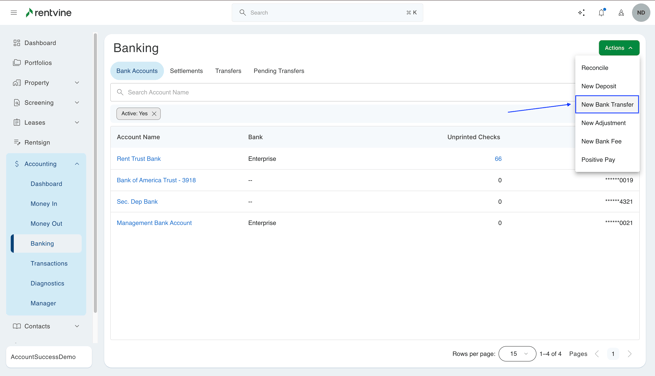
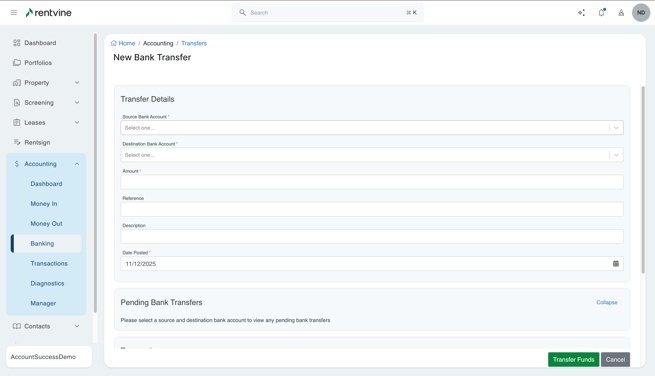
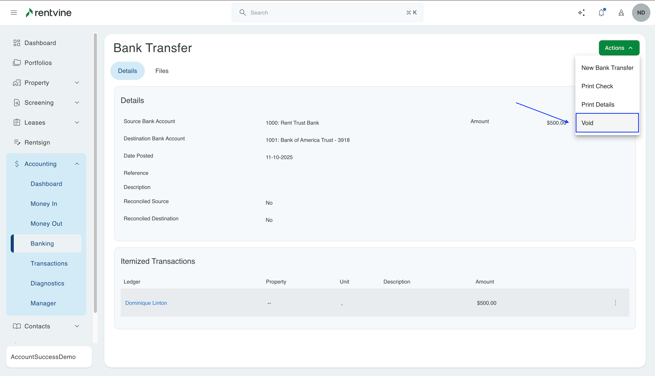
- Void Transfers- This toggle will be in the "Banking" section of your Rentvine account. This will allow the user to go to the same transfers tab and click on individual bank transfers that have already been created. In here under the green actions button, they will have the ability to void any of these bank transfers.
- Modify Adjustments- This toggle will be in the "Banking" section of your Rentvine account. This will allow the user to either go into a bank account or click the green actions button and click "New Adjustment". The user can create these for any of the bank accounts you have within Rentvine.
 OR
OR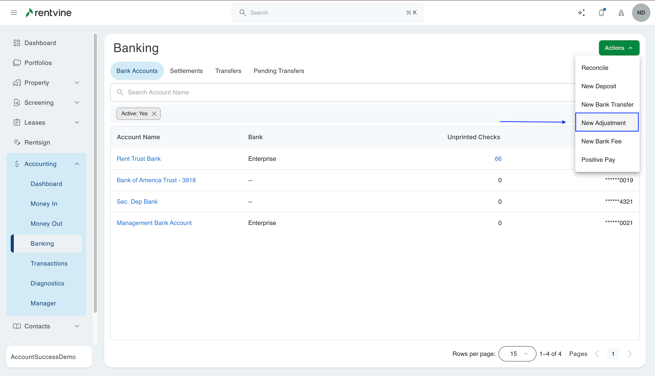
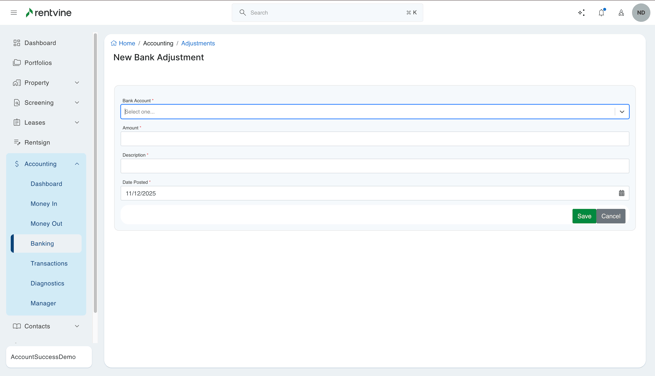
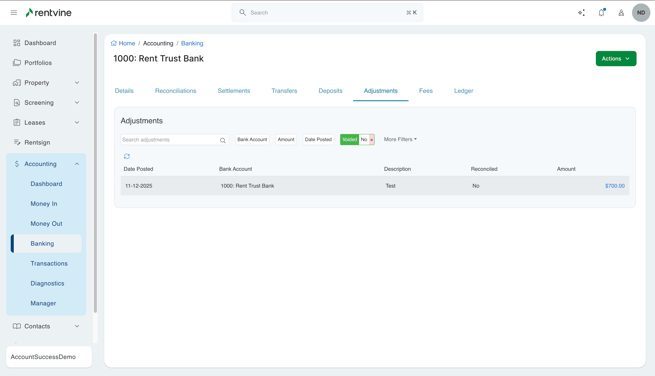
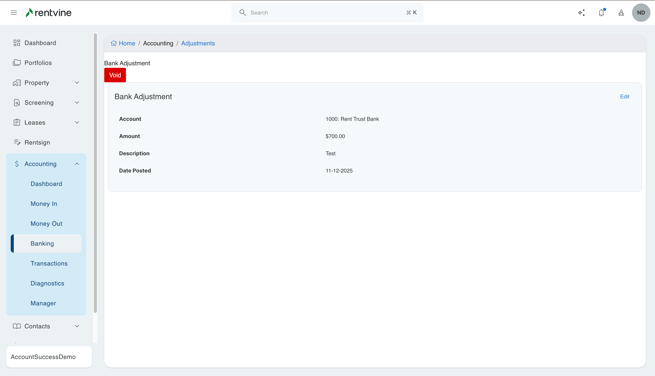
- Void Adjustments- This toggle will be in the "Banking" section of your Rentvine account. This toggle will allow the user to go into any of the adjustment tabs on any of the bank accounts. Once they click on any of the adjustments, they will have the ability to click the green actions button and void the adjustment.
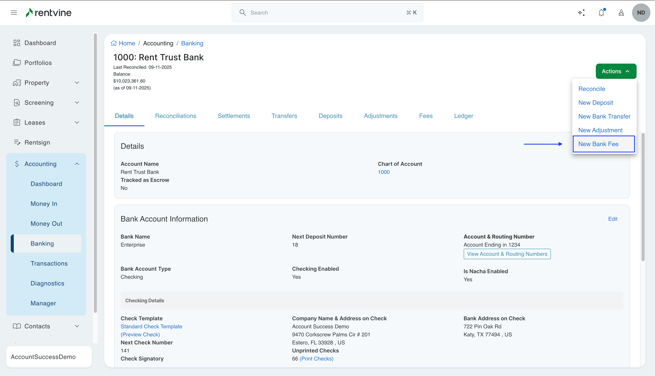
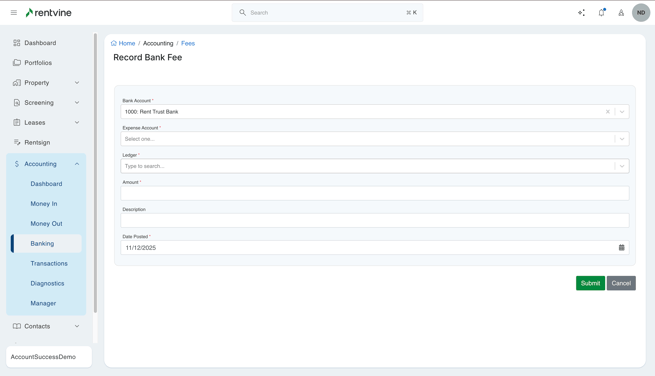
- Modify Fees- This toggle will be in the "Banking" section of your Rentvine account. This will allow the user to create new bank fees within any of your bank accounts that you have within Rentvine. They can click the new bank fee from the banking main page> green actions> add bank fee, or by clicking into a bank account and clicking the "New Bank Fee" button.
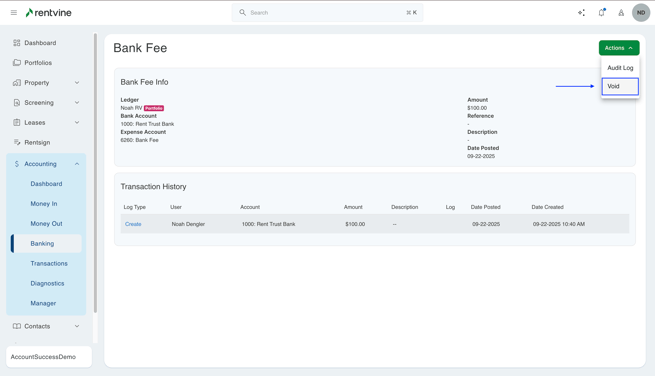
- Void Fees- This toggle will be in the "Banking" section of your Rentvine account. This will allow the user to view any bank fees that have already been created. When they click into any of these on any of the bank accounts, they can click the green actions button and void the bank fee.
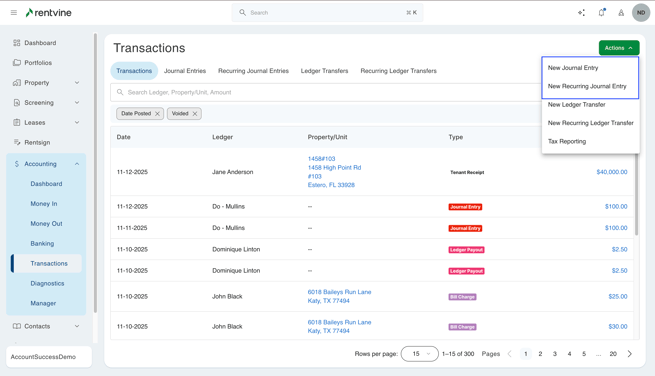
- Modify Journal Entries- This toggle will be in the "Transactions" section of your Rentvine account. This will allow the user to create and edit journal entries and recurring journal entries within Rentvine. They can do this from the transaction's main page by clicking the green actions button and then the "New Journal Entry" button.
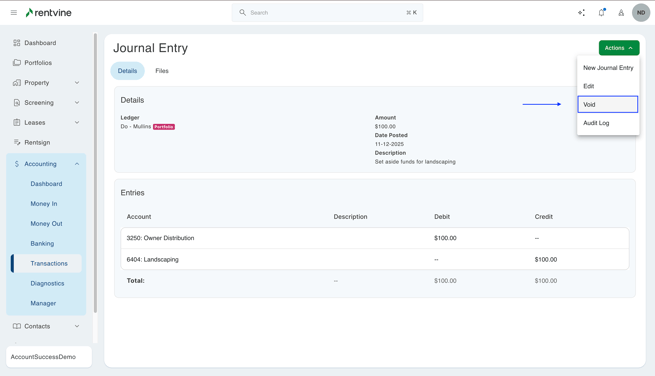
- Void Journal Entries- This toggle will be in the "Transactions" section of your Rentvine account. This will make it so the user can view any journal entries and recurring journal entries. When they click on any of these, they will be able to click the green actions button and void them.
- Modify Ledger Transfers- This toggle will be in the "Transactions" section of your Rentvine account. This will allow the user to create and edit ledger transfers and recurring ledger transfers within Rentvine. They can do this from the transactions main page by clicking the green actions button and then the "New Ledger Transfer" button.
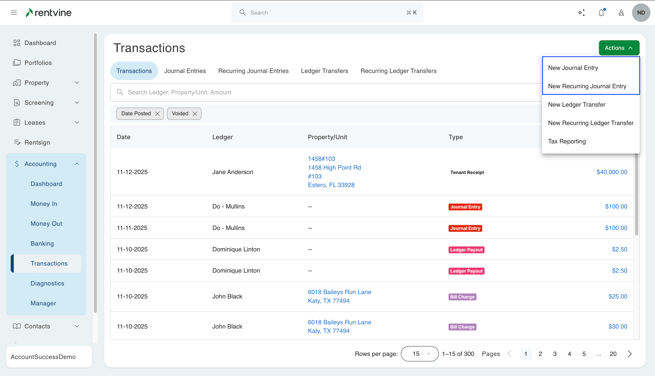
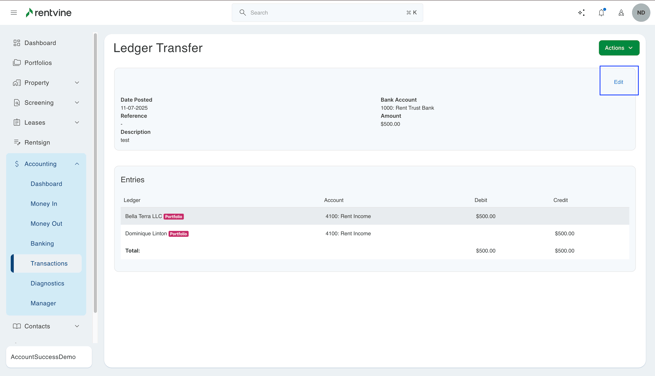
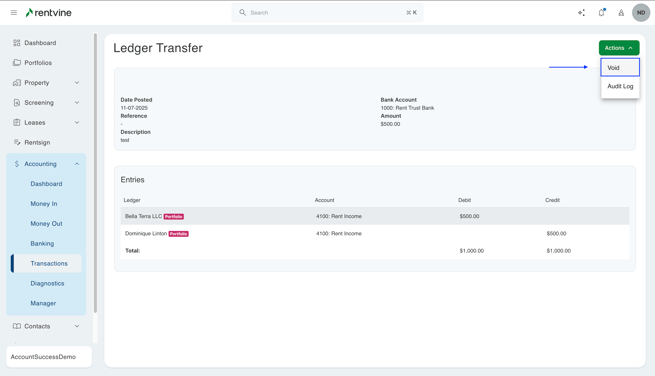
- Void Ledger Transfers- This toggle will be in the "Transactions" section of your Rentvine account. This will make it so the user can view any ledger transfers and recurring ledger transfers. When they click on any of these, they will be able to click the green actions button and void them.
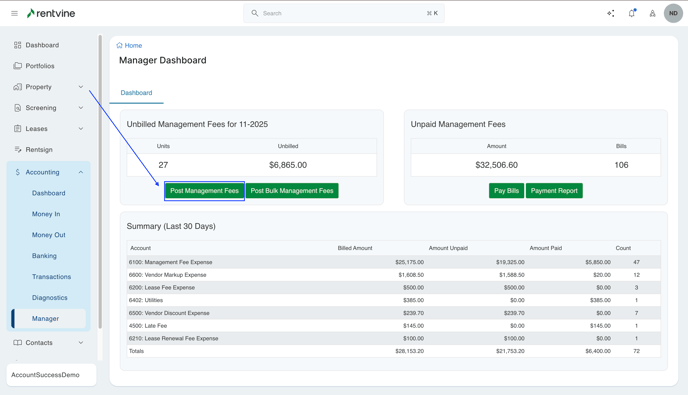
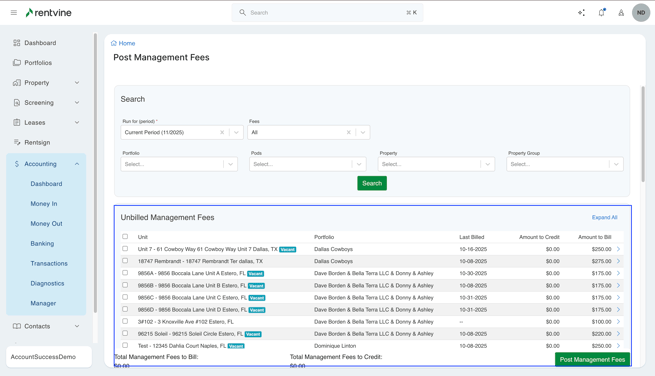
- Post Management Fees- This toggle will be in the "Manager" section of your Rentvine account. This will allow the user to view and post all of the management fees from the manager dashboard. This will just create the bill for all of those management fees in the system.
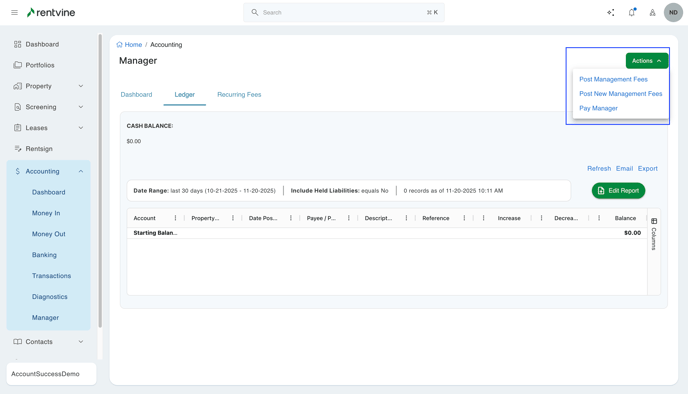
- Charge Management Fees- This toggle will be under the "Manager" section of your Rentvine account. Please note that this is only for accounts using Ledger Mode and not Bill Mode. This will allow the user to view the manager ledger and click the green actions button. In here, they can manually charge management fees, bulk management fees, and recurring management fees.
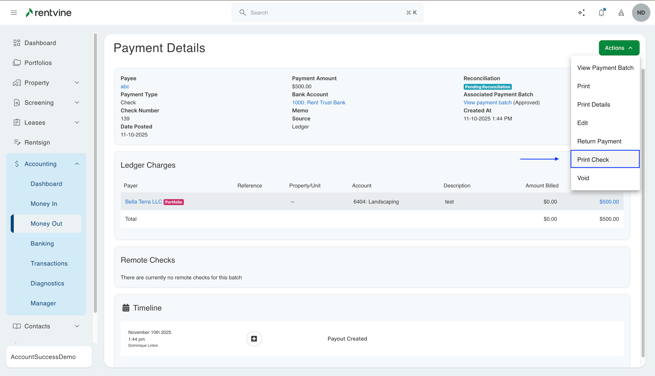
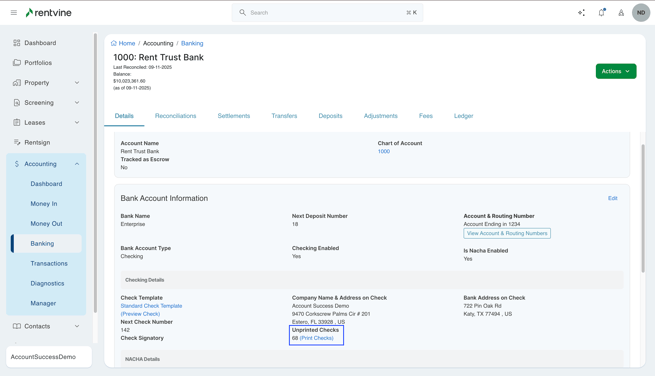
- Print Checks- This toggle will be in the "Money Out" section of your Rentvine account. If they go to the "Payments" tab, they will be able to click on any check payments. In here, if they click the green actions button, they can print the checkout. This will also control the user's ability to download NACHA Files and send Remote Checks out of the system. This will also allow the user to print checks from a specific bank account in the "Unprinted Checks" section under the "Banking" tab.
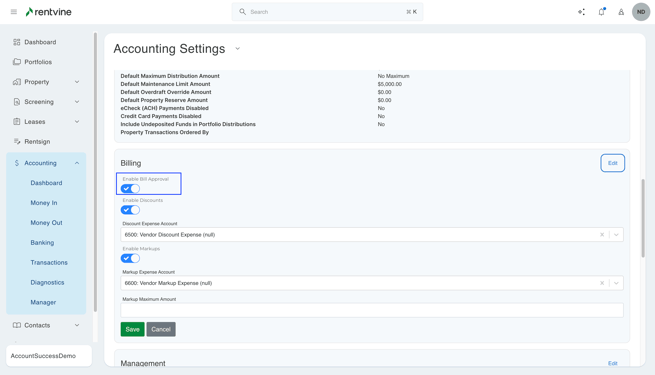
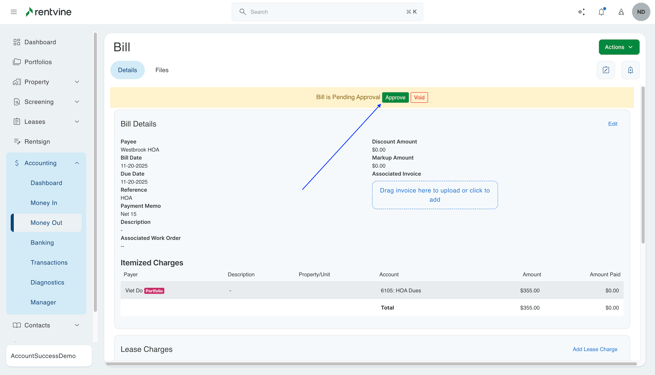
- Approve Bill- This toggle will only work if the setting under "Accounting Settings" for "Bill Approval Enabled" is toggled on. This makes it so whenever a bill is created by a user, it will need to be approved or voided. Once the bill is approved, it can be paid. This toggle will allow the user to approve those bills so that they can be paid
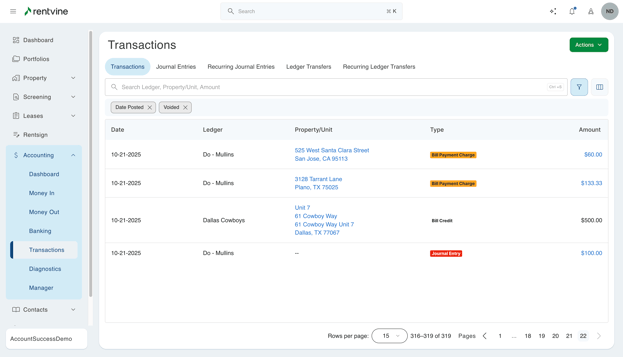
For a majority of these, you will also be able to find them from the transactions menu under accounting. Clicking any of these will take you to the respective tab. The toggles will still have the same effect as the ones listed above.
Leasing
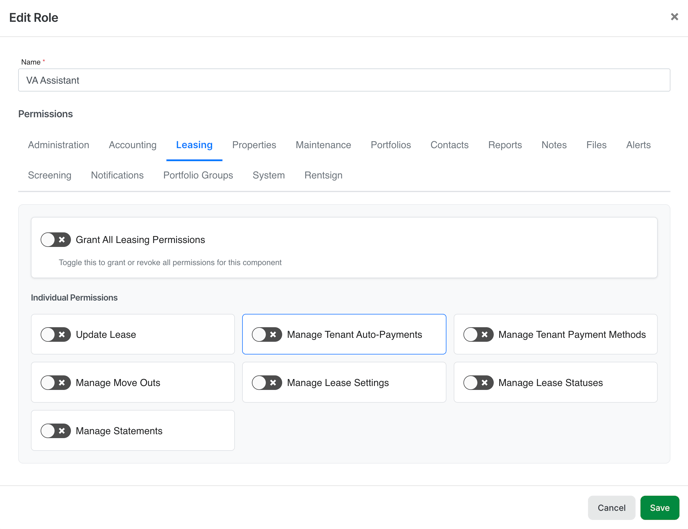
The top toggle in here is "Leasing". If you toggle this on, it will turn on all toggles for this field, and will toggle off all if you toggle it off.
The other toggles are as follows:
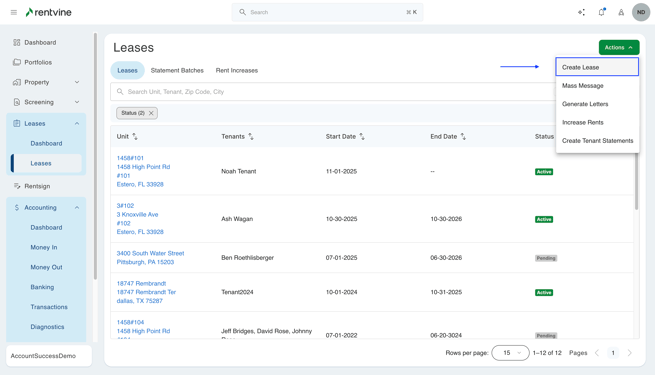
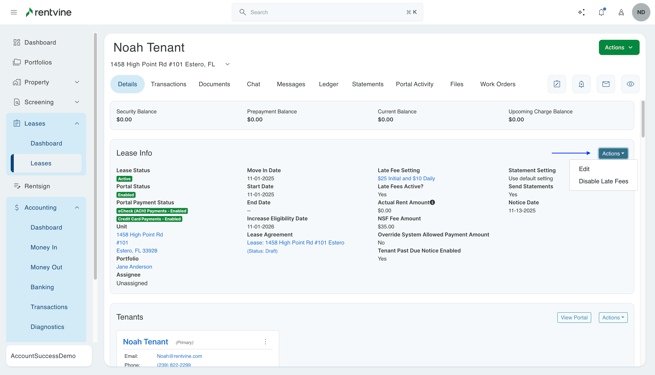
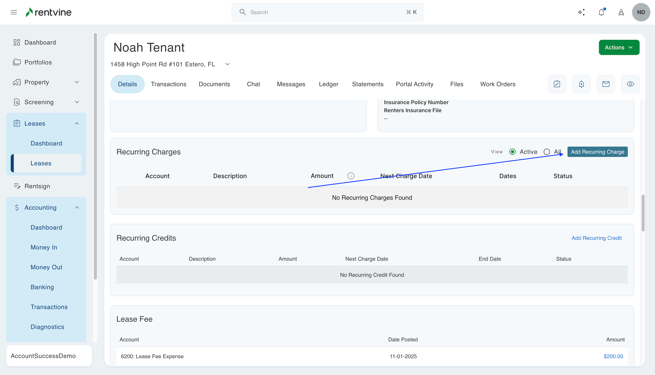
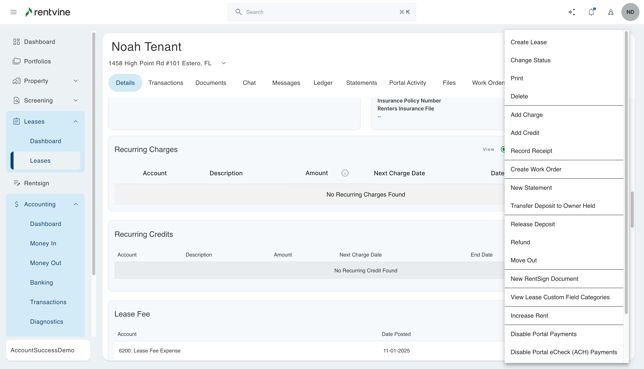
- Update Lease- This toggle will allow the user to create leases on any property within the system. It will also allow them to update any information that is on any lease. This includes all of the information within the details tab of the lease (Recurring charges, lease info, tenants, etc.) The user will see an edit button in the top right of every box for them to change the information. This will also give the user access to all of the actions within the green actions of the lease. In here, the user will also be able to add tenants to the lease and have the ability to create tenant contacts.
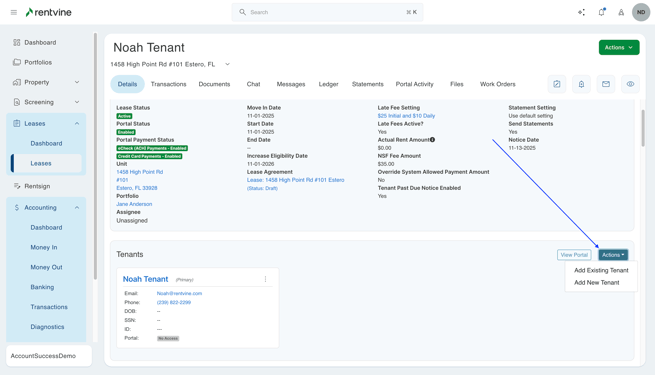
- Manage Tenant Auto-Payments- This toggle will allow the user to go into any lease, and in the "Portal Activity" tab, they can change or delete the auto-payments that tenants have set up from their portal.
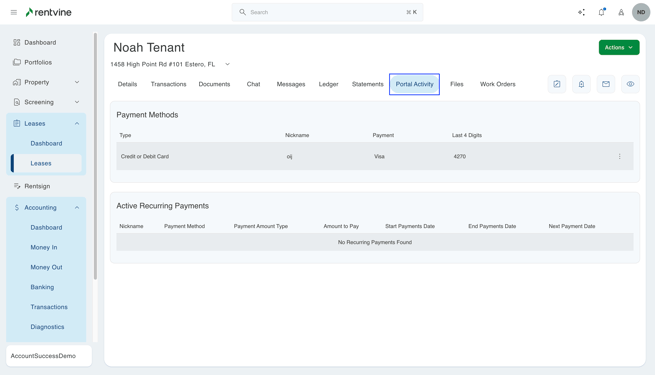
- Manage Tenant Payment Methods- This toggle will allow the user to go into any lease, and in the "Portal Activity" tab, they can change or delete the payment methods that tenants have saved in their portal.
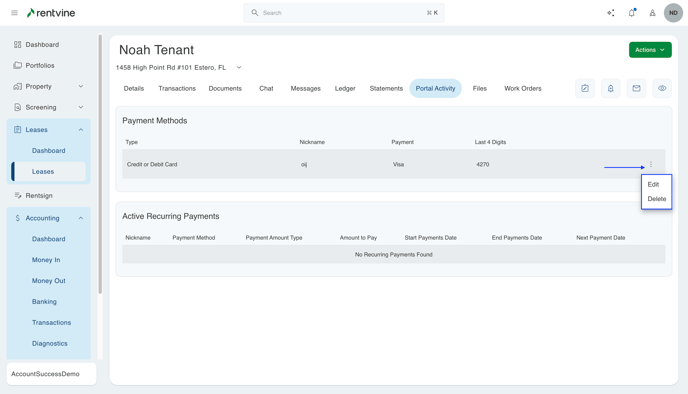
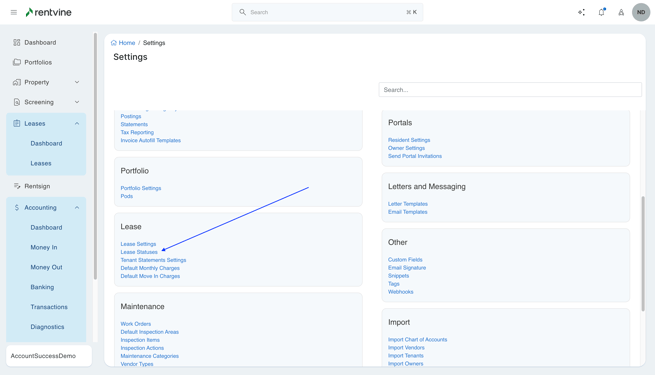
- Manage Lease Settings - This allows users to adjust the global lease settings in the Global Settings page
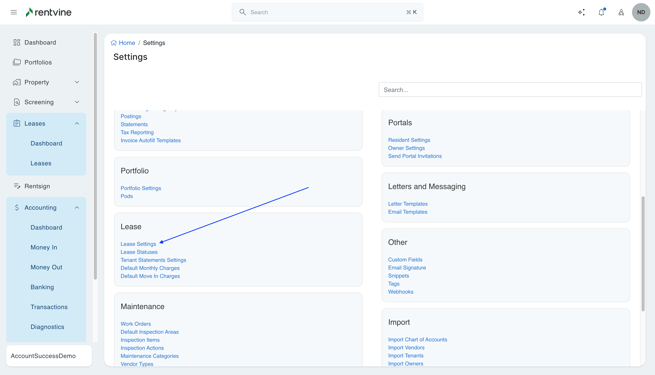
- Manage Lease Statuses - This allows users to adjust the Lease Statuses settings on the Global Settings page
Properties

The top toggle in here is "Properties". If you toggle this on, it will turn on all toggles for this field, and will toggle off all if you toggle it off. Please note that this top toggle will also allow the user to create an Association as well.
The other toggles are as follows:
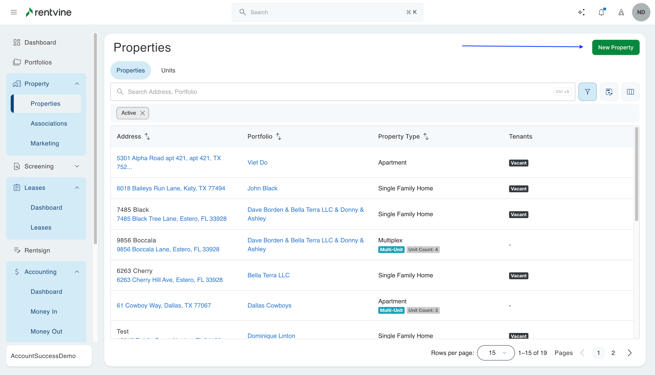
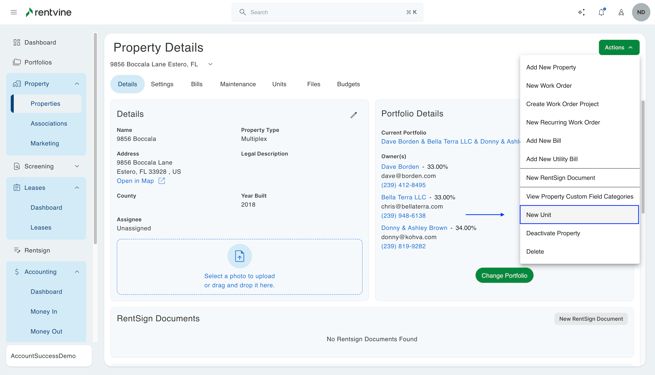
- Create Property- this toggle will for the "Properties" tab and will allow the user to create a new property or unit on a multi-unit property. The user can do this from the main properties page by clicking the green"New Property" button. They can also reach this by clicking on a specific property and clicking the green actions button, then "Add New Property".
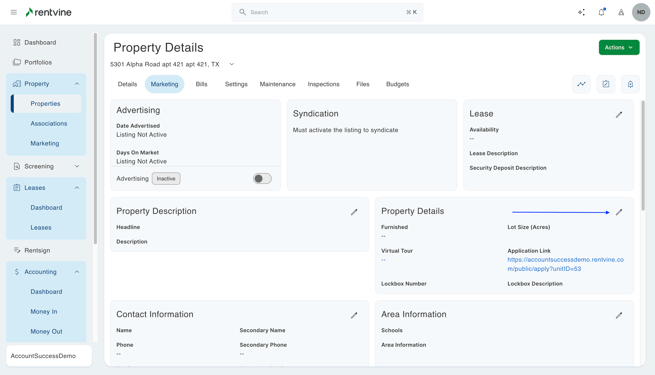
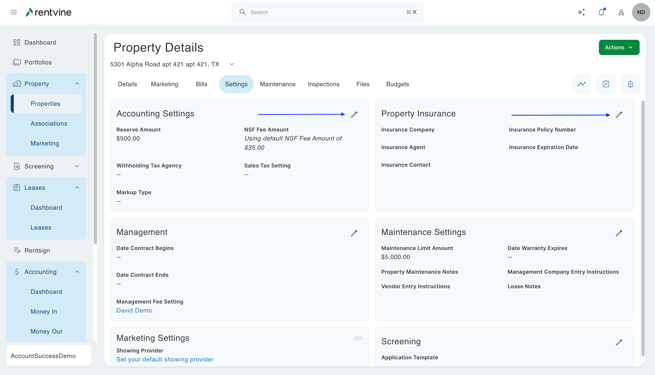
- Update Property- This toggle will allow the user to change the information of a specific property. The user can change all of the information that shows on the details tab of the property and update the images within the "Images" tab. This will also allow the user to update the marketing information under the "Marketing" tab. They will also be able to edit the information in the "Settings" tab (Management fee setting, marketing settings, etc.).
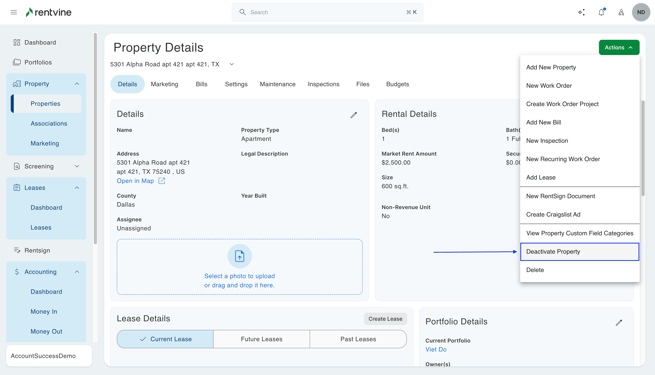
- Change Property Status- This toggle will allow the user to change the status applied to a specific property. This will be if the property is active or deactivated. This will also give the user the ability to delete the property from the system. The user can do this by going to a specific property and clicking the green actions button and clicking "Deactivate Property" or "Delete".
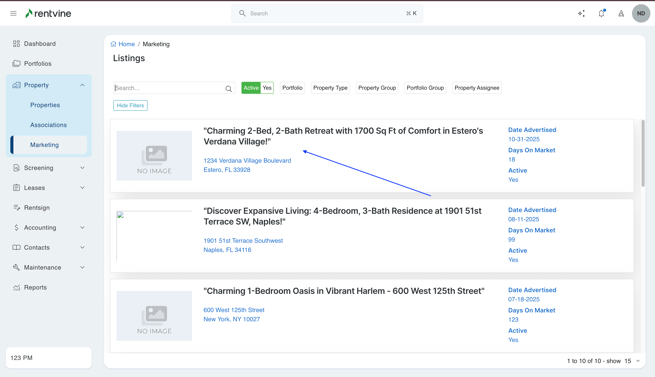
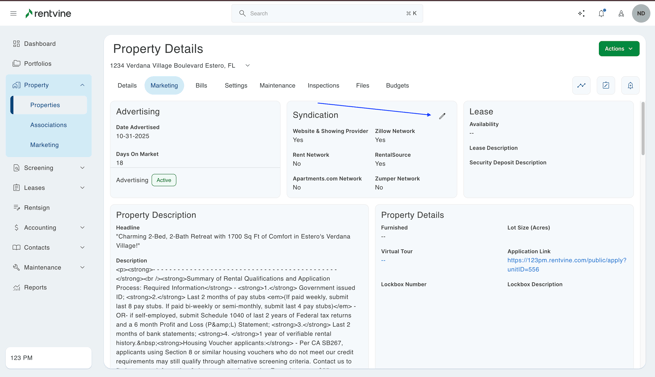
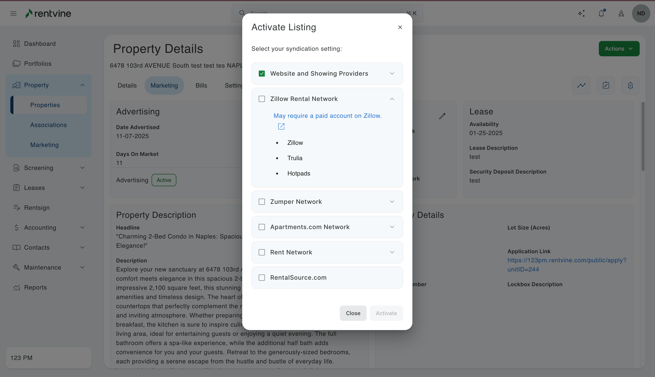
- Update Listing- this toggle will allow the user to update the "Syndication Settings" that are attached to listings. Please note that these listings will need to be activated before the user can update these settings unless they can also "Change Listing Status". They can reach this by going to the marketing tab to view all of the activated listings. After clicking on one of these, they can click the edit icon to change the syndication.
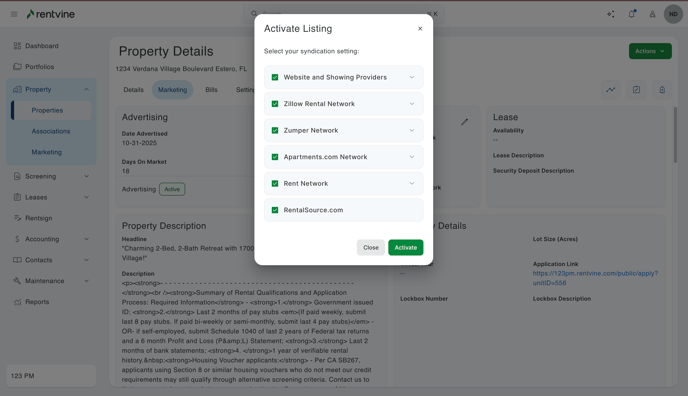
- Change Listing Status- This toggle will allow the user to activate a listing for any property that is not currently listed. They will be able to click on the "Marketing" tab within any property and click the "Activate Listing" button. They will also be able to select the syndication options for this listing.
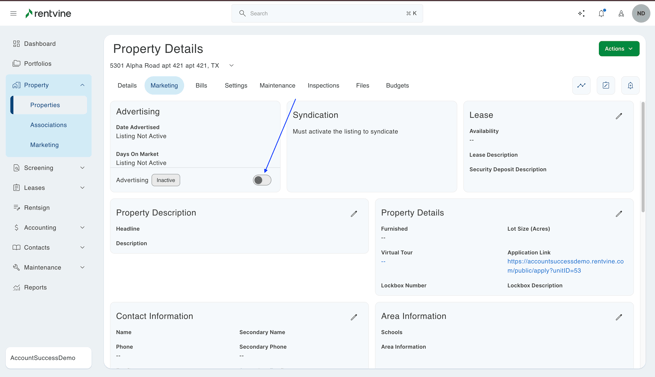
- Manage Marketing Settings - This allows users to adjust the Marketing settings on the Global Settings page
- Manage Utilities - This allows users to adjust the Utilities settings on the Global Settings page
- Manage Tenant Liability Insurance Providers - This allows users to adjust the Tenant Liability Insurance Providers settings on the Global Settings page
Maintenance
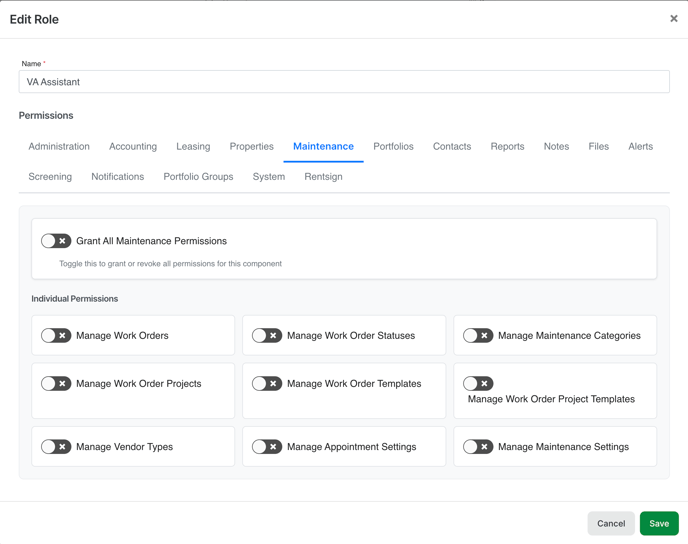
The top toggle in here is "Maintenance". If you toggle this on, it will turn on all toggles for this field, and will toggle off all if you toggle it off.
The only other toggle here is to:
- Manage Work Orders- this toggle will affect the Maintenance Tab of your Rentvine account. This toggle will give the user access to create work orders, create recurring work orders, clone a work order, delete a work order, send a review request, change the details of current work orders, and change the status/ close out work orders. This gives the user all of the functionality with the work orders tab of Rentvine.
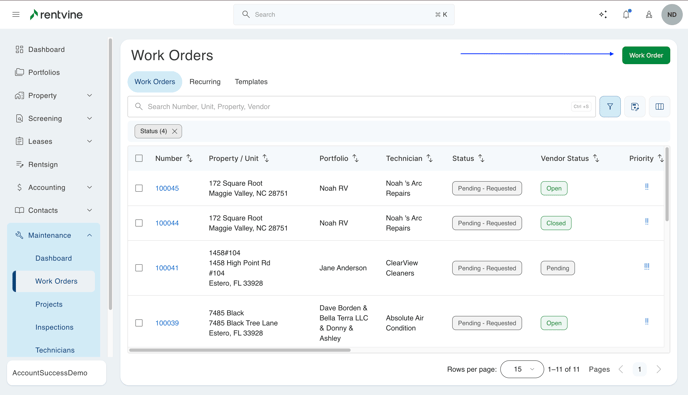
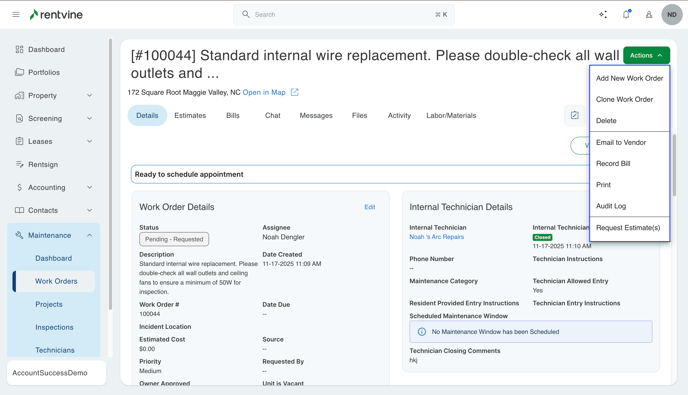
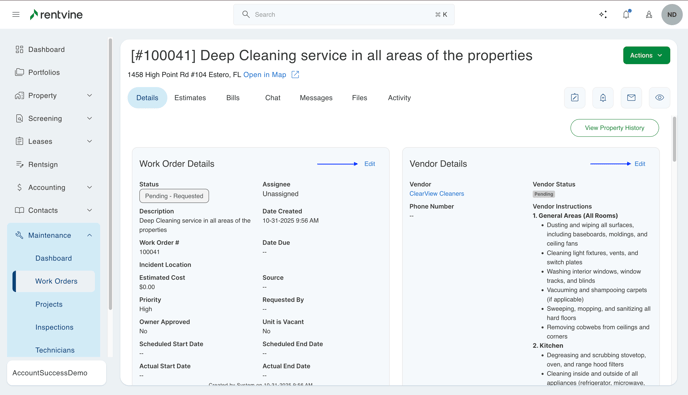
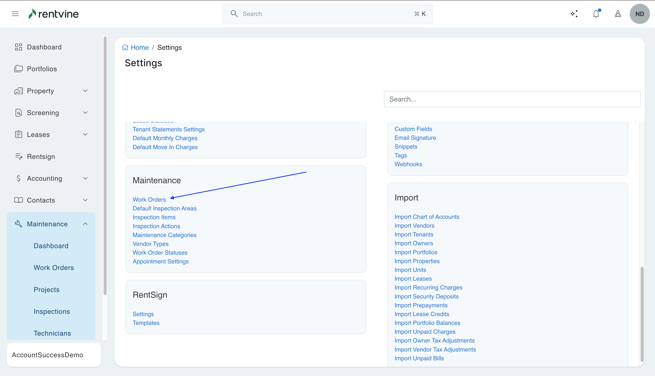
- Manage Work Order Statuses - This allows users to adjust the Work Order Statuses settings on the Global Settings page
- Manage Maintenance Categories - This allows users to adjust the Maintenance settings on the Global Settings page
-
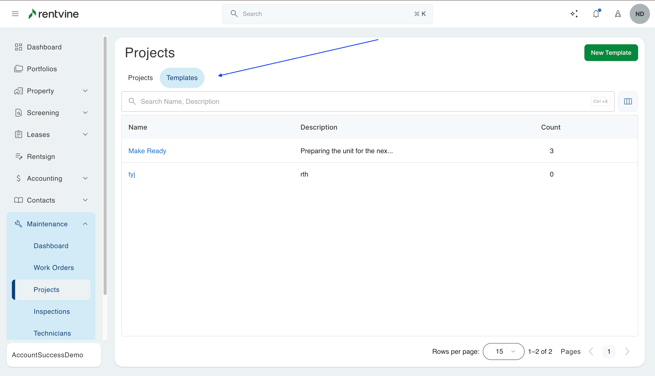
Manage Work Order Projects - This allows users to edit and information within the Work Order Projects Details
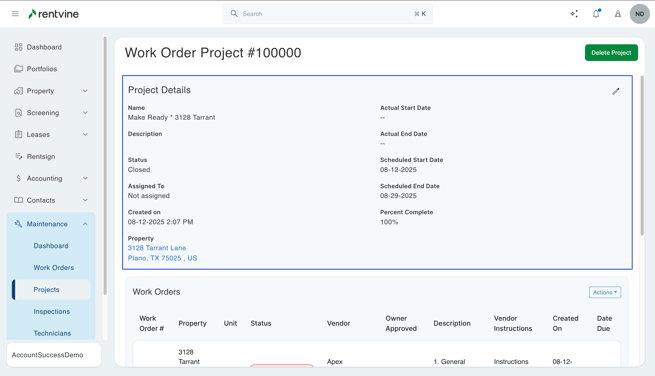
-
Manage Work Order Templates - Allows the users to add / edit the Work Order Templates on the account

-
Manage Work Order Project Templates - Allows the users to add / edit the Project Templates on the account
-
Manage Vendor Types - This allows users to edit the Vendor Types on the global settings page
-
Manage Appointment Settings - This allows users to edit the Appointment Settings on the global settings page
-
Manage Maintenance Settings - This allows users to edit the Work Orders Settings on the global settings page
Portfolios
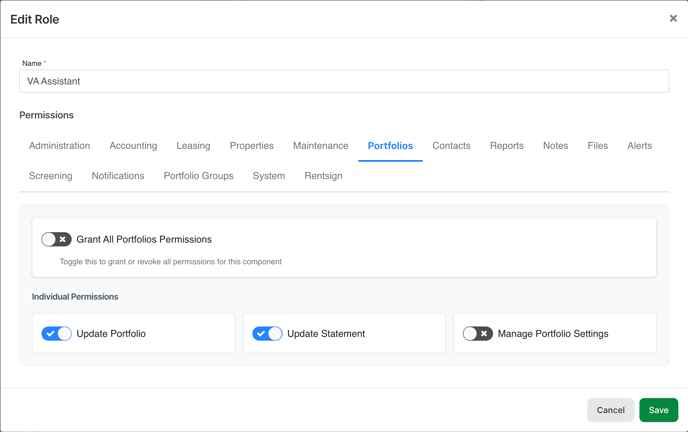
The top toggle in here is "Portfolios". If you toggle this on, it will turn on all toggles for this field, and will toggle off all if you toggle it off.
The other toggles are as follows:
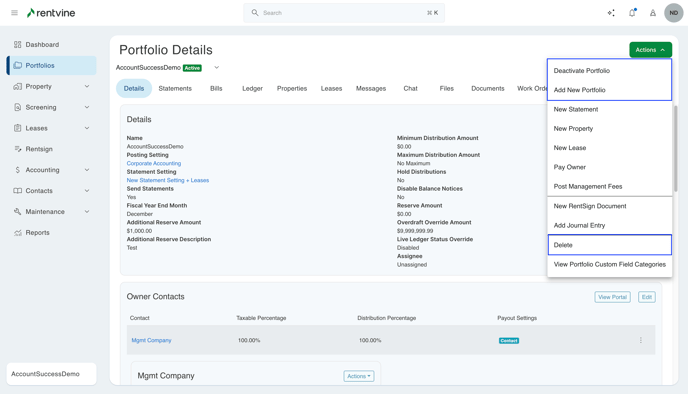
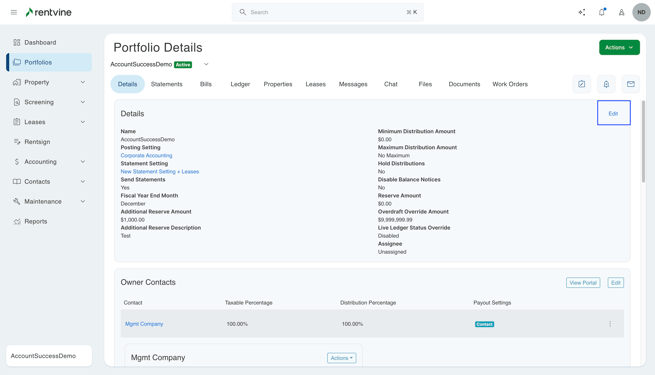
- Update Portfolio- This toggle will be used for a lot of the permissions within a portfolio. If this is toggled on, it will allow the user to create a new portfolio within the portfolio's main page. This will also allow them to deactivate a portfolio, delete a portfolio, and edit any of the details with a portfolio's "Details Tab".
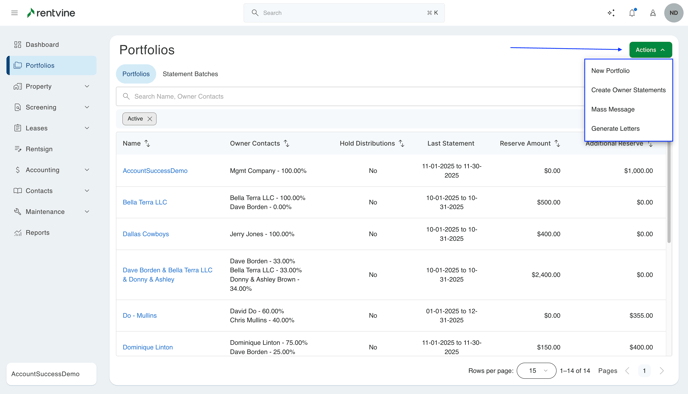
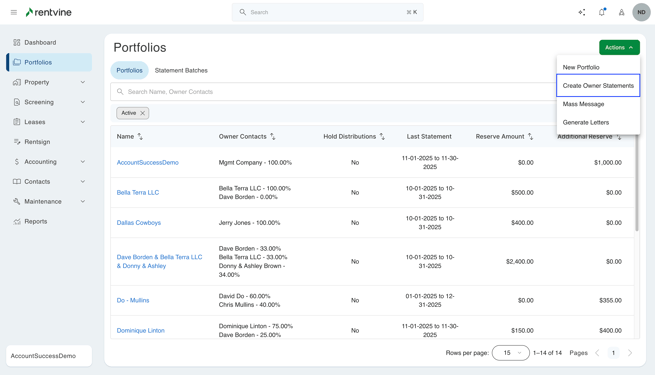
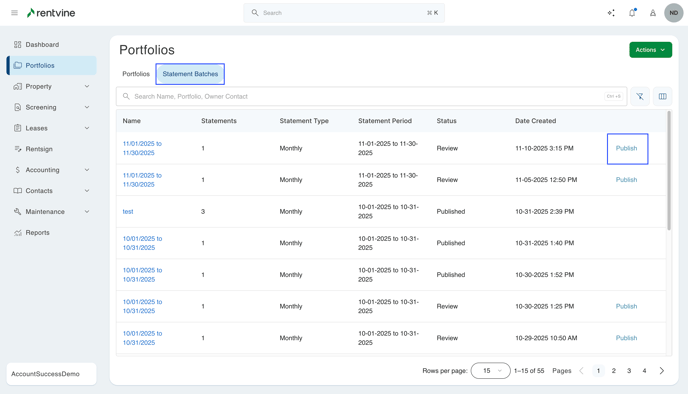
- Update Statement- This toggle will be for creating and sending statements to the owners. Please note that the toggle to Update Portfolio will need to be on for the user to create owner statements. With this on, they can create owners' statements from the portfolio's main page. This will also give the user permission to publish owner statements that are in the "Review" state. This will also allow the user to delete any owner statement batches that have been posted.

- Manage Portfolio Settings - This allows users to adjust the Portfolio Settings on the global settings page
Contacts

The top toggle in here is "Contacts". If you toggle this on, it will turn on all toggles for this field, and will toggle off all if you toggle it off.
The other toggles are as follows:
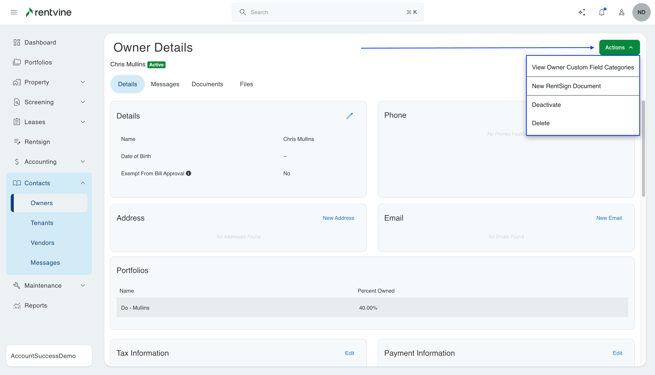
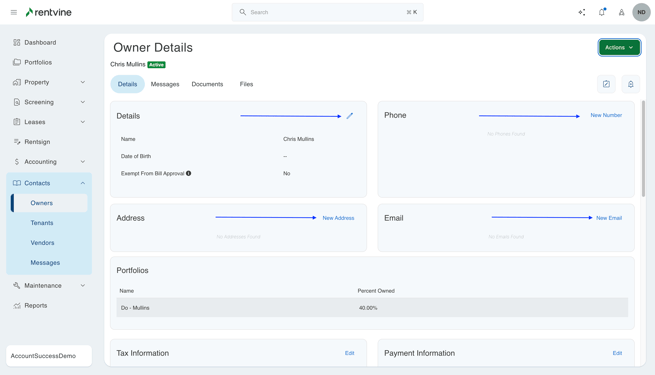
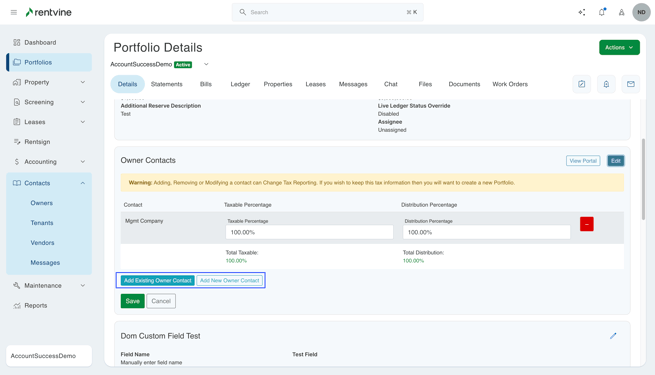
- Update Owner- this toggle will allow the user to change any information within an owner contact. This includes their phone number, email, address, tax information, payment information, and tax adjustments. This will also allow the user to deactivate or delete the owner contact. The last thing this toggle will do is allow the user to create new contacts from a specific portfolio page.
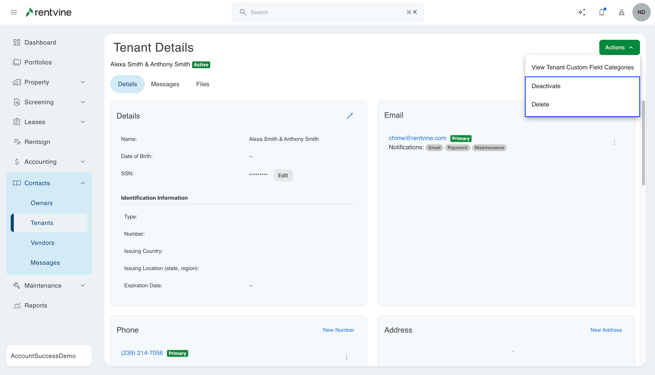
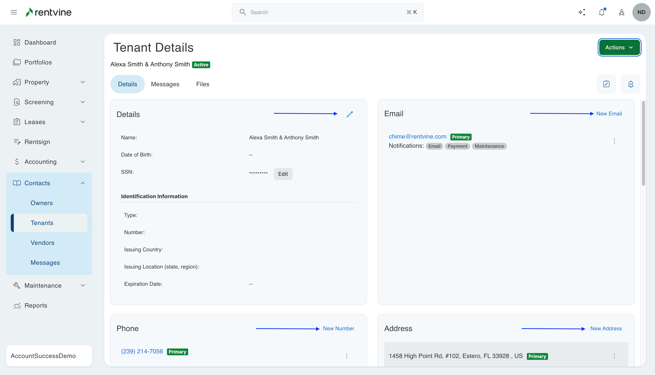
- Update Tenant- this toggle will allow the user to change any information within a tenant contact. This includes their phone number, email, address, and their details (name/DOB). This will also allow the user to delete or deactivate any tenant contact.
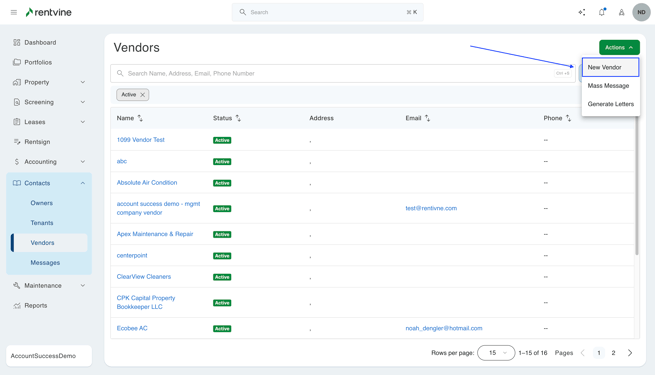
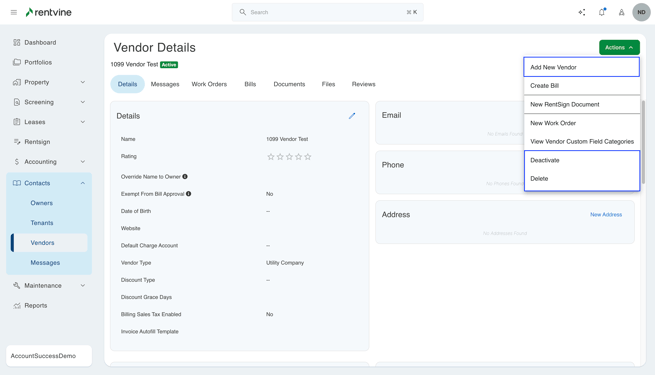
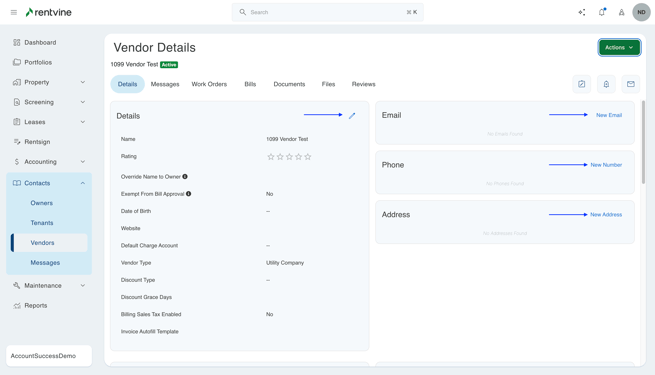
- Update Vendor- this toggle will allow the user to create a vendor contact from the vendor's main page. They can also change any information within a vendor contact. This includes their details, email, phone, address, payment information, insurance information, tax information, etc. They will also be able to deactivate or delete any vendor contacts within the system.
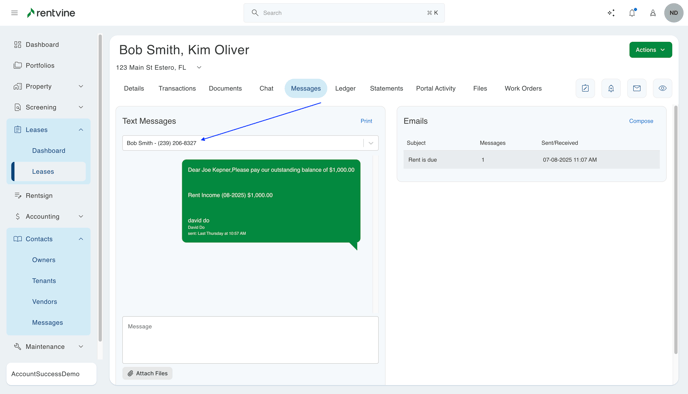
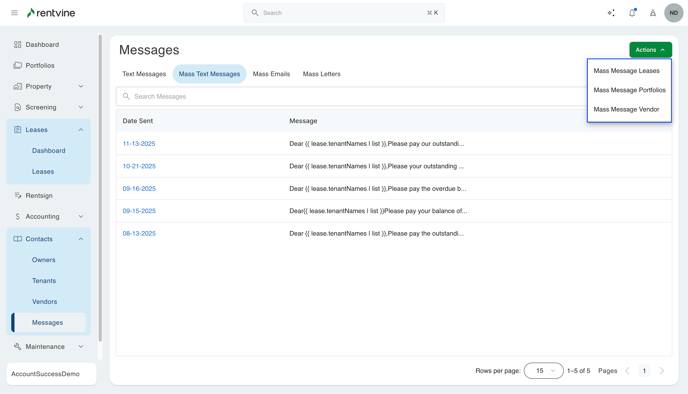
- Send Messages- This toggle will affect all of the messages tabs around the system. You will see these message tabs on individual portfolios, leases, all contacts (vendor, owner, tenant), work orders, and the mass messages section. This will allow the user to send either emails or text messages on whichever respective messages tab they are on.
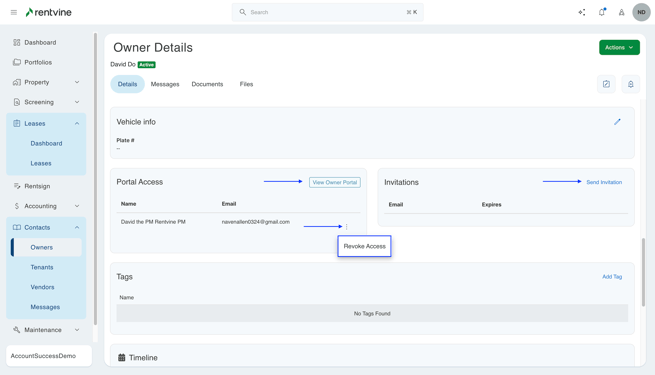
- Manage Portal Access- this toggle will be for portal access for all contacts (owner, tenant, vendor). It will allow the user the ability to go into any of these contacts and go to the "Portal Access" box. If they click the ellipses, they can click revoke access so that the contact will not be able to get into their portal. This will also give the user the ability to send invites to all of these contacts for access to their portal. Please note that the toggles for Update Owner, Update Tenant, and Update Owner will need to be on in order for the user to control the portal access on each of these contacts.
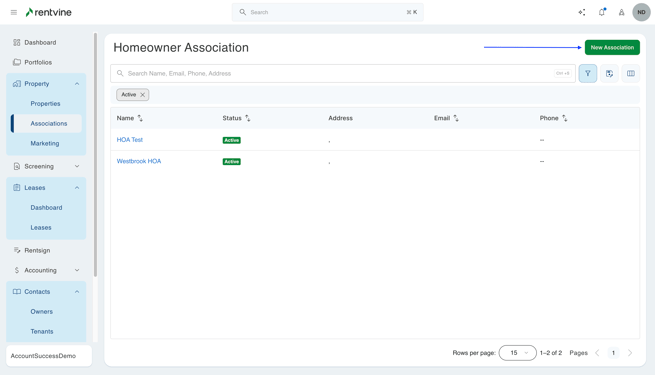
- Update Association- this toggle will be under the "Properties" tab for "Associations". This will also allow them to edit any information within the details sections of specific Association contacts. This includes details, email, phone, tax information, payment information, and address. They will also have the ability to deactivate or delete any association contact. Please note that the setting for Update Vendor will need to be on to update all of this information, because an HOA contact is like a vendor contact.
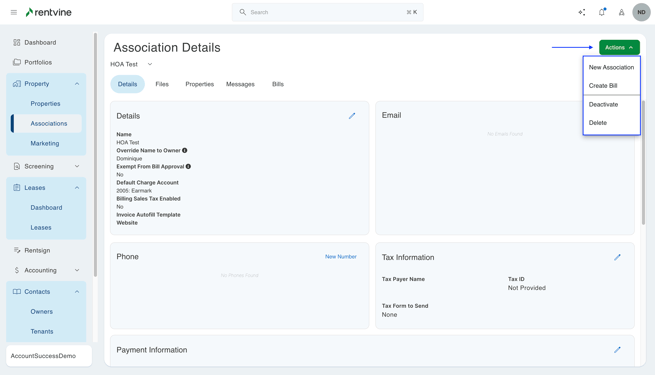
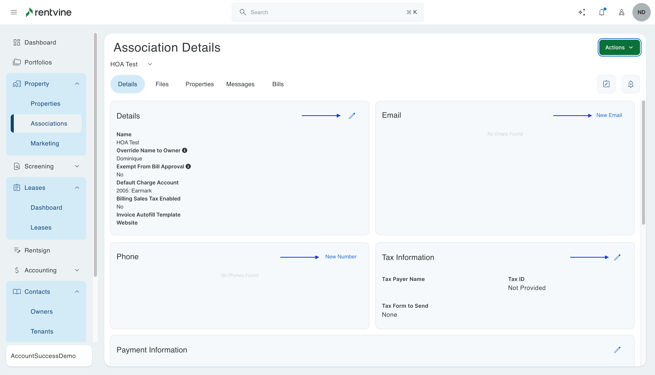
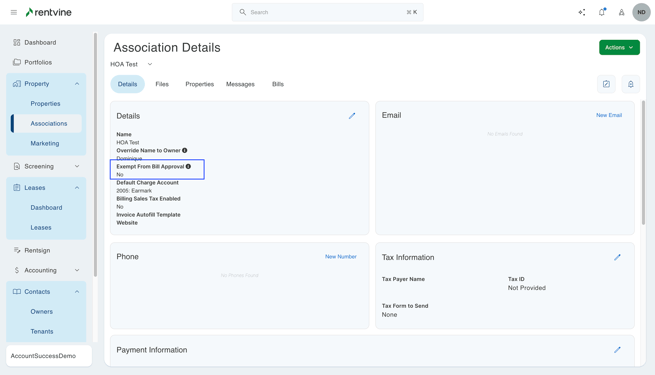
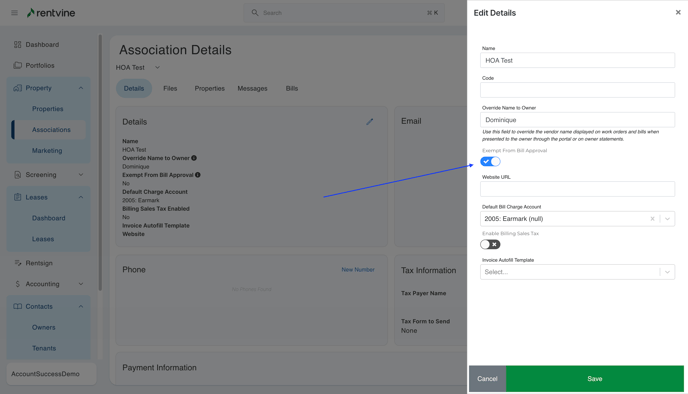
- Update Bill Approval Exemption- this toggle will be in the contact section for owners, vendors, and associations. In the details section of each of these contacts, there will be a toggle for "Exempt from Bill Approval". This role setting will allow the user to turn that on or off. This will make it so whenever a bill is created using any of these contacts with this on it will not need to be approved before it can be paid.
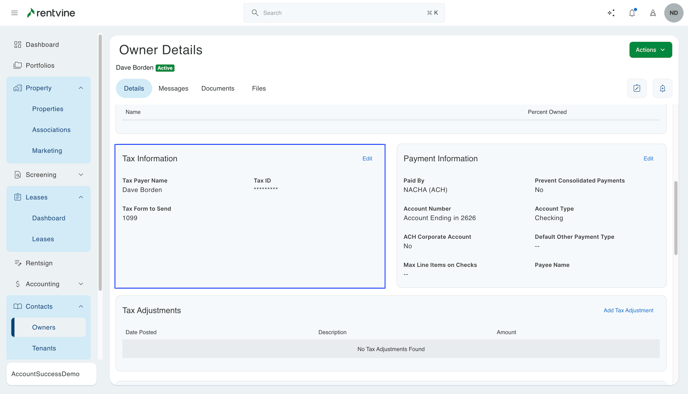
- Manage Tax Info- This toggle will allow the user to edit and view the tax information that is set for any owner or vendor in the system.
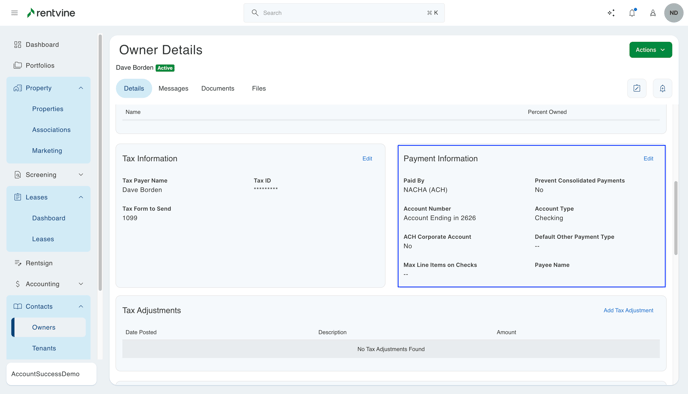
- Manage Payment Information- This toggle will allow the user to edit and view the payment information that is set for any owner or vendor in the system.
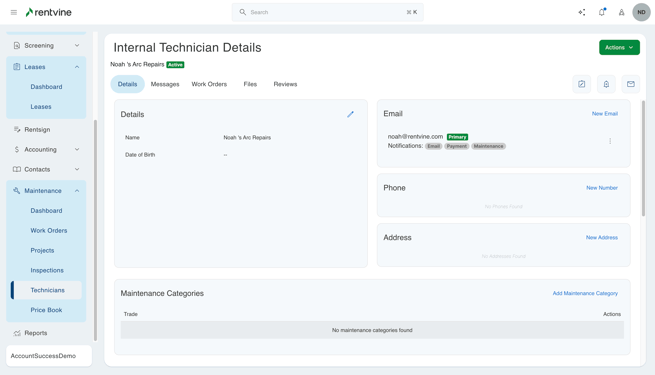
- Update Maintenance Technician Details - This gives the user the ability to adjust the Technician Contact details
Reports
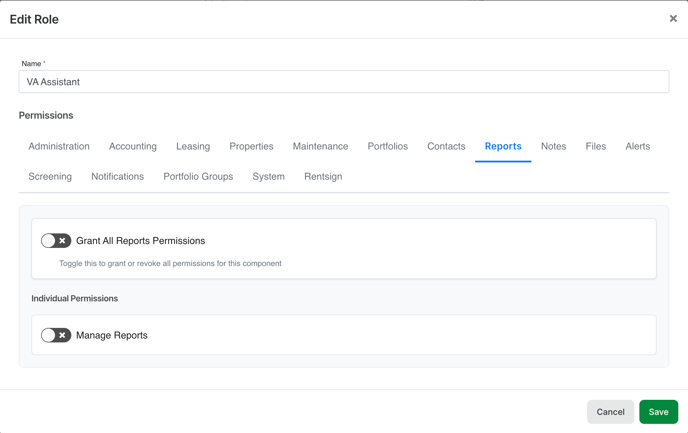
The top toggle in here is "Reports". If you toggle this on, it will turn on all toggles for this field, and will toggle off all if you toggle it off.
The only other toggle here is to:
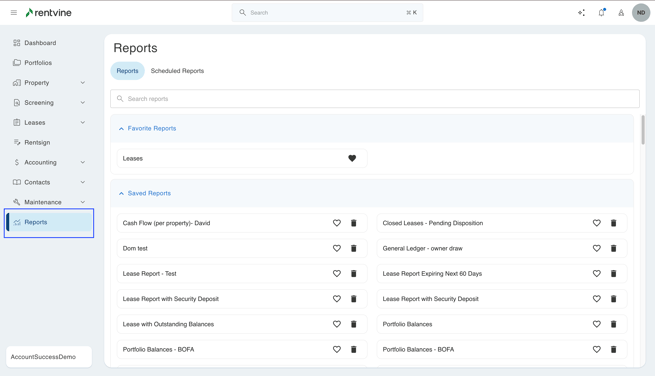
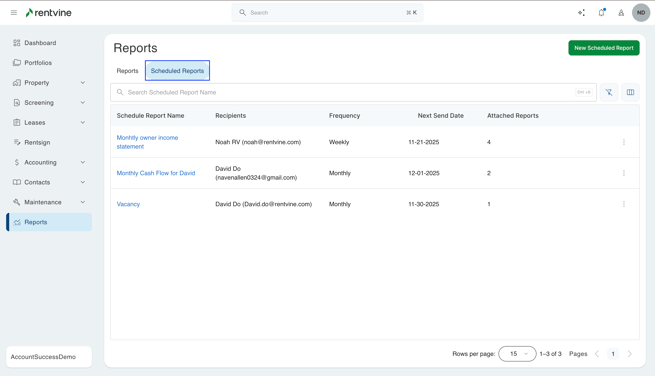
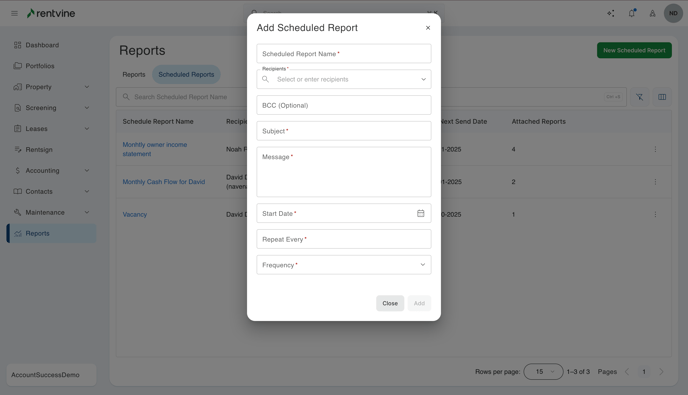
- Manage Reports- This toggle will affect everything regarding the "Reports" tab. This will allow the user to run any of the reports in this tab. It will also allow the user to create saved reports. The last thing it will allow the user to do is to run scheduled reports and be able to select who these are sent out to.
Notes
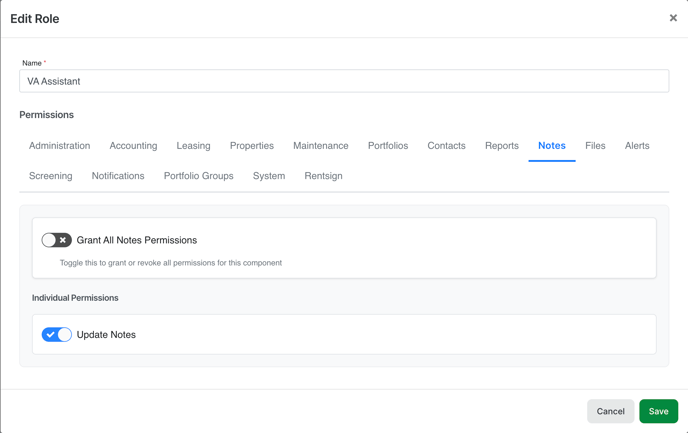
The top toggle in here is "Notes". If you toggle this on, it will turn on all toggles for this field, and will toggle off all if you toggle it off.
The only other toggle here is to:
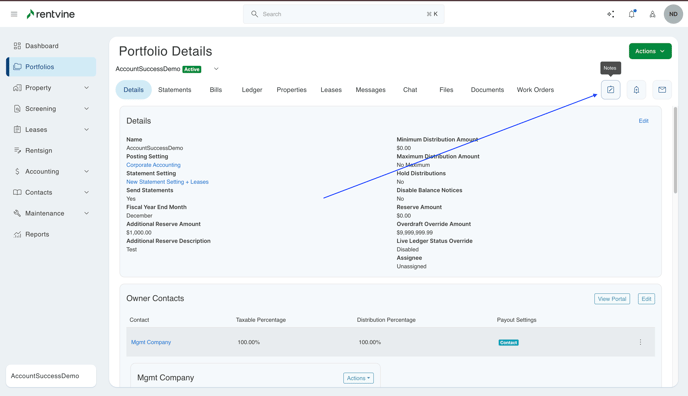
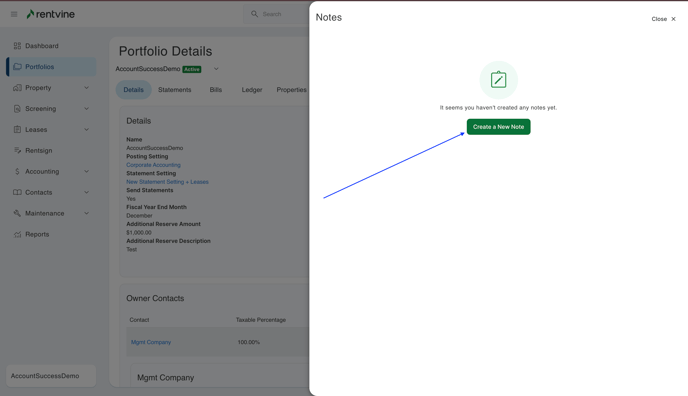
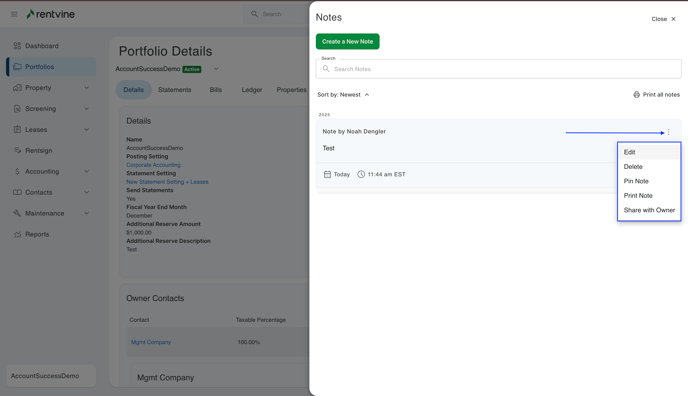
- Manage Notes- This toggle will affect notes for the entire system. Notes are in a sidebar if you click on the two blue arrows in the top right. These are on most of the pages, for example, portfolios, properties, leases, work orders, accounting transactions, etc. This will allow the user to create new notes, delete notes, edit notes, and share these notes with a tenant/owner. Please note that notes are specific to a certain page and will be different for every specific portfolio, property, lease, etc. that you are on.
Files
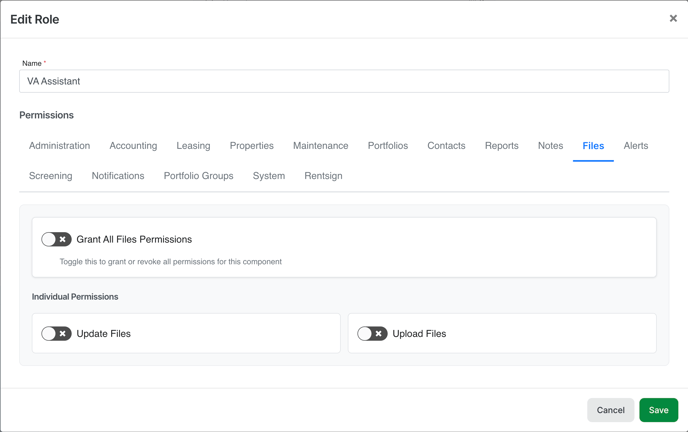
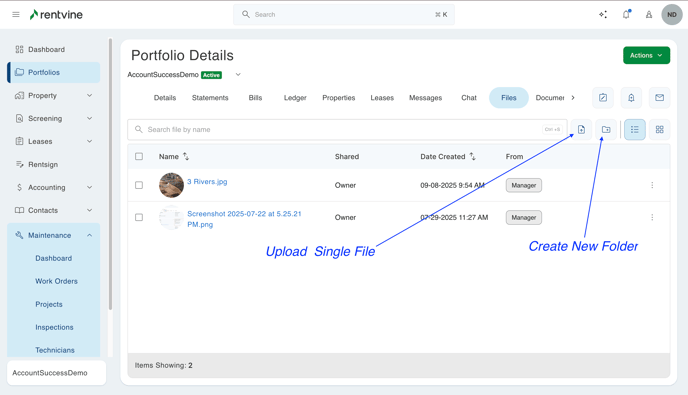
The top toggle in here is "Files". If you toggle this on, it will turn on all toggles for this field, and will toggle off all if you toggle it off. Please note that this top toggle will also allow the user to share the files with either the tenant or the owner. It will also allow the user to create folders.
The other toggles are as follows:
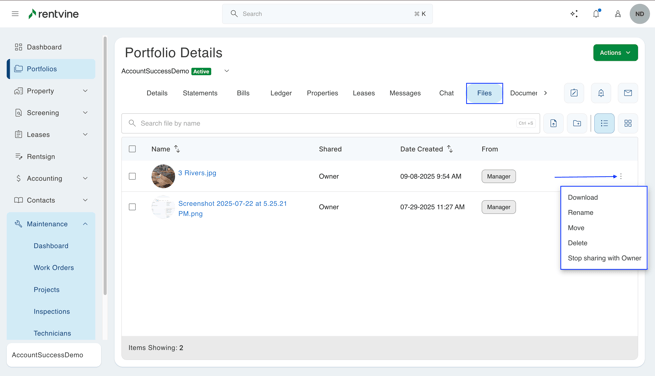
- Update Files- this toggle will affect all of the files tabs within your Rentvine account. In some places, you will see these file tabs under portfolios, properties, leases, work orders, and bills. This will allow to user to download, rename, move files to different folders, and delete any files that are already uploaded within the system.
- Upload Files- This toggle will affect all of the files tabs within your Rentvine account. In some places, you will see these file tabs under portfolios, properties, leases, work orders, and bills. This will allow the user to upload any files they have straight from their computer into whatever file tab they are under.
Alerts
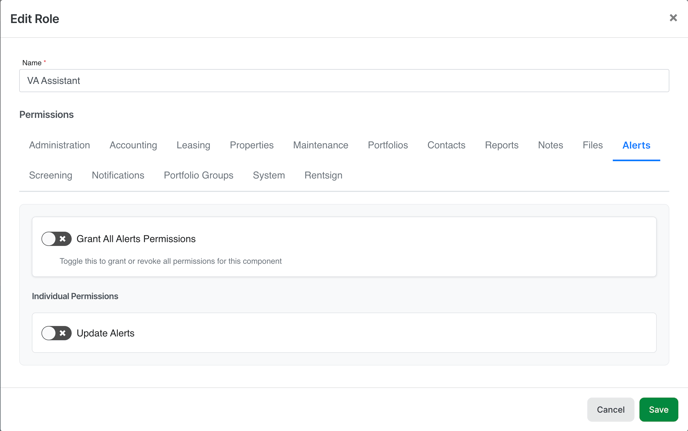
The top toggle in here is "Notes". If you toggle this on, it will turn on all toggles for this field, and will toggle off all if you toggle it off.
The only other toggle here is to:
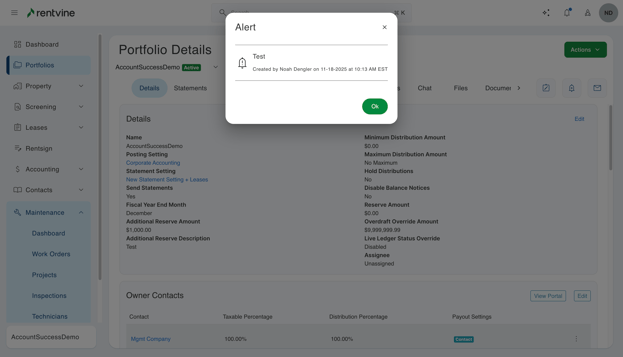
- Update Alerts- This toggle will affect alerts for the entire system. Alerts are in a sidebar if you click on the two blue arrows in the top right. Alerts work by popping up on the screen whenever any user on your account enters a tab with an alert attached. These are on most of the pages, for example, portfolios, properties, leases, work orders, accounting transactions, etc. This will allow the user to create new alerts, delete alerts, edit alerts, and select any toggles that might appear on alerts that are associated with certain tabs. Please note that alerts are specific to a certain page and will be different for every specific portfolio, property, lease, etc. that you are on.
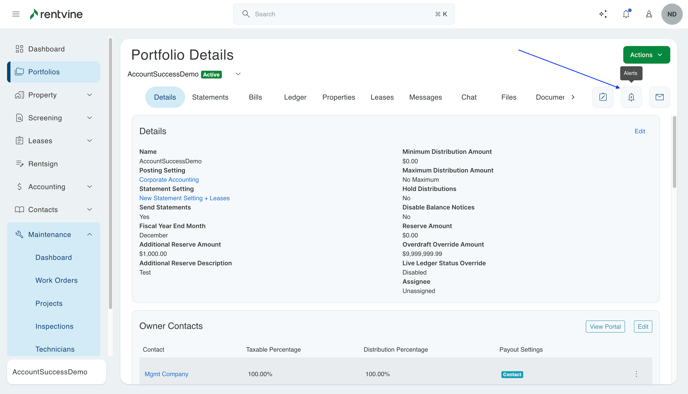
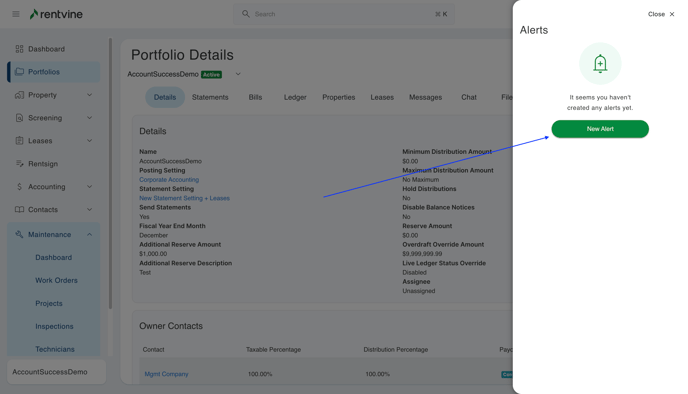
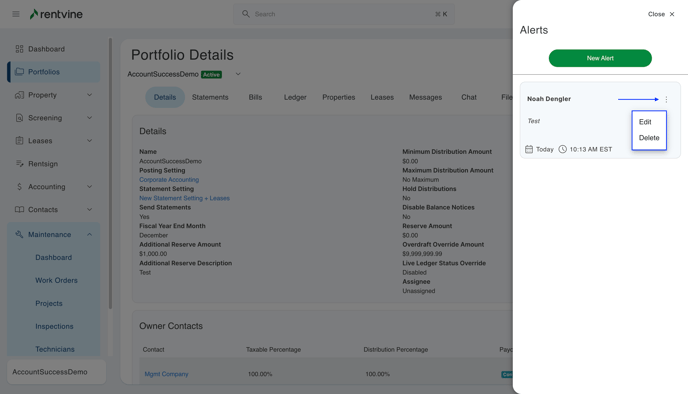
Here is an example of how that alert will look for you and your users whenever they click on a page with an alert attached:
Screening
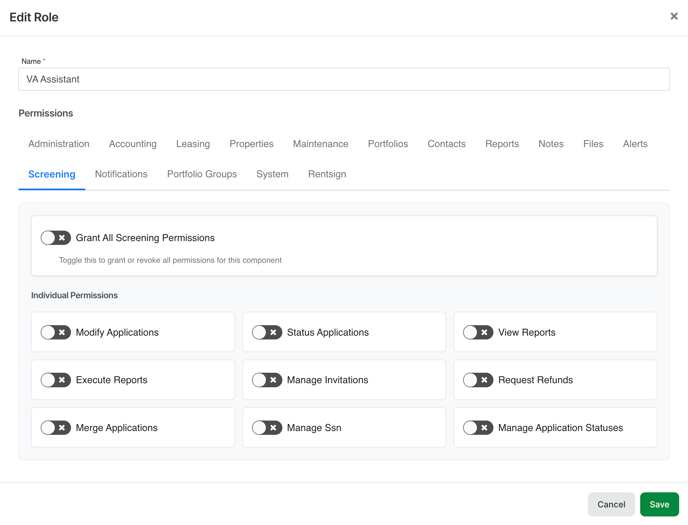
The top toggle in here is "Screening". If you toggle this on, it will turn on all toggles for this field, and will toggle off all if you toggle it off.
The other toggles are as follows:
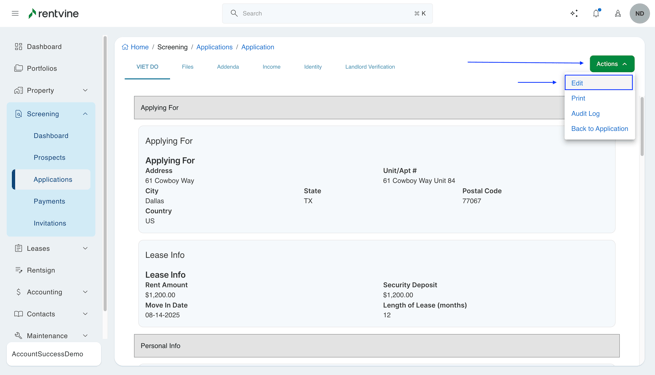
- Modify Applications- This toggle will allow the user to go into any specific application and edit the information. They can do this by clicking on an application and then going down and clicking View Applicant. In the green actions button, they will have the option to edit.
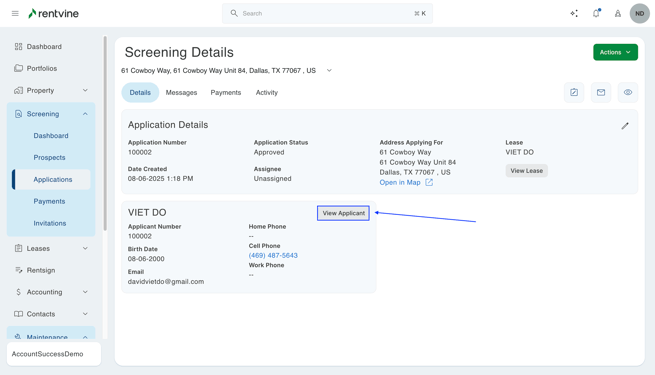
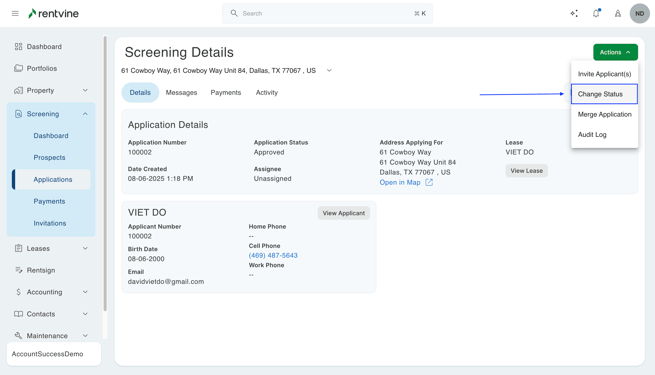
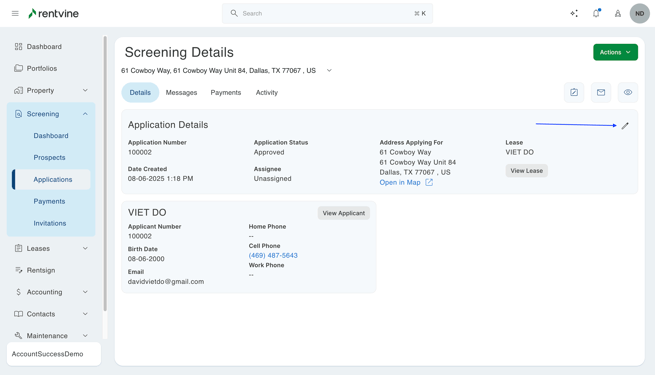
- Status Applications- This toggle will allow the user to change the status of any application in Rentvine. This will also allow the user to edit the address the applicant is applying for from the main details page of the application.
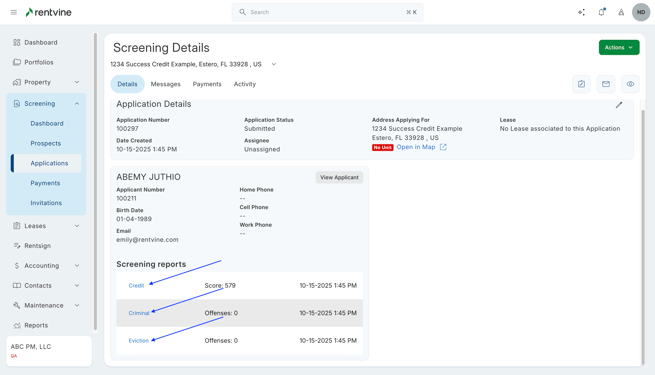
- View Reports- This toggle will allow the user to view any screening/credit reports that have been run for any applicants. This will be under the screening reports section of any specific applicant.
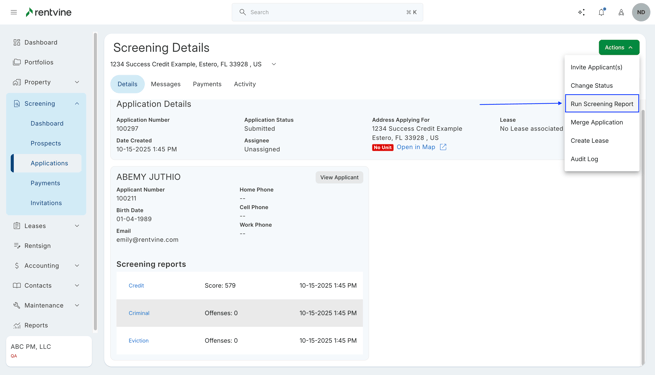
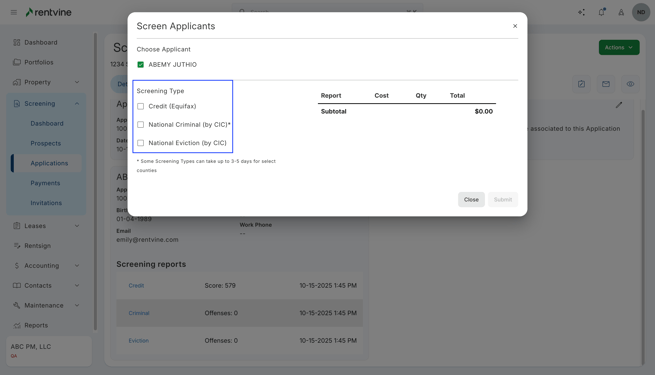
- Execute Reports- This toggle will allow the user to run a screening/credit report for any applicant in Rentvine. They will be able to do this by clicking on an application, then clicking the green actions button. In here, they can click run credit report.
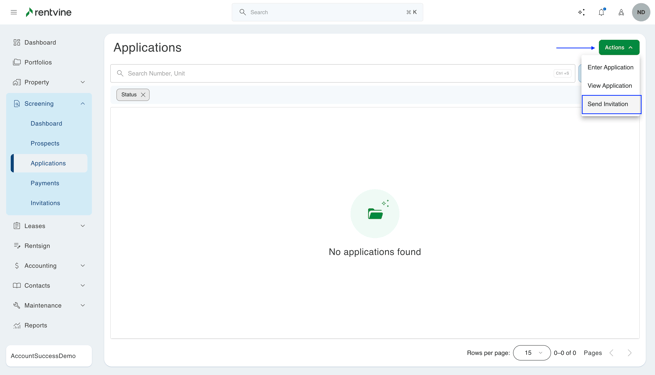
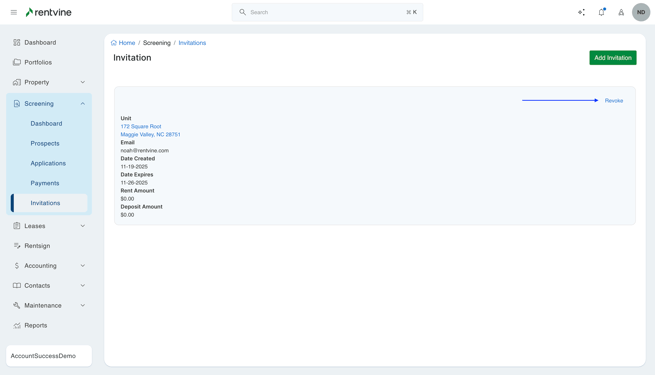
- Manage Invitations- This toggle will allow the user to send invites to any email address for any of the properties in Rentvine. They can do this from the applications screen by clicking the green actions button and then sending an invite. They will also be able to do this from the "Invitations" tab by clicking send invitation in the top right. The last thing this toggle will do is allow the user to click on current invites and click "Revoke" to revoke access to that application.
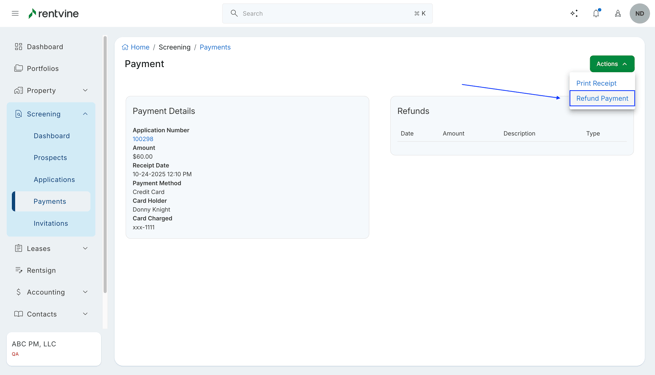
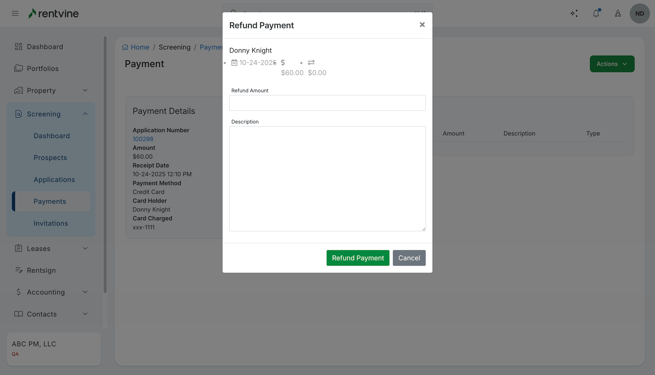
- Request Refunds- this toggle will be for the "Payments" tab under "Screening". This will allow the user to process refunds to applicants. They can do this by going to the payments tab and clicking on a specific payment. In here, they can click the green actions button and click refund.
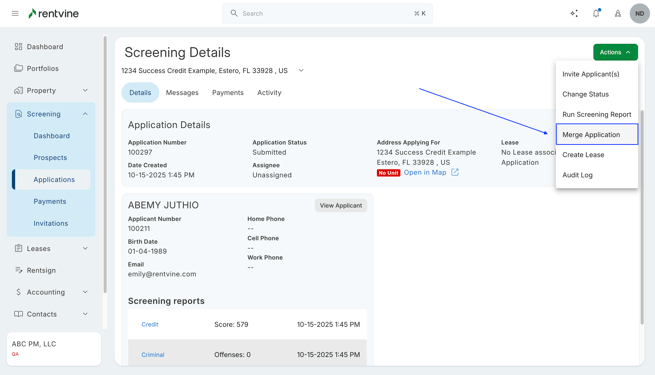
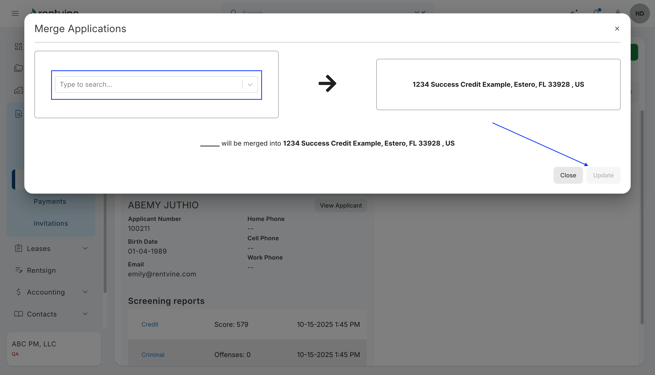
- Merge Applications- This toggle will allow the user to merge applications and combine all of the applicants. If this is done, it will combine both of the applications, making it one, and add all of the applicants together and making it so you can screen them all together.
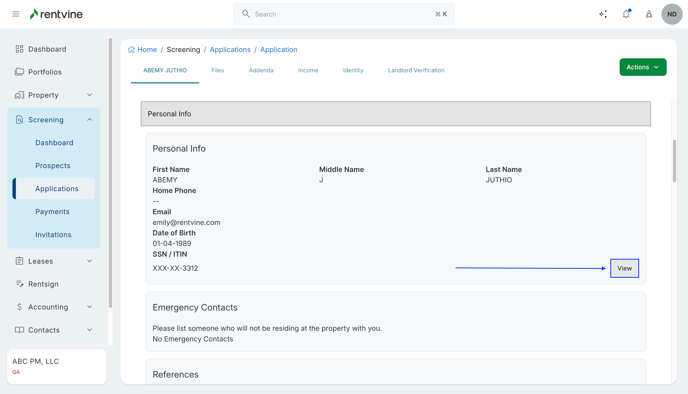
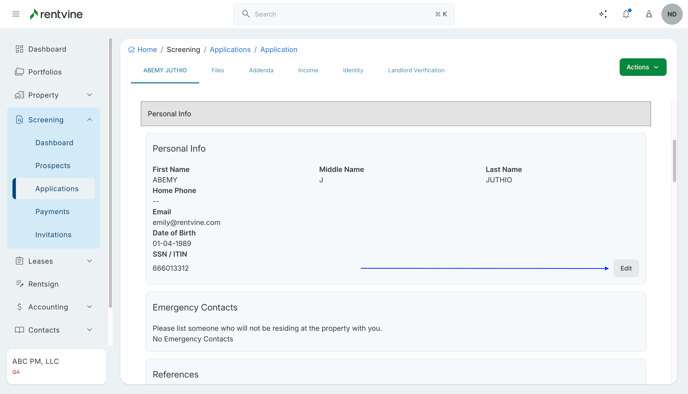
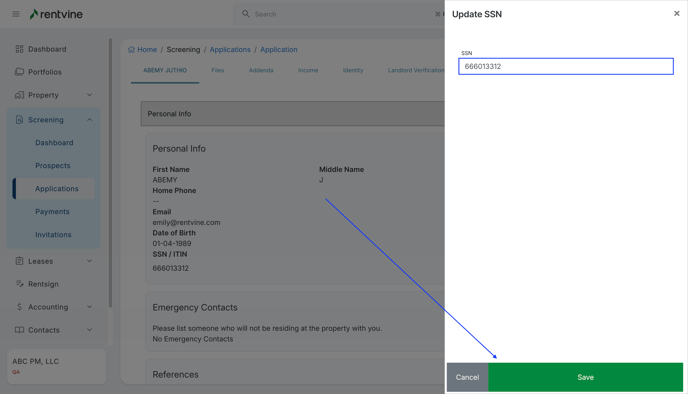
- Manage SSN- This toggle will allow the user to view and edit the Social Security number for any applicants. They can do this by clicking on an application and clicking View Applicant. In the personal info, they will be able to click View next to the SSN field, and this will show the applicant's SSN. Then they will be able to click edit and change that if needed.
- Manage Application Statuses - Allows the users to edit the Application Statuses Settings on the global settings page
Notifications
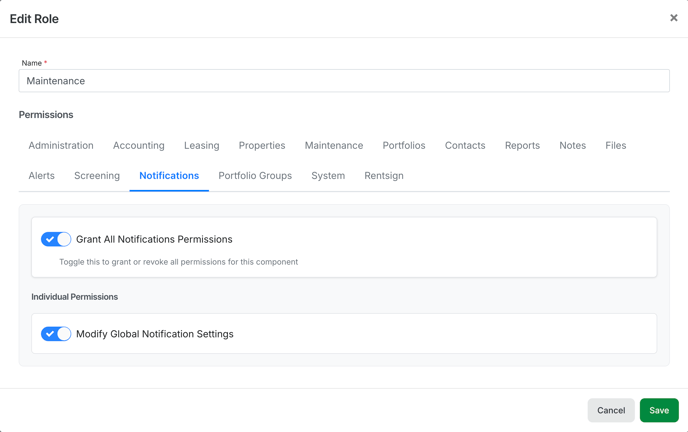
The top toggle in here is "Notifications". If you toggle this on, it will turn on all toggles for this field, and will toggle off all if you toggle it off.
The other toggles are as follows:
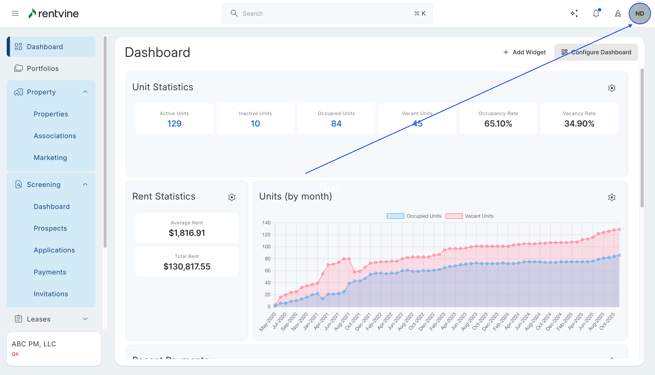
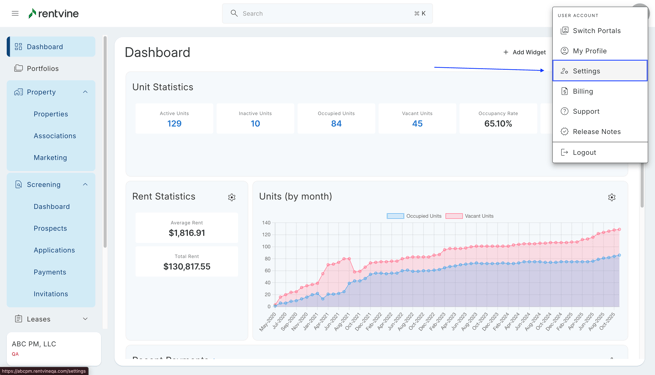
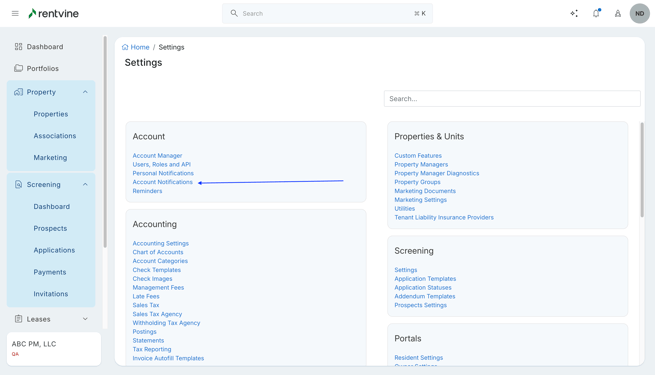
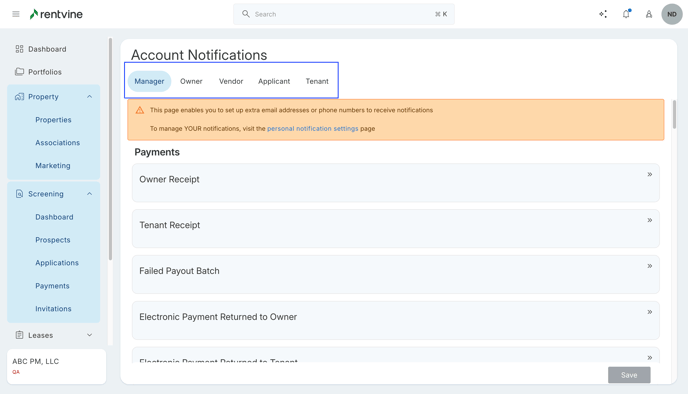
- Modify Global Notification Settings- This toggle will allow the user to modify the notifications globally for the whole system. To do this, click on the ellipsis by your name and select settings. Under the Account settings, select Notifications. This will display all the global notifications we currently have in the system for the following: Manager/Tenant/Owner/Vendor/Applicant.
Portfolio Groups
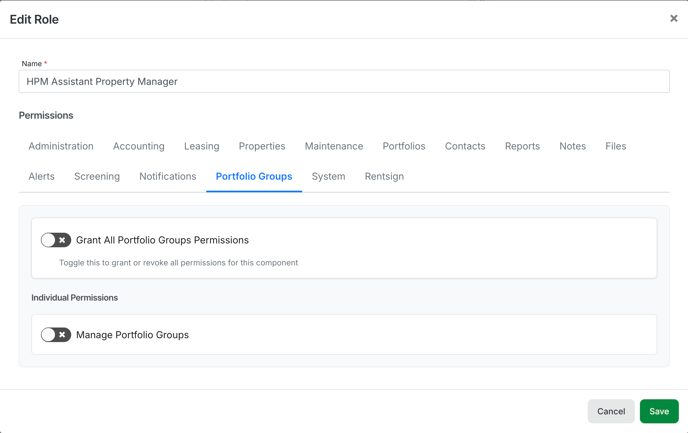
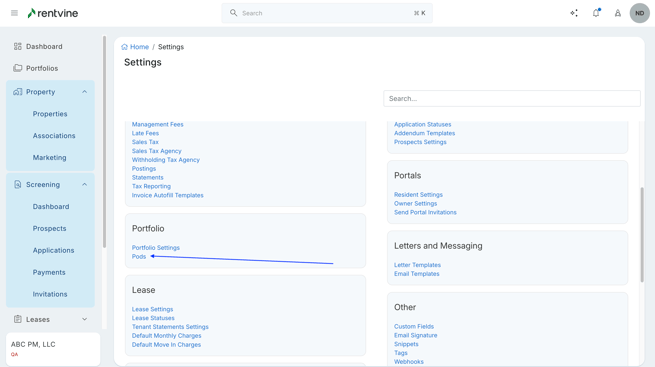
- Manage Portfolio Groups - This allows users to adjust the Pods settings, groups, and users associated within the global settings
System
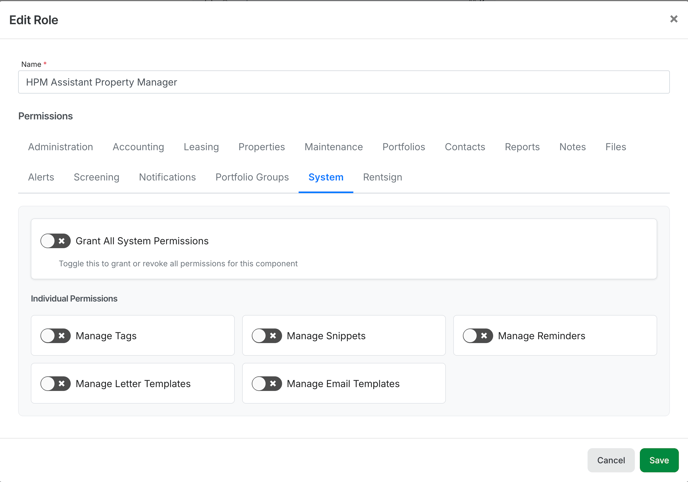
- Manage Tags - Allows users to adjust the Tags Setting in the global settings
- Manage Snippets - Allows users to adjust the Snippets Setting in the global settings
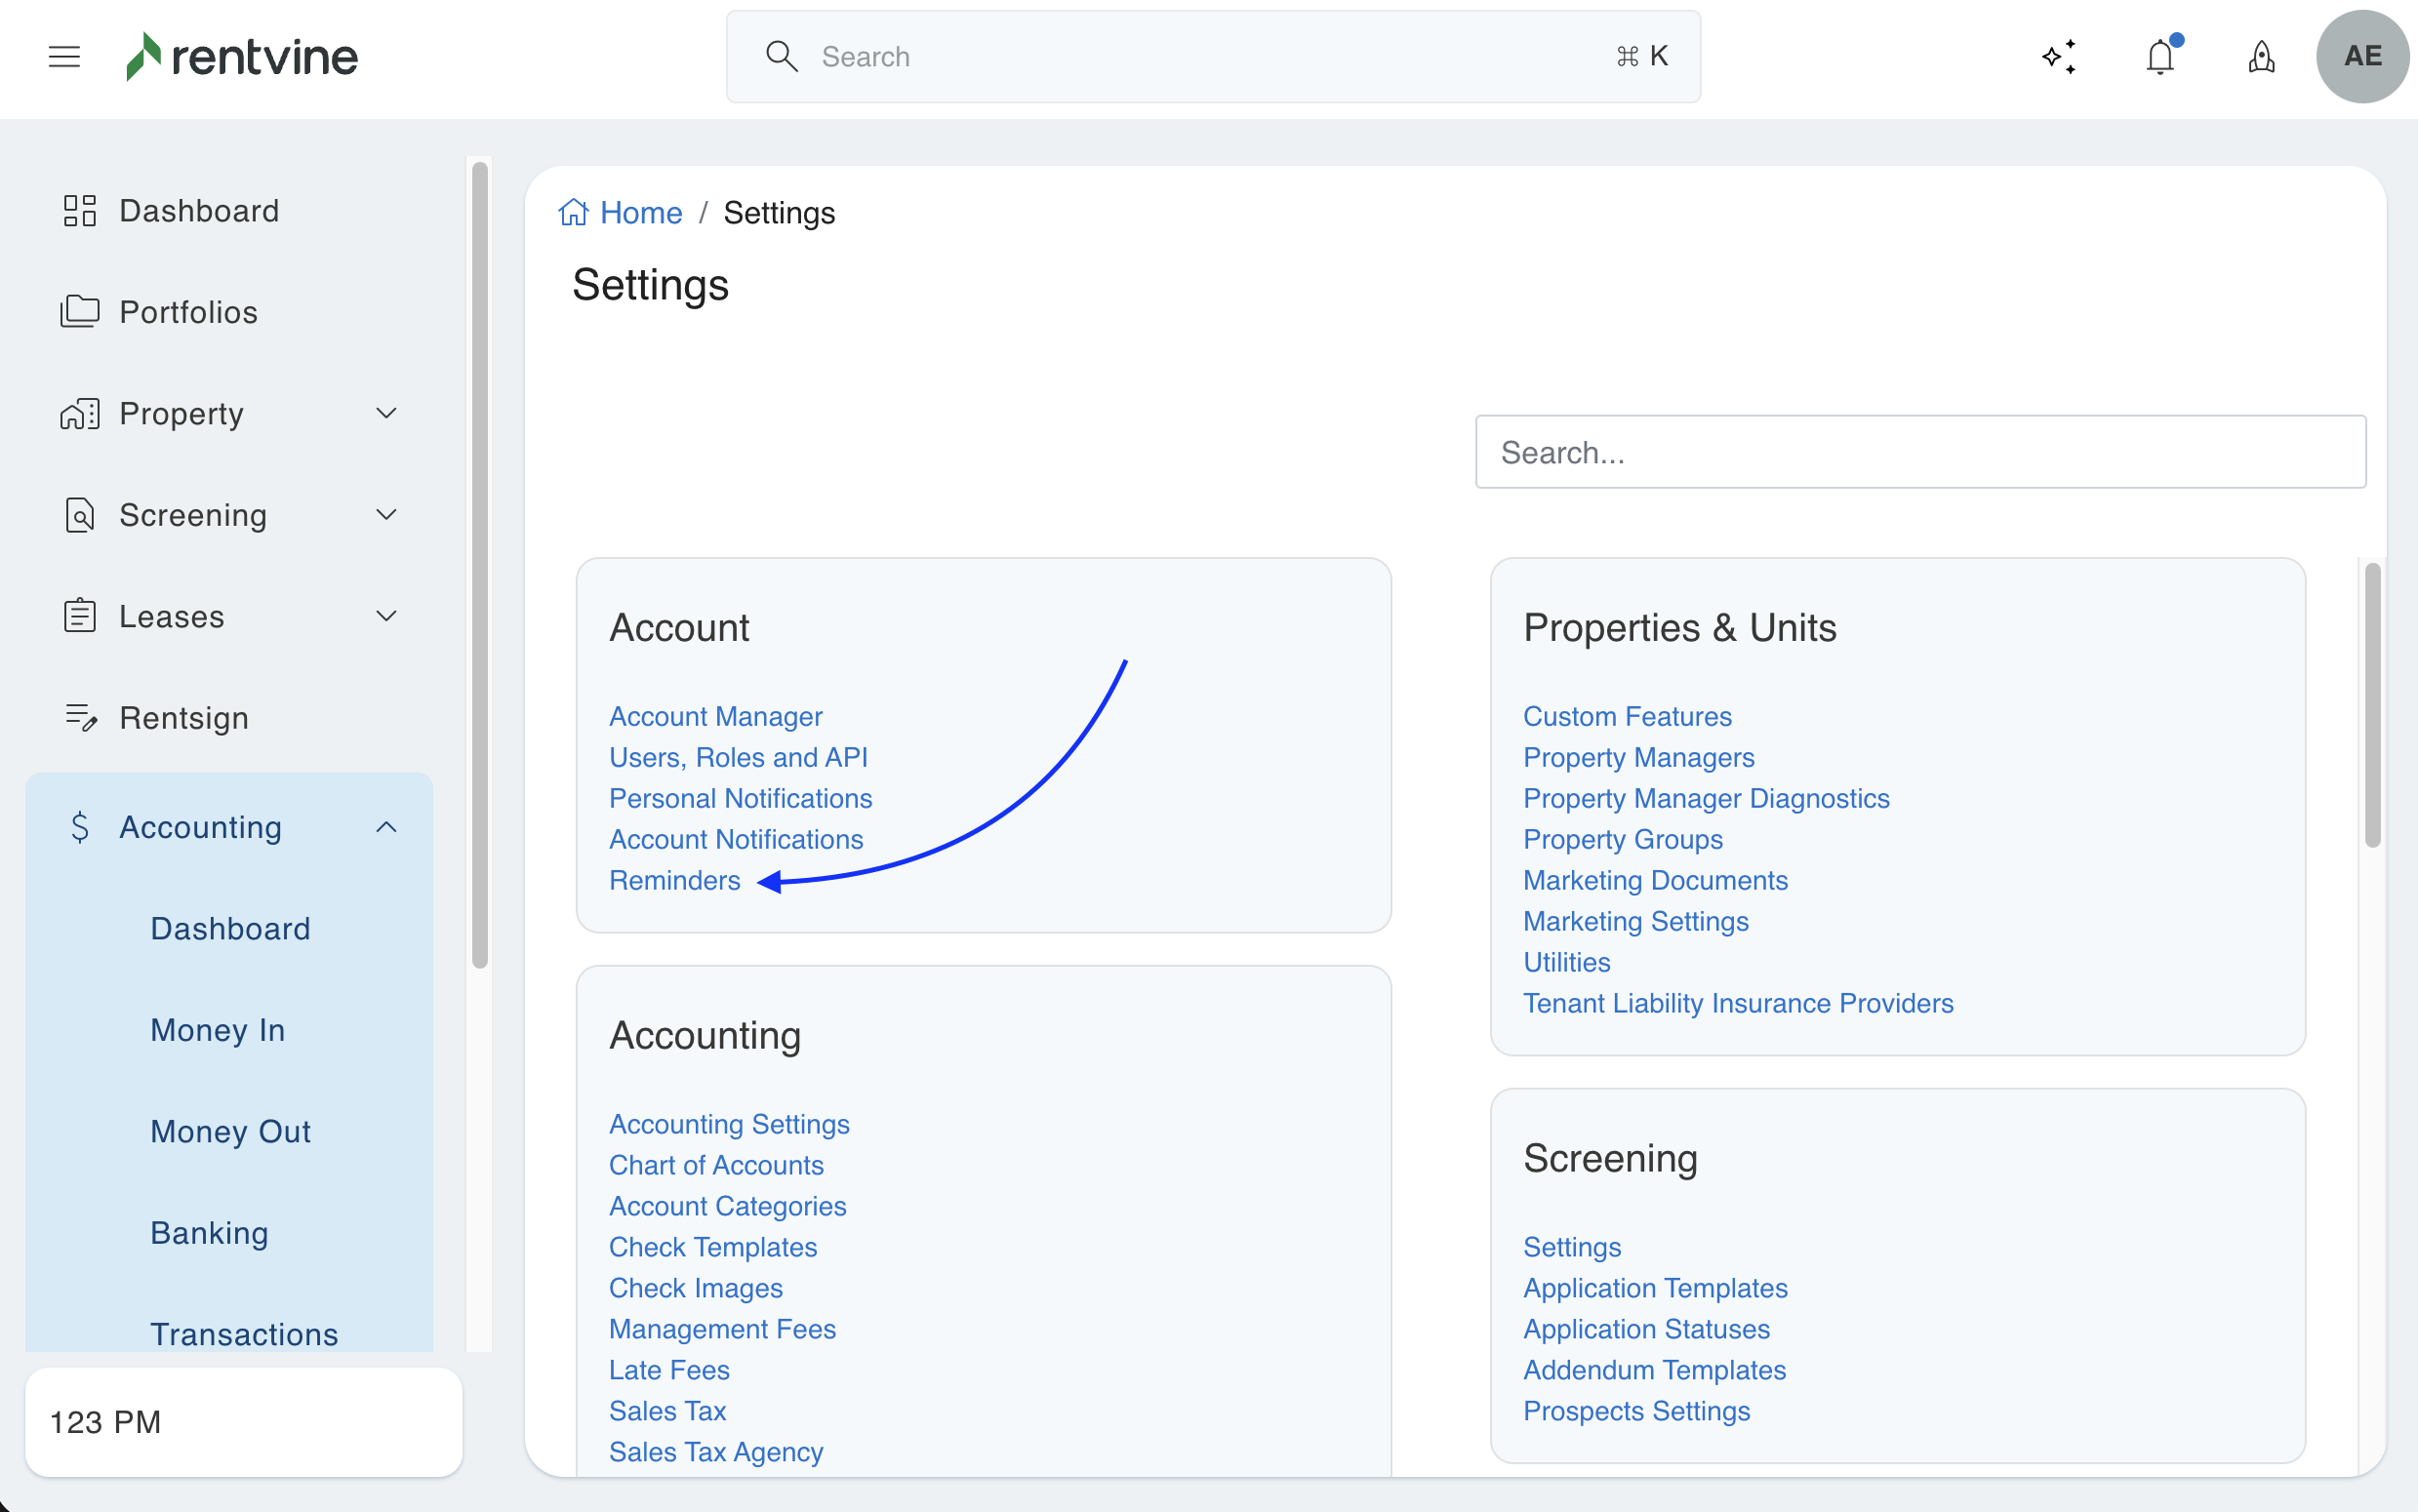
- Manage Reminders - Allows users to adjust the reminders in the Reminder Section in the global settings
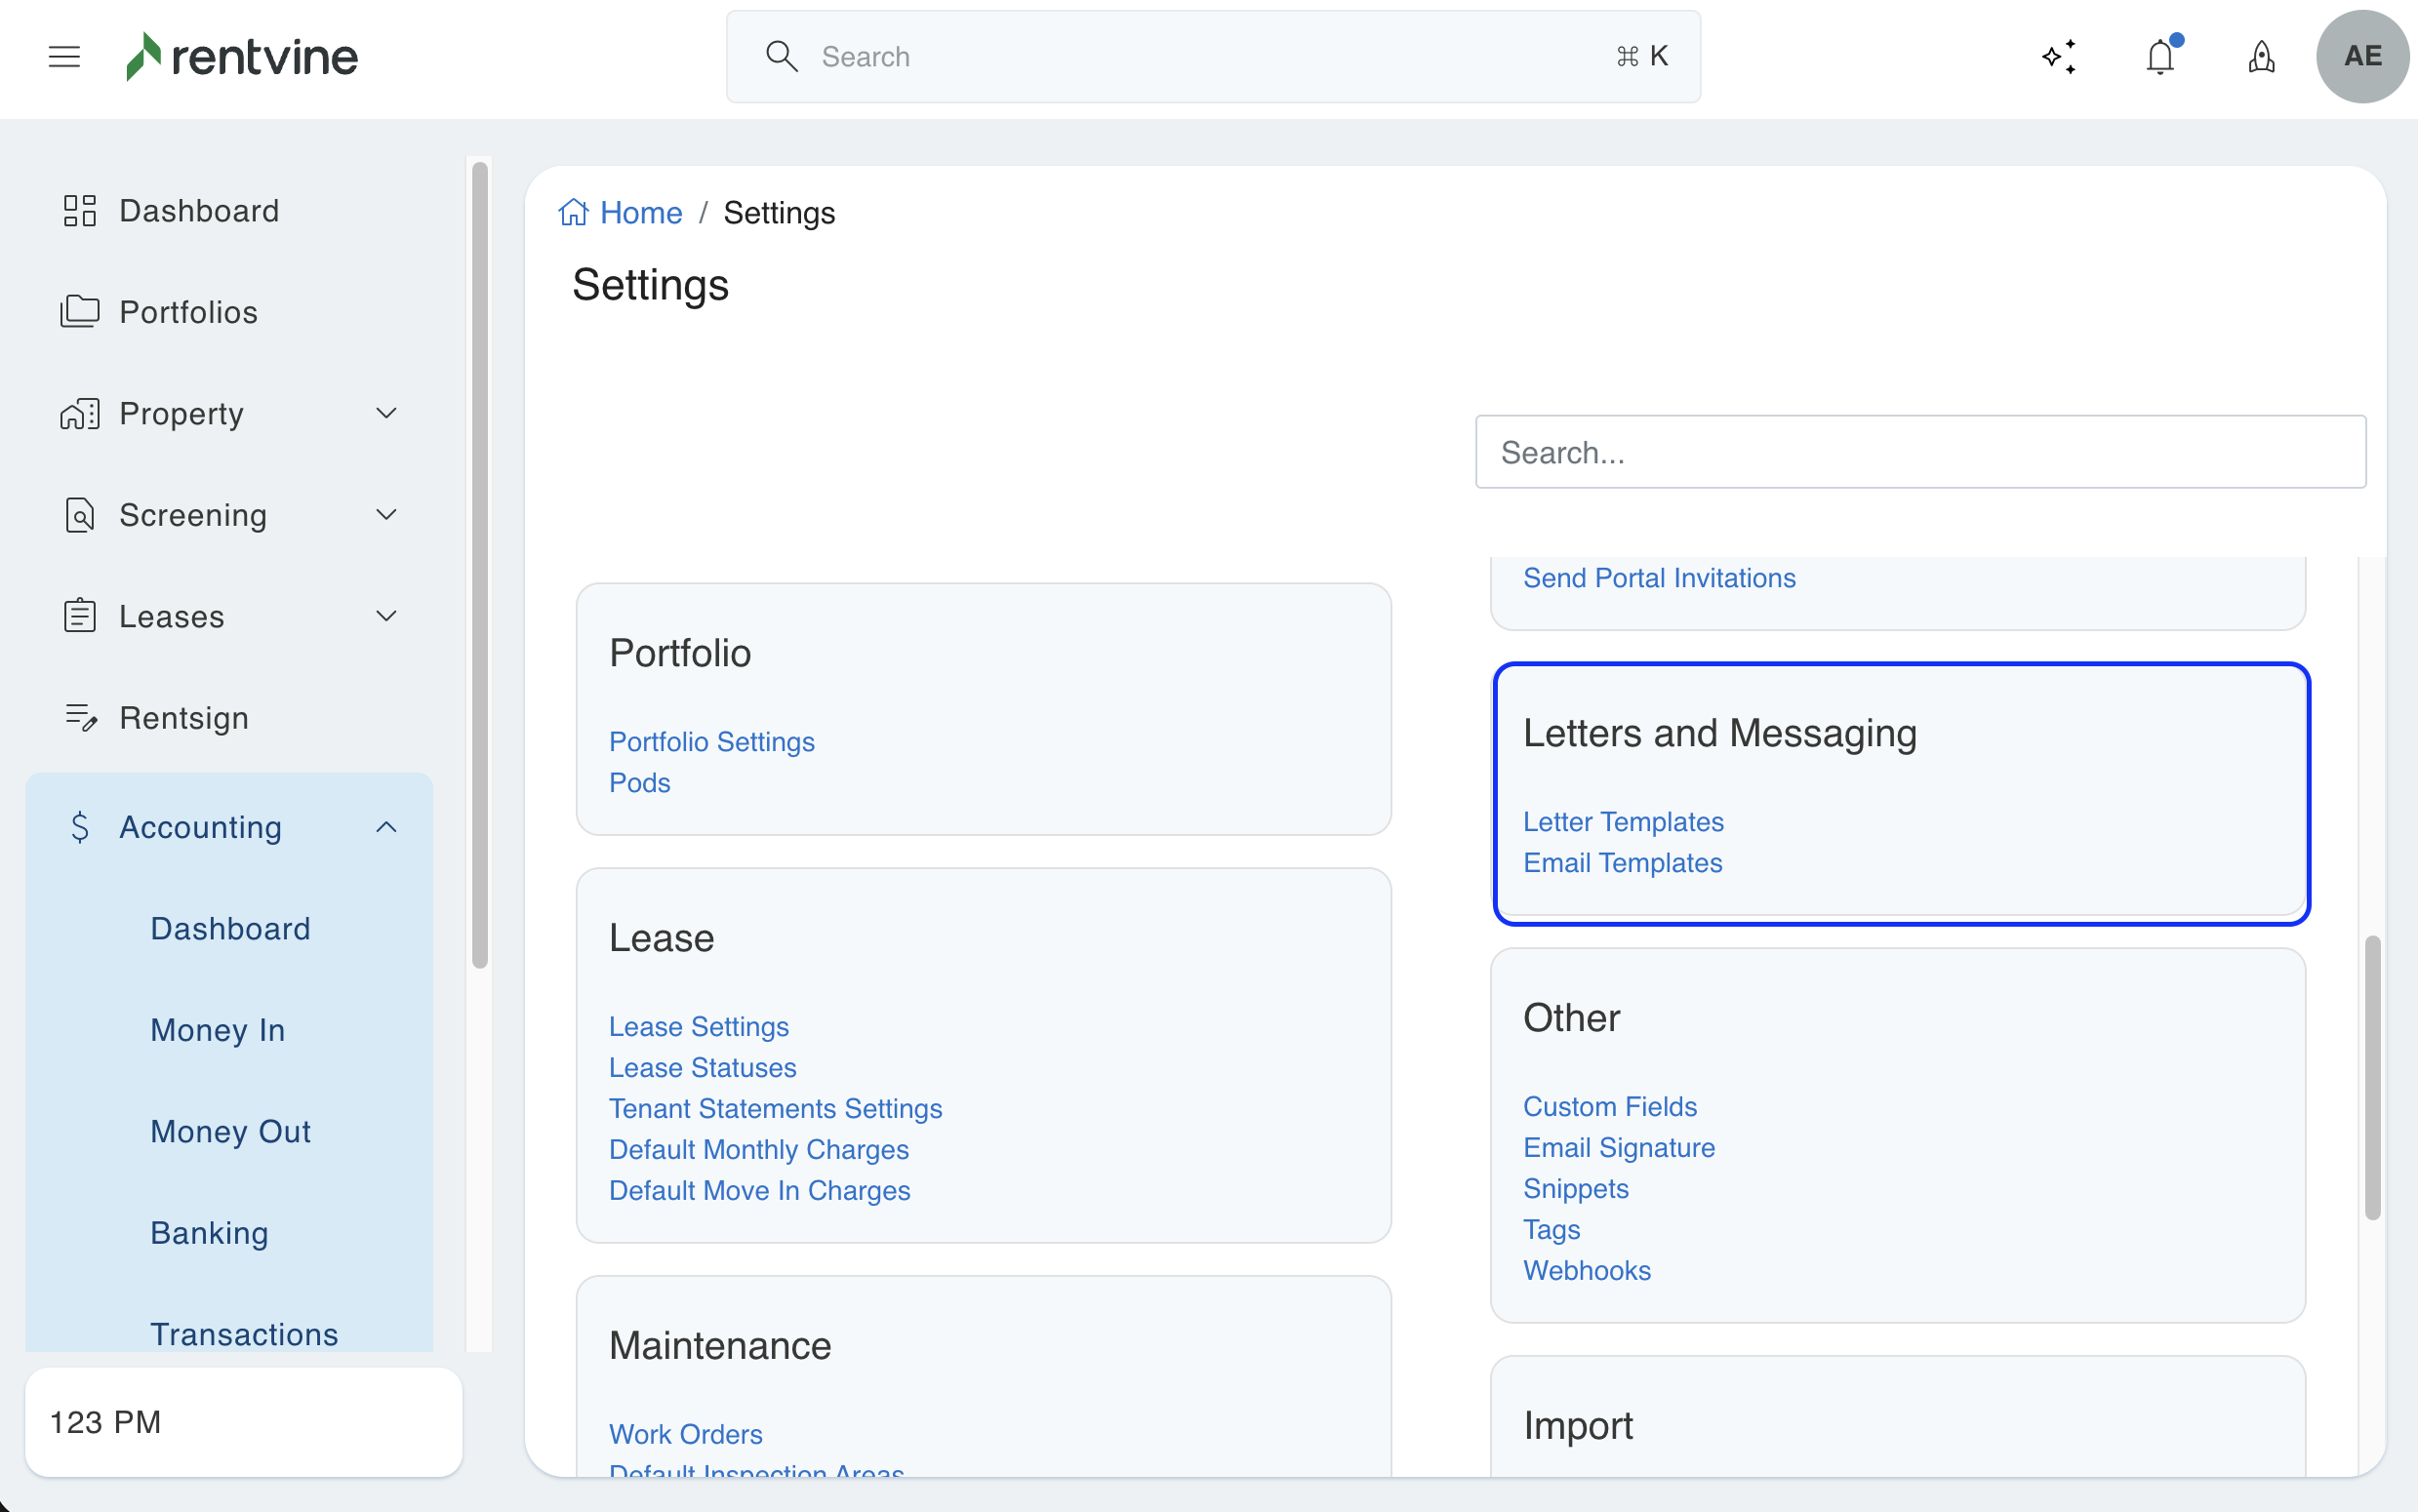
- Mange Letter Templates - Allows users to adjust the Letter Templates in the global settings
- Manage Email Templates - Allows users to adjust the Email Templates in the global settings
Rentsign
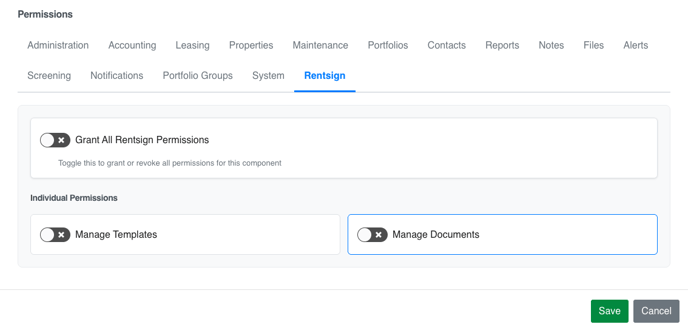
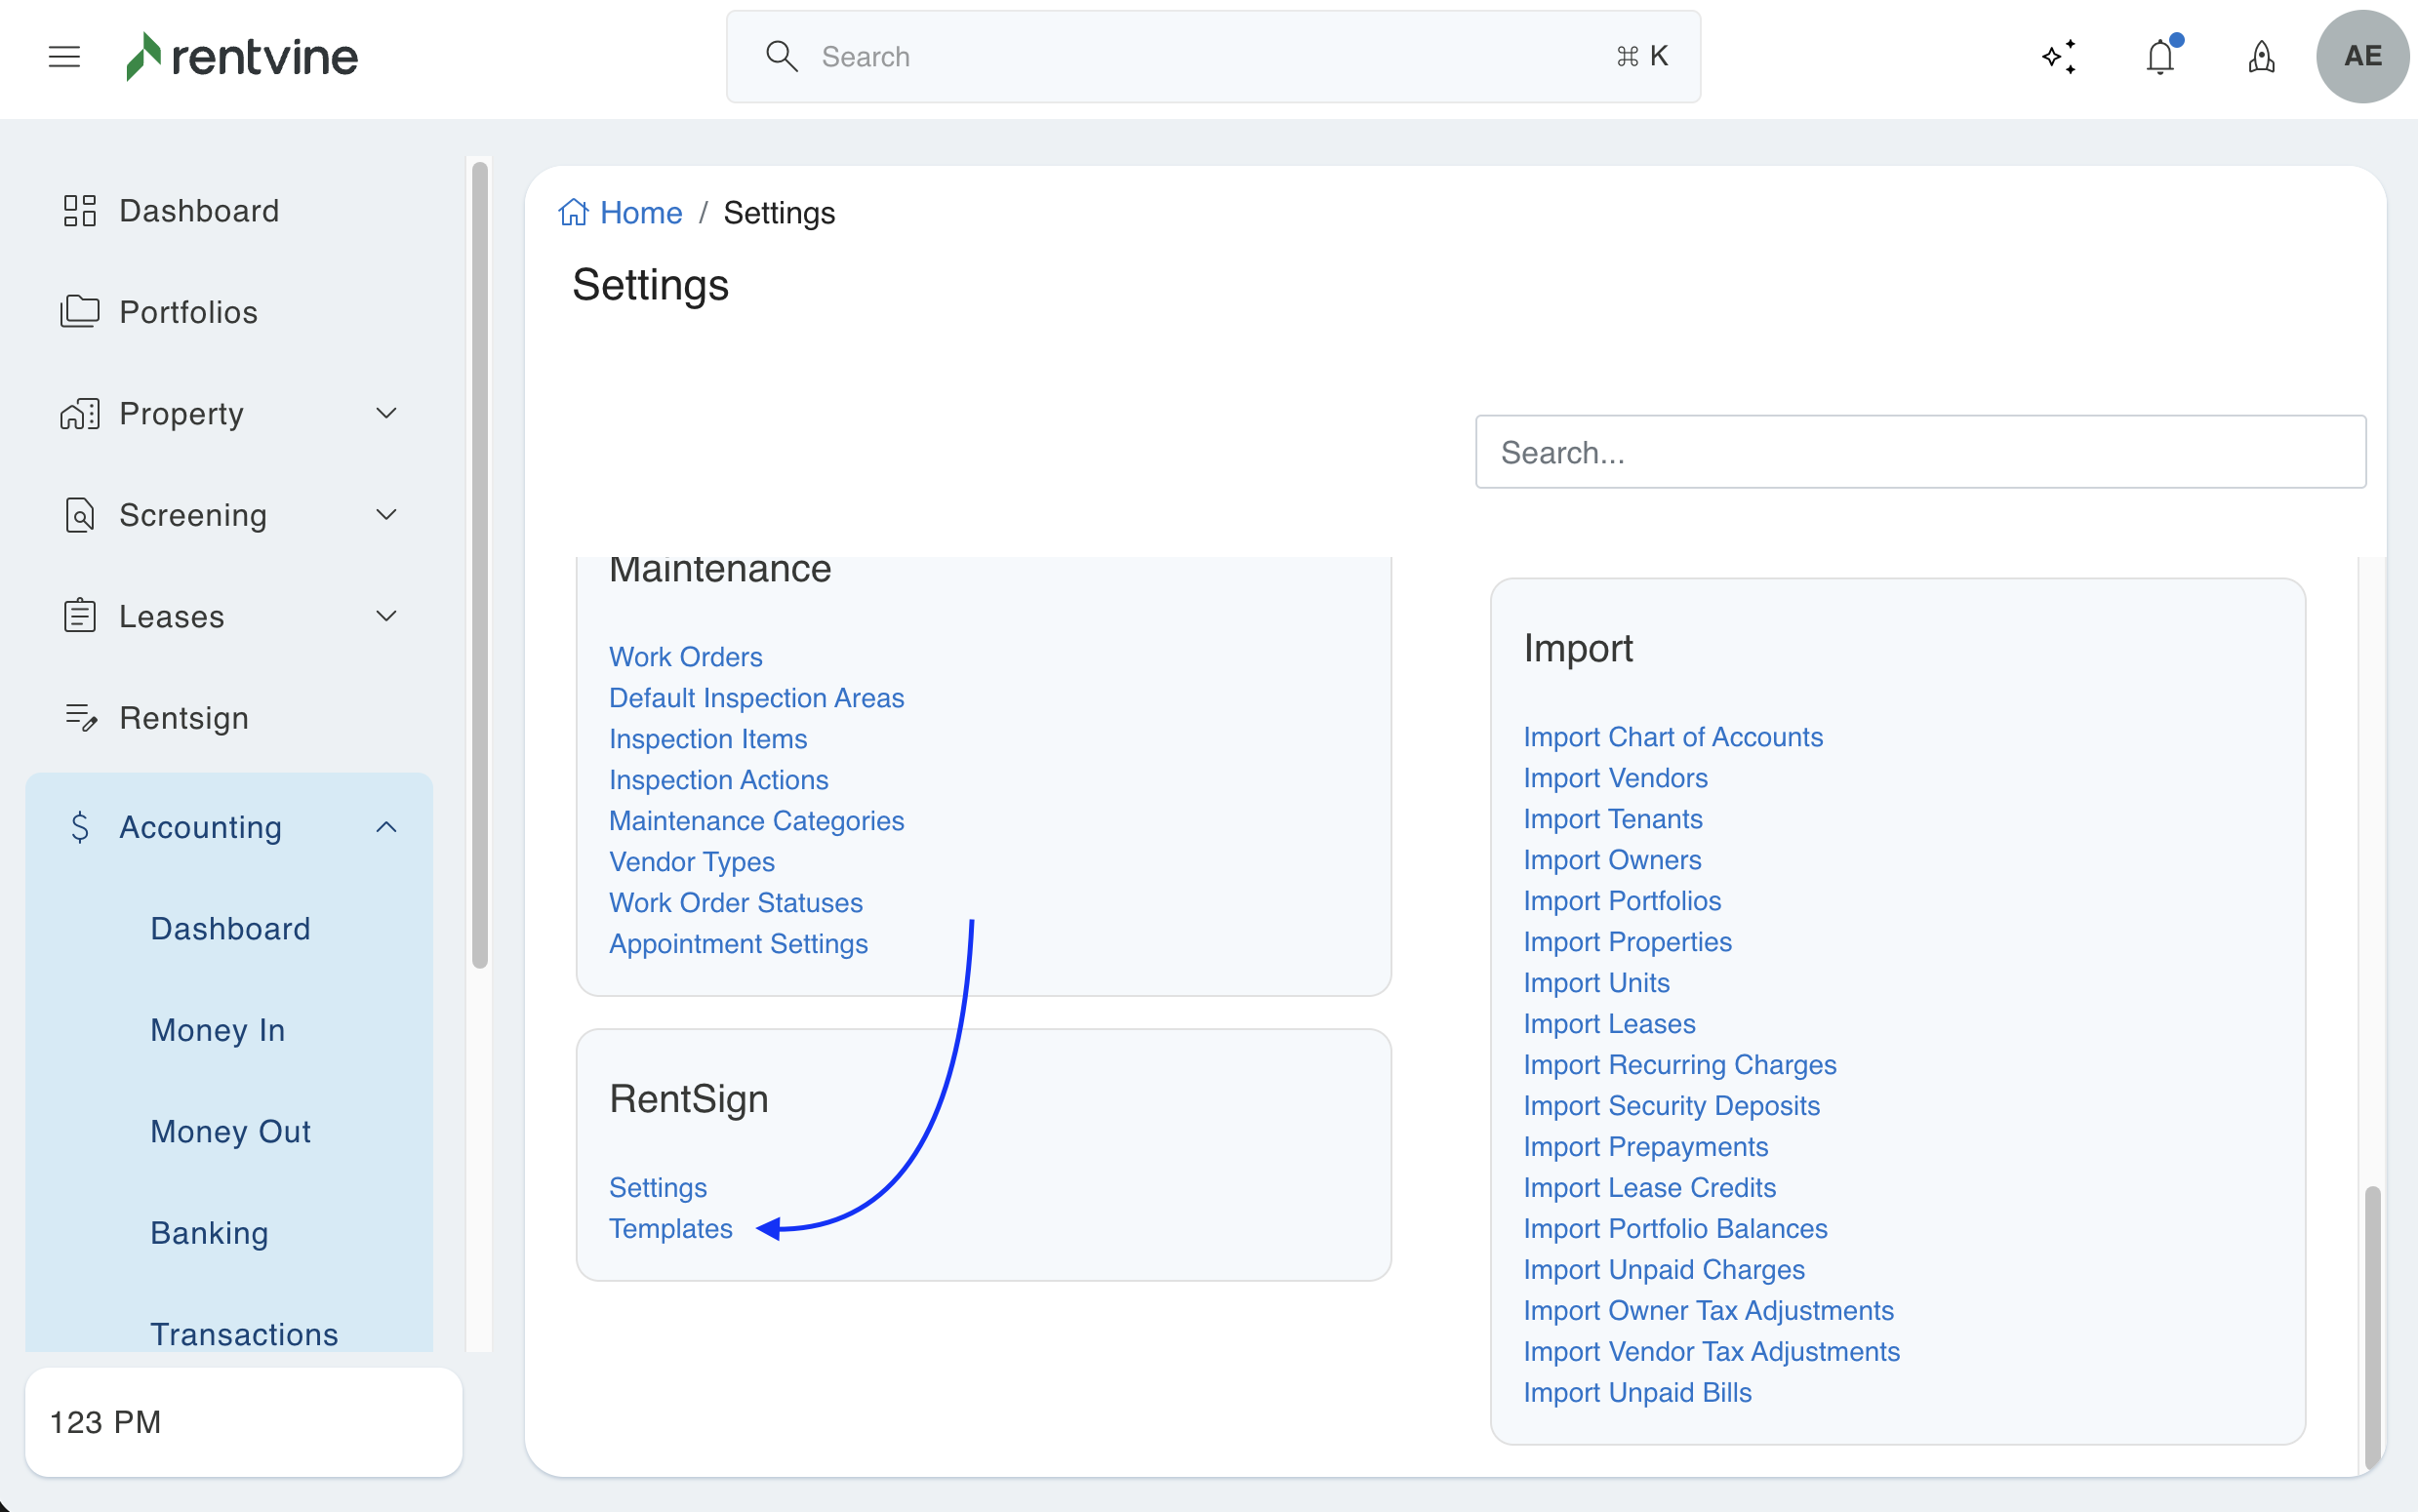
- Manage Templates - This allows the user to adjust the Rentsign Templates in Rentvine using the builder
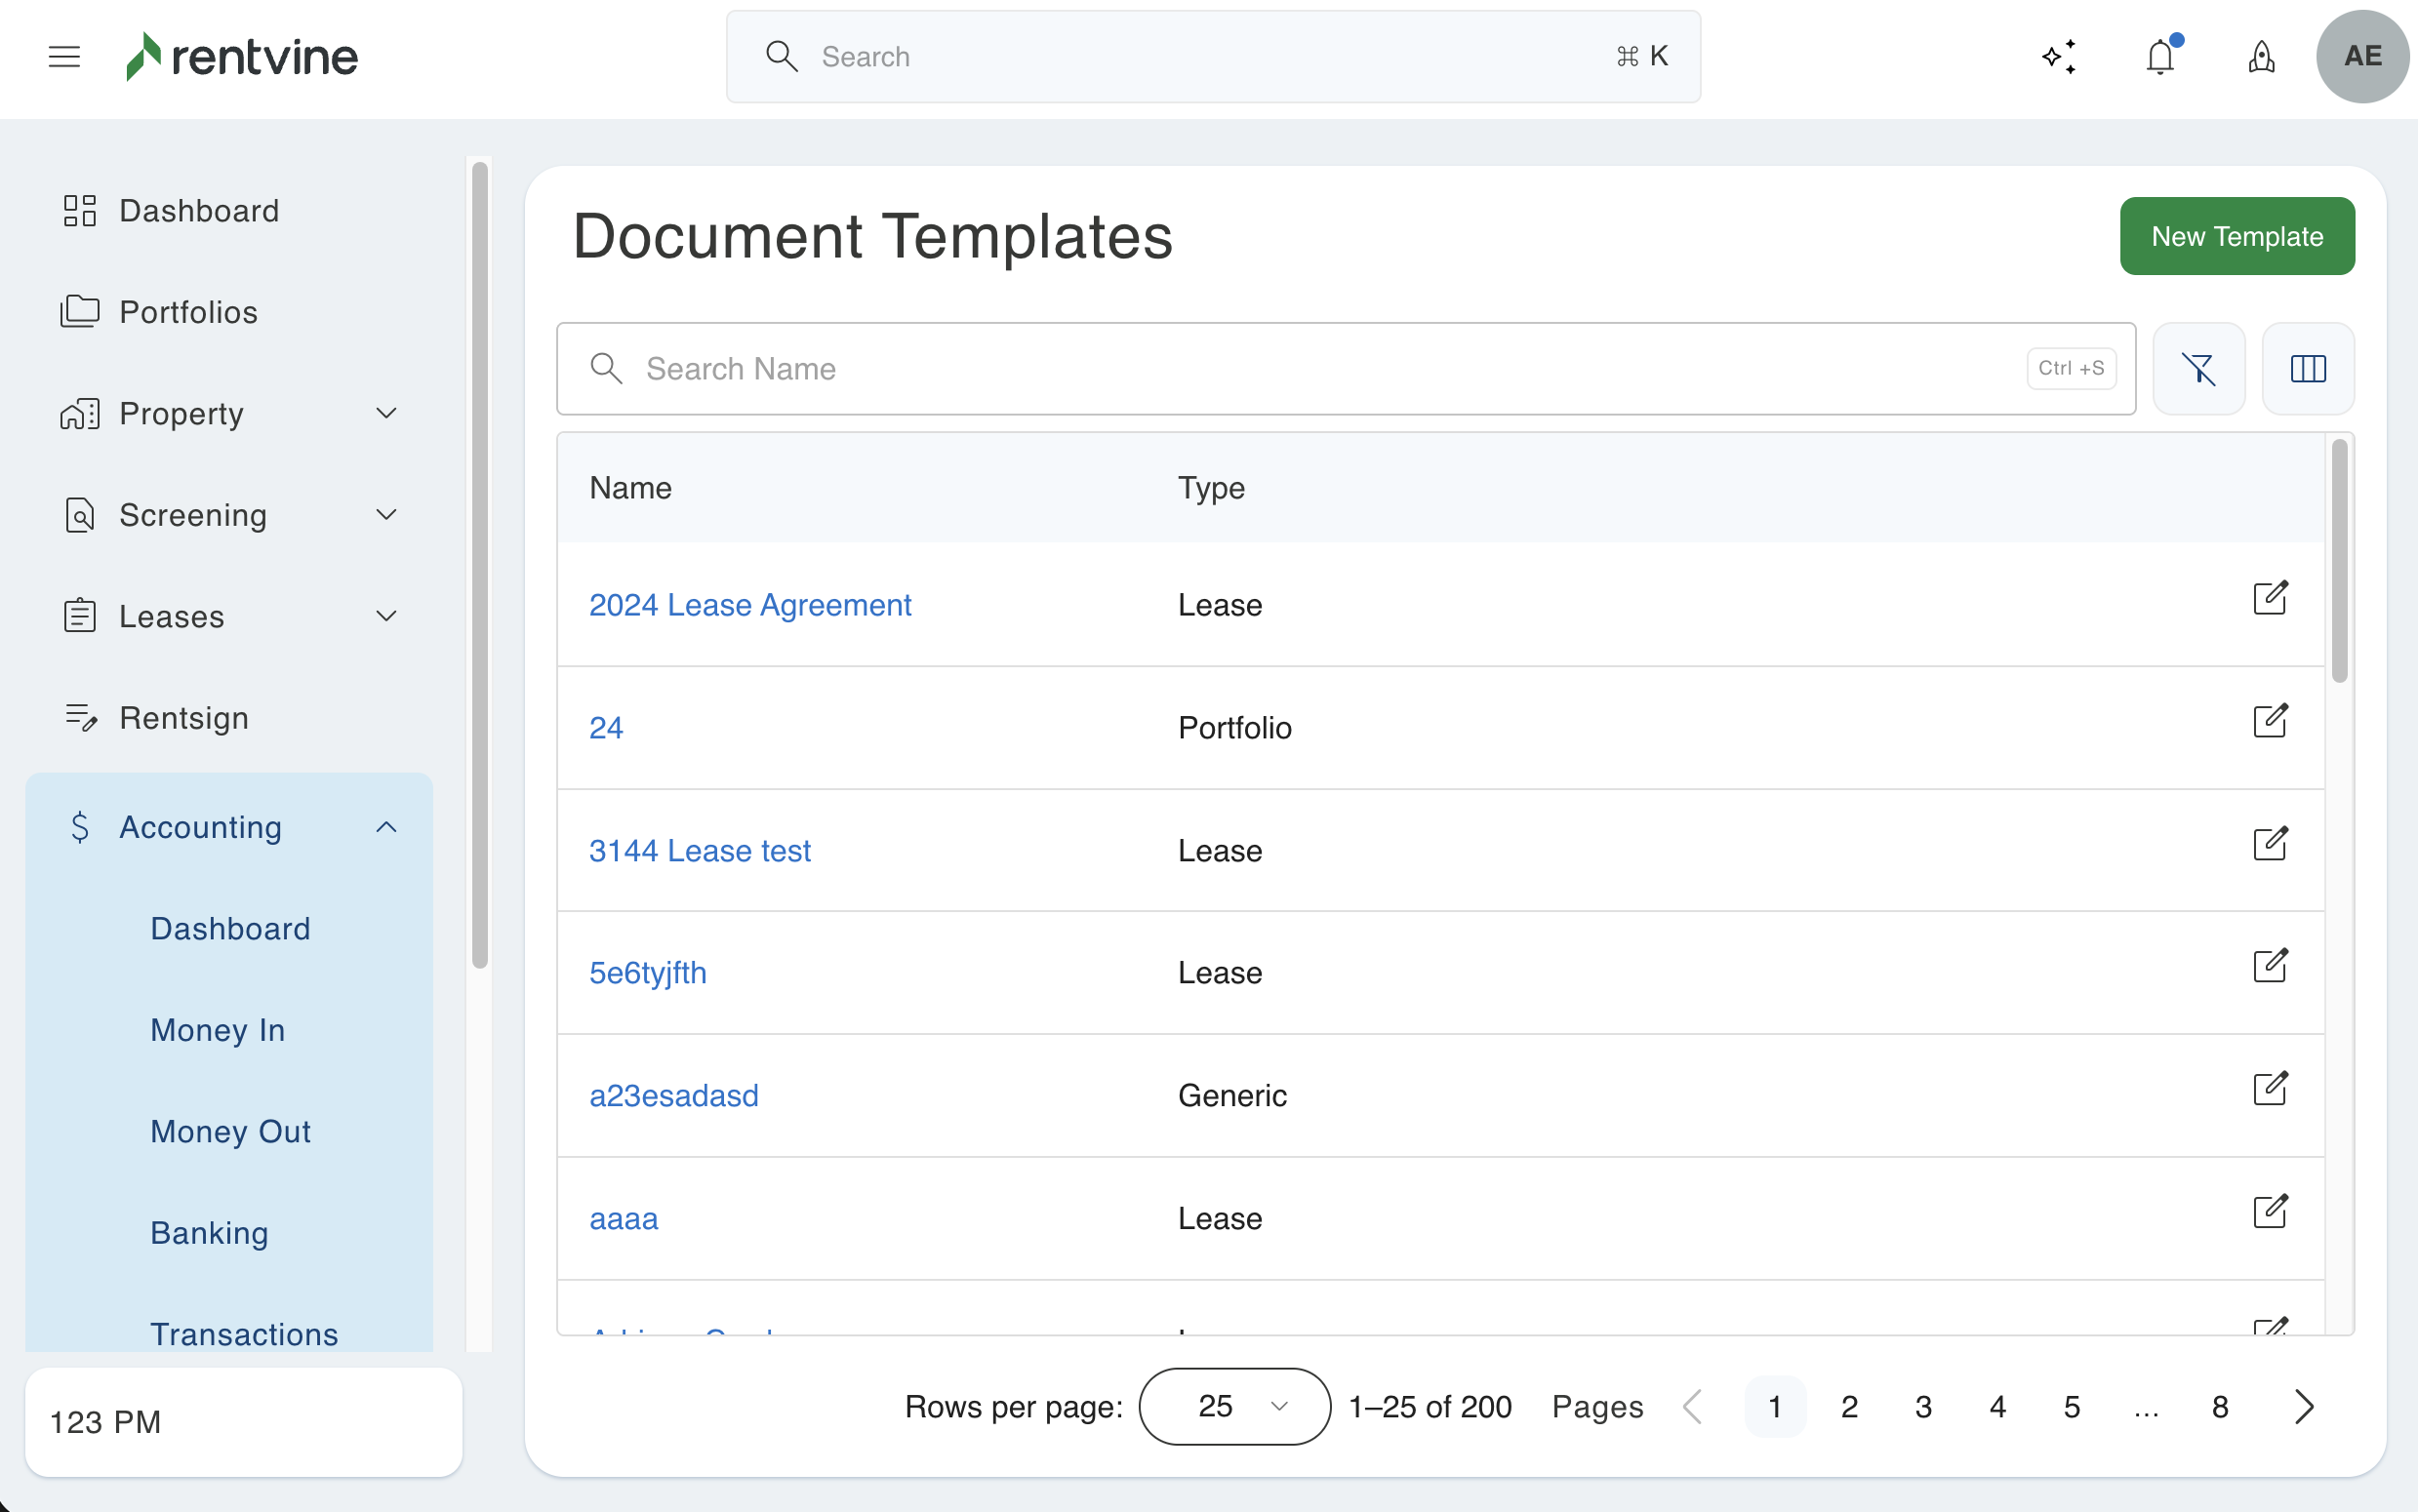
- Manage Documents - This allows the user to use the Rentsign builder on the individual Rentsign Documents sent
