Rentsign is a document signing platform that you can use to securely obtain e-signatures.
To start using RentSign, you first will want to set up a template in the global settings section of your Rentvine account. After you have at least one template set up, you can start sending out documents for signature.
Setting up a Template
- Go to the settings page by clicking your initials in the top right-hand corner of the screen. This will bring up a dropdown, and you will click on "Settings".
- From the global settings, you will want to navigate to the RentSign section at the bottom left.
- Select Templates in that section.
- After selecting Templates, you will now be able to create a new template or edit an existing one. Click on the green New Template button on the right.
- Enter the Name of your template.
- Select which Type of document this is going to be used for (lease, portfolio, etc.)
- If applicable, select which existing template you would like to Copy From
- Click the green Save button

- After clicking save, this will take you into the template where you can start building it.
- Click on the blue Builder button, or click on Actions > Builder
- The next step is to bring a document into the Builder so you can build the template by adding parties and different fields. Drag and drop a document into this section, or click on the Drag file here to upload a form to search for a document on your computer
- After bringing a document into the Builder section, it is time to start customizing the template using the icons to the left


- The first step we recommend is to create the Parties for the document. The Parties are the individuals who will be signing the document when this Template is used.
- Click on the manage parties button in the top right of the template.

- Click on the green Add Party button.
- You have the option to enter a Name, Role, and Email for each party. Since this is a template, you can be generic with the Names, and you can leave the email addresses blank. The names and email addresses will pull from the actual party on that specific lease based on the role selected. However, if there is a party that will sign on every document that is sent (i.e., the same property manager signing each lease on behalf of the owner), you can enter their name and email address, as that will remain consistent each time.
If there are more tenant parties listed on the template than there are tenants on a lease, that is okay, and the excess party fields will not appear on the actual document being sent out. However, if there are more actual tenants on a lease than there are tenant parties on the template, an error will occur when you try to send out the document for signature.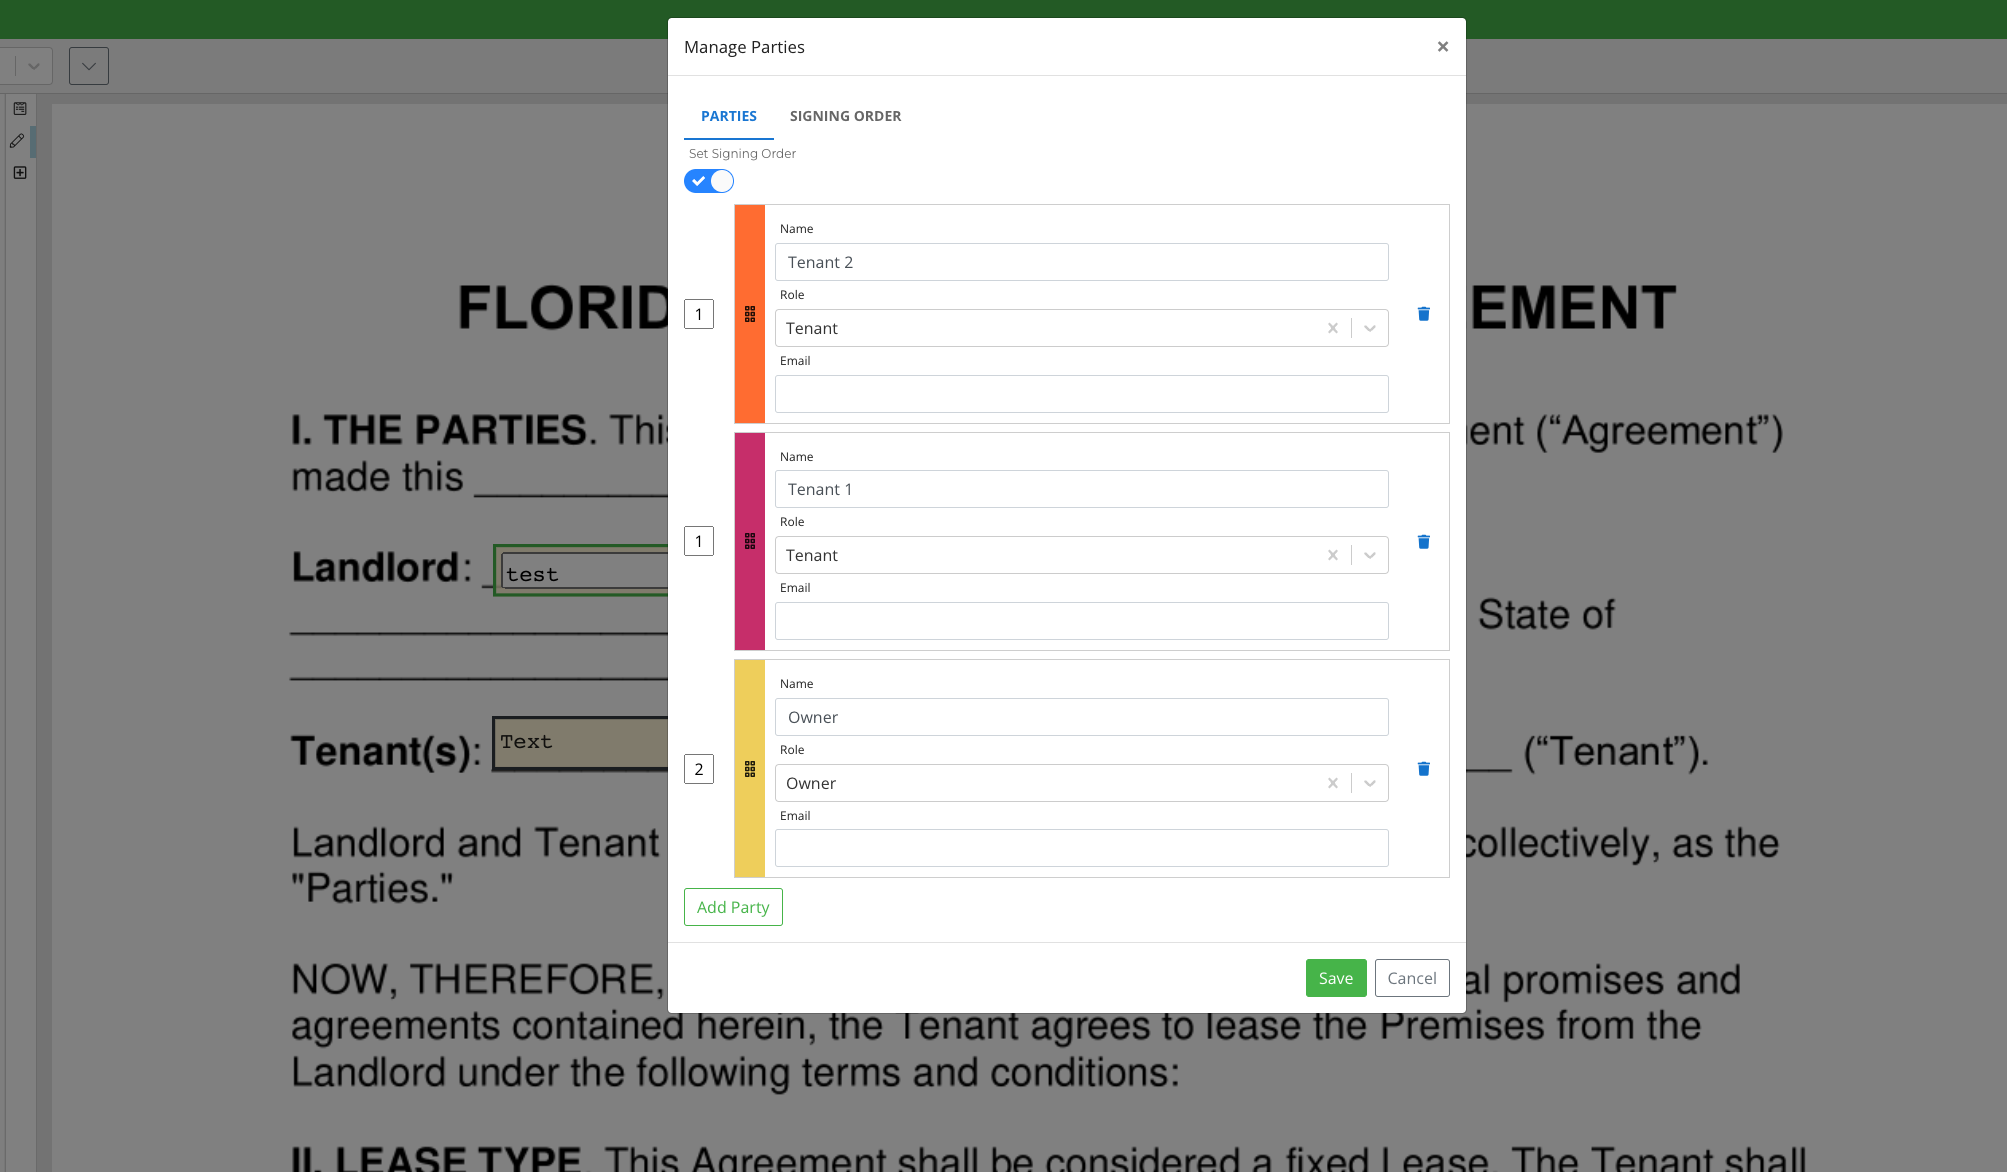
- In this section, you can set the signing order by turning on the toggle that is labeled "Set Signing Order".
- This will bring up boxes next to each tenant's name where you can set their order. If you want all parties to receive the document at the same time, you will keep that number the same at 1 or leave it blank.
- An example of this is if you wanted all the tenants to receive the document at the same time, you could put a one next to their name, and if you wanted the owner/property manager to sign after them, you would put a two next to their name. This will make it so the owner/property manager will be sent the document to sign after all of the tenants or people labeled as 1 have signed. Please refer to the screenshot below for this example.

- You can also drag and drop the tenants so their color bar matches their signature field by dragging their color bar and putting it in the correct spot.

- You can also view the signing order you have set up to confirm who will receive the document first, second, etc, by clicking on the signing order button in this screen.

Note: If you do not toggle on the "Set Signing Order" toggle, the document will send to the first person you have in that order, and then be sent to the next person after they sign, and so on.
- Click on the manage parties button in the top right of the template.
- The next step is to add Hot Fields to the template. Hot Fields will pull data into the document automatically that is specific to that document, based on the field selected.
- Click on the + sign icon, which is at the bottom of the icon list
- You will notice the Hot Field options that appear on the left. These are the fields that will pull that data into your document from the specific lease that you are sending the document for. For example, if you pull in the Start Date hot field for a lease, this will pull in the Start Date of that specific lease for the document you are sending.
- To pull a Hot Field into your template, click on the paper icon to the right of the field and drag and drop it into the template where it should go. After you drop the field into the template, you can click on it again to move it around further to get it into the correct spot in the template.
- Continue pulling in the Hot Fields for all that apply to the template.

- Click on the pencil icon, which is second from the top of the icon list
- The first party that you created will show in the drop-down list, and the fields under that party will relate to that specific party
- Click the field that you would like to bring into the template, and drag and drop it into the correct spot in the template. Continue dragging and dropping fields into the template until all of the necessary fillable fields are in
- After bringing all the fillable fields in for one party, click the dropdown to select another party. Drag and drop the fillable fields for the party you have selected. Repeat the process until all of the fields for all of the parties have been brought into the template. You will notice that the fields are color-coded for each party.

The next step is to add Fillable Fields to the template. Fillable Fields are specific to the Parties and allow them to sign, initial, fill in text, use checkboxes, etc.
- The final step is to add Block Fields to the template. Block Fields are blank text fields where you can type in anything that you would like
- Click on the notepad icon, which is the top icon on the list
- If you would like to pull a blank text field into the template, click on 'A Text' and drag and drop it into the template. You can pull as many blank text fields into the template as you need
- You can type text into those fields now, or you can do it later at the time of sending the document
- Once you have the template built out completely, you can click on the yellow Save and Close button at the top right
- You are now ready to use this template and send a document out for signature
You can use the tab key on your keyboard to "tab" through the fields and edit any fields as needed.
Rentsign will autosave your work every 30 seconds. However, it is best to click the save button before exiting the builder page to be sure to capture all of your work.
Sending a Document
- To send a RentSign document, click on RentSign in the left menu bar
- Click on the green New Document button on the right
- You can also send a document from the following sections
- Clicking on the New Document button from the Documents tab of a Portfolio
- Clicking on the New Document button from the Documents tab of a Property
- Clicking on the New Document button from the Documents tab of a Lease
- Clicking on the New Document button from the Documents tab of an Owner Contact
- Clicking on the New Document button from the Documents tab of a Vendor Contact
- On the next screen, give the document a Name
- Select the Type of document from the dropdown list
- Select the Template from the dropdown list. This list will change based on the type selected
- Lastly, select either the lease, owner, or property, etc., based on the type that was selected earlier. This field will change based on the type selected
- Click the green Create button
- On the next screen, you will notice the different sections
- The Details section will give you information such as the name of the document, the type of document, and the date it was created
- The Parties section will list each party and their emails for this specific document
- The Forms section will list the form(s) that will be sent
- The Signature Requests section will list updates as the document is sent and the parties sign

- Click on the blue Builder button to view the full document
-
Review the document to ensure that all of the fields look correct. You will notice the hot fields pulled in the specific data for that specific document. At this time, you can overwrite fields if needed or make any other changes you would like
- Once everything looks good, click the yellow Save and Close button at the top right
- When you are ready to send the document, click the yellow Send for Signature button
- This will open a prompt for you to enter a message along with the document. Enter a message if you would like, and click the green Send button.

- The document has now been sent for signature to the first party/parties on the list. Once the party signs, it will go to the next party on the list until all parties have signed.
You can check the status of the signatures on the document by coming back into this document at any time. To locate this document, go into that specific lease, owner, property, etc., click on the Documents tab, and then click on the correct document. Once all parties have signed, each party will receive an email with the fully executed document. The document will also remain in the Documents tab and the RentSign section of your Rentvine account.