- How to Add a Charge to a Lease
- How to Record a Tenant Payment
- How to Change a Lease Status
- How to Add a Credit to a Lease
- How to Add New/Existing Tenant
- How to Add Occupants
- How to Collect a Lease Fee
- How to Add/Collect a Renewal Lease Fee
- How to Add/Edit Recurring Charges
- How to Add/Edit Recurring Credits
- How to Add/Edit/Renters' Insurance
- How to Disable Portal Access
- How to Disable Portal Credit Card Payments
- How to Disable Portal ECheck Payments
- How to Disable Portal Payments
- How to Edit Lease Information
- How to Upload/Import Files into Leases

How to Add a Charge to a Lease
- From the left navigation menu, click on LEASES
- On the next screen, enter the Address/Tenant the lease belongs to in the search field

- From the search results, click the Lease that you would like to change
- Click the Green Actions Button
- In the drop-down, click on Add Charge

- On the next screen, enter the required information.
-
 Account: Enter/Select from the drop-down the charge that you would like to add.
- Enter the Amount of the charge.
- Enter the Date Posted.
- Enter the Description of the charge.
- Click the Green Save button at the bottom of the screen, or click the Save and Add Another button to add more charges on the same Lease.
How to Record a Tenant Payment
- From the dashboard view of Rentvine, click on Leases on the left-hand side
- On the next screen, enter the Address/Tenant the lease belongs to in the search field
- From the search results, click the Lease that you would like to change
- Click the Green Actions button
- In the drop-down, click on Record Receipt

- On the next screen, enter the required information.
- Enter/Select the Tenant
- Enter the Amount of the payment.
- Enter the Date Posted
- Select the Bank Account
- Enter the Reference Number
- Select the Type/Mode of Payment
- Enter the Description of the payment.
- Check the box to email a receipt to the tenant

For your reference, you will be able to see if there are any unpaid charges below the screen. If applicable, fill in the Amount to Pay box if the payment is paying a charge.

- After reviewing, click the Green Save button at the bottom of the screen or click the Save and Add Another button to record another payment on the same Lease.
How to Change a Lease Status
- From the left navigation menu, click on LEASES
- On the next screen, enter the Address/Tenant the lease belongs to in the search field
- From the search results, click the Lease that you would like to change
- Click the Green Actions Button
- In the drop-down, click on Change Status


- Choose the new Lease Status from the drop-down option
- Depending on the status chosen, there may be additional fields to fill out.
- Click Save
How to Add a Credit to a Lease
- From the dashboard view of Rentvine, click on Leases on the left-hand side
- On the next screen, enter the Address/Tenant the lease belongs to in the search field
- From the search results, click the lease that you would like to change
- Click the Green Actions button
- In the drop-down, click on Add Credit

- On the next screen, enter the required information:
- Enter/Select the applicable Account
- Enter the Amount of the credit
- Enter the Date Posted
- Enter the Description of the credit
- Turn on the Transfer From Manager toggle if the credit is from the property manager instead of the owner.

For your reference, you will be able to see if there are any unpaid charges below the screen. If applicable, fill in the Amount to Pay box if the credit is being applied to an unpaid charge.

- Click the Save button
How to Add New/Existing Tenant
- From the dashboard view of Rentvine, click on Leases on the left-hand side
- On the next screen, enter the Address/Tenant the lease belongs to in the search field
- From the search results, click the lease that you would like to change
- In the Tenants section, click the white Actions button


- In the drop-down Actions Option, choose Add Existing Tenant or Add New Tenant
- Click Add Existing Tenant if the tenant(s) already exist in Rentvine.
- Click Add New Tenant if the tenant for this lease does not already exist in Rentvine.
Note: You can add multiple tenants to the lease, if needed.
Adding Existing Tenant:
-
- Enter in/Select the Name of the Tenant. This field is required.
- Enter in/Select the Move-in Date. This field is required.
-
- Click the Save Button at the bottom
- Click the Save Button at the bottom
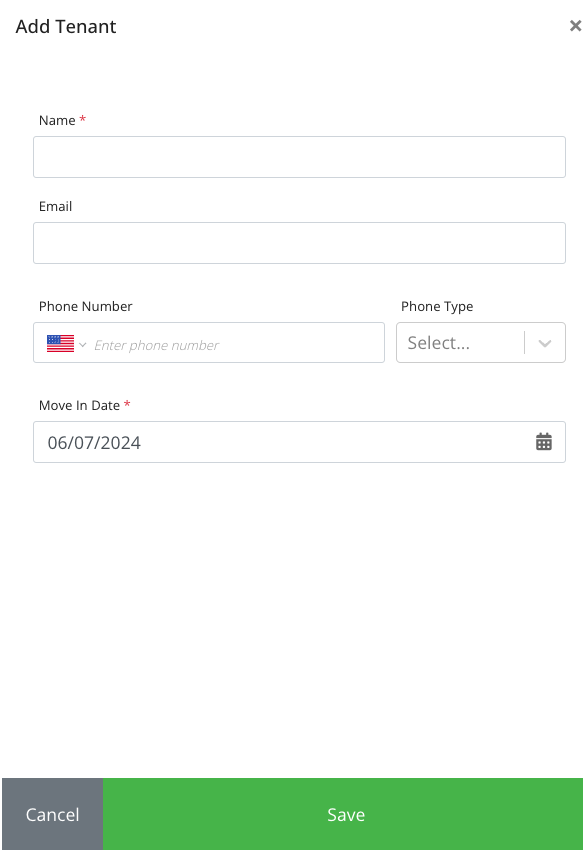
Adding New Tenant:
-
- Enter the Name of the Tenant.
- Enter the Email address
- Enter the Phone Number
- Select the Phone Type
- Enter in/Select the Move-in Date
- Click the Save button at the bottom
How to Add Occupants
- From the dashboard view of Rentvine, click on Leases on the left-hand side
- On the next screen, enter the Address/Tenant the lease belongs to in the search field
- From the search results, click the Lease that you would like to change
- In the Occupants section, click the white Add Occupant button

-
- Enter the Occupant’s Full Name
- Enter the Occupant’s Date of Birth
- Click the Save Button
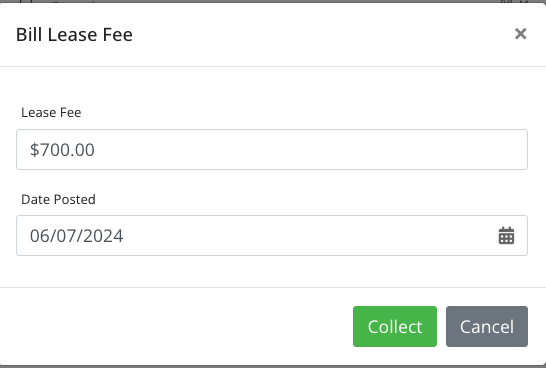
How to Collect a Lease Fee (Charge a fee to the portfolio)
- From the dashboard view of Rentvine, click on Leases on the left-hand side
- On the next screen, enter the Address/Tenant the lease belongs to in the search field
- From the search results, click the Lease that you would like to change
- In the Lease Fee section, click the White Collect Lease Fee Button

Rentvine will attempt to pre-populate this form. Adjust the information as needed.
- Enter the Lease Fee Amount
- Enter in/Select the Date Posted
- Click the Green Collect Button at the bottom
How to Add/Collect a Renewal Lease Fee
Renewal With Out a Fee:
- From the dashboard view of Rentvine, click on Leases on the left-hand side
- On the next screen, enter the Address/Tenant the lease belongs to in the search field
- From the search results, click the Lease that you would like to change
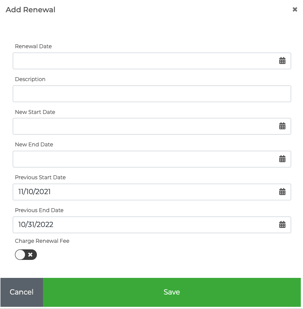
Renewal Without a Fee:
- In the Renewals section, click the White Add Renewal Button
-
- Enter in/Select Renewal Date
- Enter Description
- Click the Save Button if you would like to add the Lease Renewal Without Fee.
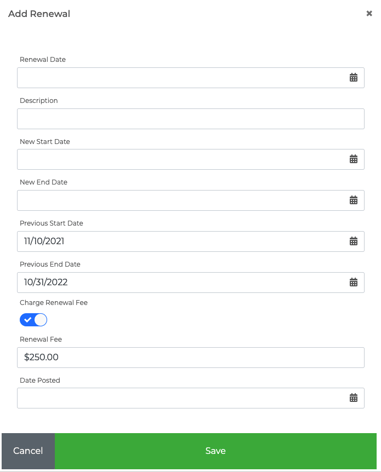 Renewal With a Fee (Charges a fee to the portfolio):
- In the Renewals section, click the White Add Renewal Button
-
- Enter in/Select Renewal Date
- Enter Description
- Click the Charge Renewal Fee Toggle Option to ON (blue)
- Enter the Renewal Fee Amount
- Enter the Date Posted
- Click the Save button if you would like to add the Lease Renewal With a Fee.
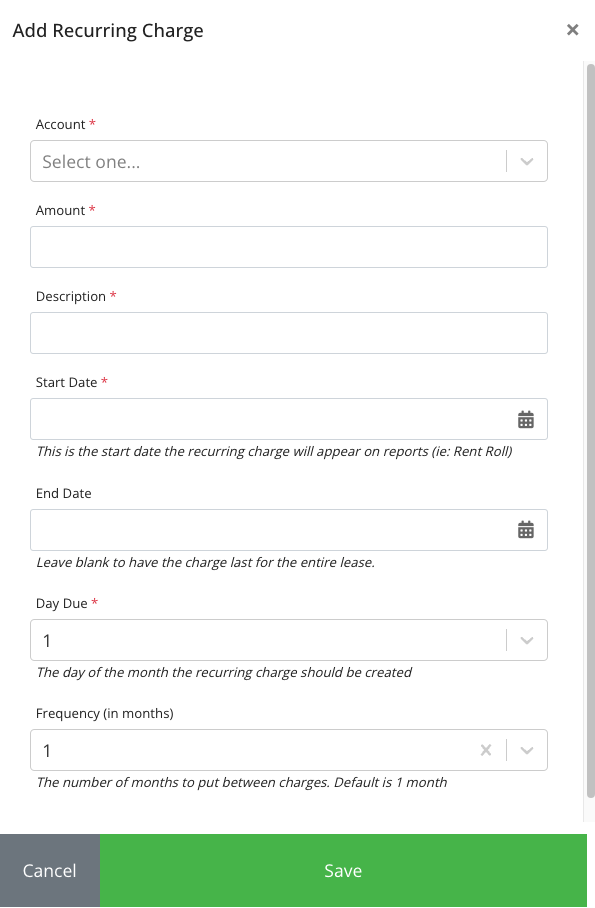
How to Add/Edit Recurring Lease Charges
- From the dashboard view of Rentvine, click on Leases on the left-hand side
- On the next screen, enter the Address/Tenant the lease belongs to in the search field
- From the search results, click the Lease that you would like to change
- In the Recurring Charges section, click the white Add Recurring Charges button

Fill out the Add Recurring Charge Form:
-
- Account - Choose the appropriate account.
- Amount - Type in the dollar amount to charge.
- Description - Type in a description.
- Start Date - Enter the date that you want the charge to start posting.
- Repeats Every - Only option is once per month.
- Ends - Choose when to end the recurring charge.
- Never
- On - Choose an end date
- After - Choose how many occurrences before it ends
- Click Save.
How to Add/Edit Recurring Credits to a Lease
- From the dashboard view of Rentvine, click on Leases on the left-hand side
- On the next screen, enter the Address/Tenant the lease belongs to in the Search field
- From the search results, click the Lease that you would like to change
- In the Recurring Credits section, click the white Add Recurring Credit button

Fill out the Add Recurring Credit Form: 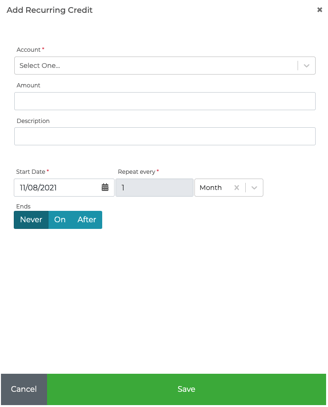
-
- Account - Choose the appropriate account.
- Amount - Type in the dollar amount to charge.
- Description - Type in a description.
- Start Date - Enter the date that you want the charge to start posting.
- Repeats Every - Only option is once per month.
- Ends - Choose when to end the recurring charge.
- Never
- On - Choose an end date
- After - Choose how many occurrences before it ends
- Click Save.
How to Add/Edit/Renters' Insurance
- From the dashboard view of Rentvine, click on Leases on the left-hand side
- On the next screen, enter the Address/Tenant the lease belongs to in the search field
- From the search results, click the Lease that you would like to change
- In the Insurance section, click the White Edit Button

- Enter the Tenant’s Insurance Company
- Enter the Tenant’s Insurance Expiration Date
- Enter the Tenant’s Insurance Policy Number
- Upload any pertinent documents
- Click the Save Button
** The tenant can also enter the insurance information directly through the tenant portal.
How to Disable Portal Access
- From the dashboard view of Rentvine, click on Leases on the left-hand side
- On the next screen, enter the Address/Tenant the lease belongs to in the search field
- From the search results, click the Lease that you would like to change
- Click the Green Actions Button
- In the drop-down, click on Disable Portal

.jpeg?width=300&height=128&name=Image%2012-5-25%20at%2011.17%20AM%20(1).jpeg) A window will appear and will ask you to confirm to Disable or Cancel.
A window will appear and will ask you to confirm to Disable or Cancel.- Click the Red Disable button at the bottom
How to Disable Portal Credit Card Payments
- From the dashboard view of Rentvine, click on Leases on the left-hand side
- On the next screen, enter the Address/Tenant the lease belongs to in the search field
- From the search results, click the Lease that you would like to change
- Click the Green Actions Button
- In the drop-down, click on Disable Portal Credit Card Payments

.jpeg?width=300&height=122&name=Image%2012-5-25%20at%2011.19%20AM%20(1).jpeg) A window will appear and will ask you to confirm to Disable or Cancel
A window will appear and will ask you to confirm to Disable or Cancel- Click the Red Disable button at the bottom
How to Disable Portal eCheck Payments
- From the dashboard view of Rentvine, click on Leases on the left-hand side
- On the next screen, enter the Address/Tenant the lease belongs to in the search field
- From the search results, click the Lease that you would like to change
- Click the Green Actions Button
- In the drop-down, click on Disable Portal eCheck Payment
.jpeg?width=688&height=362&name=Image%2012-5-25%20at%2011.20%20AM%20(1).jpeg)
 A window will appear and will ask you to confirm to Disable or Cancel.
- Click the Red Disable button at the bottom
- After clicking the Red Disable button, it will automatically update in the Lease Info section

How to Disable Portal Payments
(This will disable all forms of payment from the resident portal.)
- From the dashboard view of Rentvine, click on Leases on the left-hand side
- On the next screen, enter the Address/Tenant the lease belongs to in the search field
- From the search results, click the Lease that you would like to change
- Click the Green Actions Button
- In the drop-down, click on Disable Portal Payments

.jpeg?width=300&height=155&name=Image%2012-5-25%20at%2011.23%20AM%20(1).jpeg) A window will appear and will ask you to confirm to Disable or Cancel
A window will appear and will ask you to confirm to Disable or Cancel- Click the Red Disable button
How to Edit Lease Information
- From the dashboard view of Rentvine, click on Leases on the left-hand side
- On the next screen, enter the Address/Tenant the lease belongs to in the search field
- From the search results, click the Lease that you would like to change
- In the Lease Info section, click the White Actions Button and choose Edit

- Enter or modify the information that you would like to change.
Lease Information Fields:
-
 Notice Date: Enter in/Select the date that the tenant notified the property manager that they will be moving out.
- Expected Move Out Date: Enter in/Select the tenant's expected move-out date.
- Move In Date: Enter in/Select the tenant's move-in date.
- Move Out Date: Enter in/Select the tenant's move-out date.
- Deposit Refund Due Date: Enter in/Select the deposit refund due date.
- Closed Date: Enter in/ Select the closed date of the lease
- Move Out Comments: Enter any move out comments
- Start Date: Enter in/Select the start date of the lease
- End Date: Enter in/ Select the end date of the lease
- Actual Rent Amount: Enter the amount of the actual rent
- Late Fee Setting: Select the New Late Fee Setting
- Override System Allowed Payment Amount Toggle Option:
- Select the Any Amount or Full Amount Only option
-
- Click the Save Button at the bottom
- Click the Save Button at the bottom
How to Upload/Import Files into Leases
- From the dashboard view of Rentvine, click on Leases on the left-hand side
- On the next screen, enter the Address/Tenant the lease belongs to in the search field
- From the search results, click the Lease that you would like to change
- Click the Files Menu on top

- Select the Files that you would like to upload to the property.
- Drag and drop the files below to upload

- Files that are uploaded to the property are automatically saved and will appear in real time.
- To share a file with tenant(s), select the ellipse to the right of the file and select "Share With Tenant". Files can be shared and unshared at any time.
