What is the NACHA File Format? A NACHA file is an electronic set of instructions that triggers a batch of ACH payments when uploaded into a bank portal. The file must be formatted in such a way that the scanner reads it properly and initiates payment.

*Below is what the fields could look like, but it is recommended that your bank confirms this so that money is sent to the right places. Your bank might give you different definitions or information/numbers for these fields
Download a Test NACHA File
Once you have configured the NACHA settings, a button will appear that lets you download a test NACHA file that can be provided to your bank.
- Click on Accounting on the left side of your screen
- Click on Banking from the drop-down
- You should now see your bank account(s) listed. Click on the bank account for which you want to enable NACHA
- In the middle section for Bank Account Information, there will be a field for Is Nacha Enabled. If it states 'No', you will want to click Edit to the right

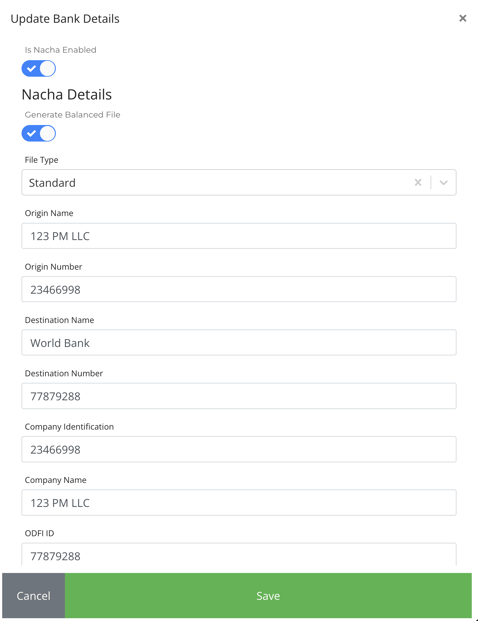
- After clicking Edit, an Update Account Information pop-up will show with your current bank account information. Look for the Is Nacha Enabled toggle and toggle it on (blue)
Generate Balanced File - On or Off.
If you receive a 200, 220, or 225 service code error from your bank when it tries to process the NACHA file, it may be because the Generate Balance File toggle may not be set correctly.
-
- If turned ON, a balanced file is a file that carries the offset (settlement) account within the file. This generates the file with a service code of 200.
- If turned OFF, an unbalanced file is a file that does not carry the offset (settlement) account within the file. The offset (settlement) account is managed by the ODFI. This generates the file with a service code of 220 or 225.
File Type - Standard or Chase (JP Morgan). For most banks, select Standard. However, if you are using Chase Bank, select Chase (JP Morgan).
Origin Name - Typically, your business name
Origin Number - Typically, your business Tax ID
Destination Name - Typically, the bank's name
Destination Number - Typically, the bank's routing number
Company Identification - Typically, your business Tax ID
Company Name - Typically, your business name
ODFI ID - Typically the bank's Tax ID or routing number
*Below is what the fields could look like, but it is recommended that your bank confirms this so that money is sent to the right places. Your bank might give you different definitions or information/numbers for these fields
Download a Test NACHA File
Once you have configured the NACHA settings, a button will appear that lets you download a test NACHA file that can be provided to your bank.- On the same Bank Account Details page, click on the "Download Test NACHA File" button
